Strobist - SUNPAK 120J PROFESSIONAL


Few months back, I mentioned that I am going to start a “mini tips” sharing section in this thread. The purpose is to share with you all the tips and tricks I learned from others and some from my own experience. Most of these tips have something to do with the SUNPAK 120J but a few are not. Thus I decided to name it “Strobist Mini Tips” instead of “120J Mini Tips”

For photographers who have met me know that I will share this tip with everyone. Its a cool trick that I learned from a “old” friend and mentor. So Tip number one is:
 

SMT01.jpg

Let there be LIGHT!
The LIGHT is Modeling Light in this case. Something that we Strobist shooter don't have the privilege of using it because almost all battery hot shoe flashes does not have this “continuous light” ability build into them. So what is modeling light?

Modeling light in my words and personal understanding are continuous light source commonly found in monoblocks or battery powered strobe. Its for the photographer to see the “light” (shadows and highlight) so he can work more efficient and faster when shooting with flash.


6113thru-1.gif

Softbox placed 1.35m away. Light Meter reading is ISO100 Shutter speed 1/60 F2.03.

6113thru.jpg

The image above, the grey target is not lit from the flash. It was lit from a “continuous light” inside the softbox. I did this by sticking a LED torch inside. Walla! We have modeling light. Below you can see how I do it. Its fairly simple, I just secured the LED torch with a elastic velcro band. You can also used rubber bands, gaffer tape, garden wire and even elastic cloth hair band.
 

Do take note you need a decent powerful torch to see the light. I highly recommend that you go buy a LED torch with a Q5 LED bulb which is about 5 watt. Almost all 5 watts and above LED torch used 18650 battery. There are some 5 watts LED torches which use 3 AAA batteries with an adapter case but you will only get 75-80% light efficiency from the Q5 bulb.

6135.jpg
The LED torches above from left are 3W, 5W and 6W. The 3W is a bit low power to be used inside a softbox with diffuser. However if you are using it with a shoot thru or reflect umbrella 3W is okay. The 6W is powerful and I can get 1 more stop of light as compared to the 5W, however this 6W torch get very very hot very fast. The 5W does get warm after some time but to me its still acceptable. There are LED torch that are 10W and more, but these torches are huge and heavy.

1560.jpg

Another advice is try to buy LED torch that you can stripped away the zoom head easily and make it bare bulb. The reason been, most LED torch widest zoom coverage is between 60-90 degree depend on the distance. As you can see from here, even when I have it zoomed to the widest, the torch is still too near and can't lit the umbrella fully and reflect the “correct modeling light”.

6113ref.jpg


6113ref-1.gif

Softbox placed 1.35m away. Light Meter reading is ISO100 Shutter speed 1/60 F1.43.

6116b.jpg

Now if I stripped away the zoom head, the bare bulb torch can give a 120-160 degree coverage. When using with softbox, I like to placed the LED facing inside just like the 120J. I do loose one stop of light as compare placing frontal, in return I get a more even and accurate modeling light. Do remember, I only need to see the “estimated” light so I know where is the shadow and highlight roughly will be. And the continuous light output is good enough for me to AF easily with F3.5-F5. However do bear in mind that not all LED torch can remove it's zoom head easily. For the past 2 years I have collected 8 types of LED torches. Out of these 8 I damaged two when I force opened them. So please think carefully before you do it. Its at your own risk.

Now will this work outdoor during day time, the answer is absolutely NO. This tip is for Strobist who shoot at night or in door when ambient light is low. You can AF very fast without the need to use that irritating red AF assist light from your camera. You will save some time on chimping since now you can roughly see the “light” from your modifier. Its is also a great way for newbie to learn lighting and get to know your light modifiers better.

Hope some of you guys will find this info useful, lastly do check out this video by photographer Larry Becker famous “Cheap Shots”. Larry Becker have a cool idea of combing fluorescent light with hot shoe flash.


Continuous Fluorescent Light (Technical), Photography with Continuous Fluorescent Lights
 

Hi all, here is another side tip for "let there be LIGHT!". If you are using honeycomb grids as hair, rim or even spot. Used your LED torch to see where "the light" falls on your model or object. For example, for the LACE project spot light background. the LED torch is placed in front of the SUNPAK 120J with a 3x3 grid. The person can than adjust the desire angle and spot based on the "LIGHT" from the LED torch. This will save you quite some time from chimping.


5807.jpg
Using LED torch, you will roughly see where the light falls. For photo shoot, its important to do things fast so the model wouldn't get bored by waiting when the photographer is struggling using the trial and error method. This is even more important in commercial shoot when you are shooting "very busy business people" who may only give you 3 - 5 mins to get a few profile shots of them.

Have a good week end everyone :)

Continuous Fluorescent Light (Technical), Photography with Continuous Fluorescent Lights
 

Morning everyone, Let continue with the "LACE" shoot. Got to work with Vanessa again and she was the second model for "LACE".

She performed brilliantly even though she was tired from her tightly packed drama rehearsal schedules. The light setup is basically identical, except I swapped the color gel to a lighter shade. You can refer to the lighting diagram on thread #57 if you want.

LACE06.jpg

LACE08.jpg

LACE07.jpg

Few of my favorite shots from Vanessa's lot.

LaceLSU01B.jpg

A quick BTS snap, WYN was doing hair and re-styling on Vanessa. Running out of space with all these lights cramped in.​

Will like to say a BIG thank you to Vanessa for coming to the shoot. thank you thank you :bsmilie:
 

Hi all, Its been months since I shoot the first part of LACE. Next week I will be shooting the second LACE shoot with new models and new lighting techniques I like to try out. So I think its good idea to wrap up by posting a few more photos from the first LACE shoot and explain why I made the models in tears when coming to the end of that photo shoot.

The second part of the shoot was a short 15 minutes for each model. April's shoot went very well and I have got the images that I want and really like. So for the last frame. We decided to do something fun and new to us. All 3 of us went to my iPad mood board and swapped through the photos on it to seek some inspiration. We came across this very beautiful “Modern Gothic Style” image of a lady with her eyes closed and tears flowing down her cheek. Yes, this is the one! Immediately it got us very excited, but wait! How are we going to pull this off? We paused for a few short seconds...

Thinking thinking... any idea? How about the crying babies by Jill Greenberg? Honestly speaking during that short few seconds of deep thoughts. Greenberg crying babies never came into my mind even though the first shoot was largely inspired by it. Really stupiak (stupid + a piak on my face) of me... BTW FYI, what Greenberg did was, she will give a lollipop or sweet to these kids and while they are enjoying it. She will snatch it from them by surprise. And voila we have crying kids.

Now back to my deep thoughts. I suddenly recalled an old article I read from a magazine of a photographer who shoot a credit card ad which required a female model to cry very sadly and looked real. At first, the photographer tried eye drops and make up effect. The photographer don't like it at all. Instead the photographer sat down with the model and start talking about saddest things in life. The model start to cried (real crying) when she talk about her grandma who passed away. The photographer immediately picked up his camera and start shooting. It became a great ad photo.

I found the answer in a yes, no, yes way. YES, this might work, NO I am not going to make April cried for real and make her day miserable after the photo shoot. I am going to use the eye drop method, and coincidentally few days back I bought two boxes of disposable “capsule” type eye drops from Watson at a great bundle price. YES!

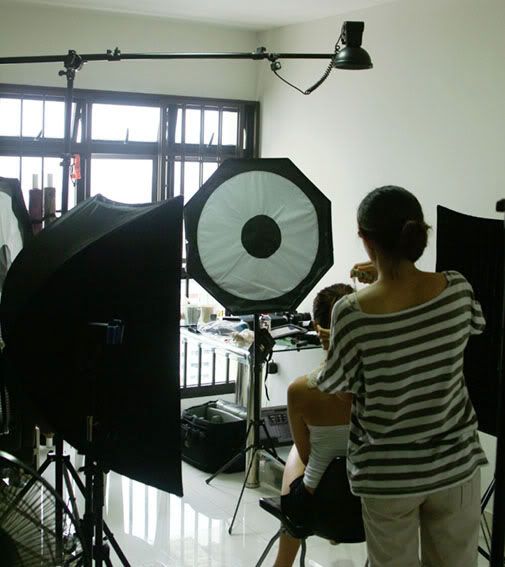
Since Vanessa was ready for her second shoot, and I don't want her to wait too long. I asked Wyn to help me think of a way on how to execute it in 1 minutes time frame while I go and changed the SUNPAK 120J with new batteries so they can recycle faster. One minute later, Wyn have an eye drop capsule in her hand, April have a box of tissue, I have a camera and we are ready to go.


LaceLSU03.jpg

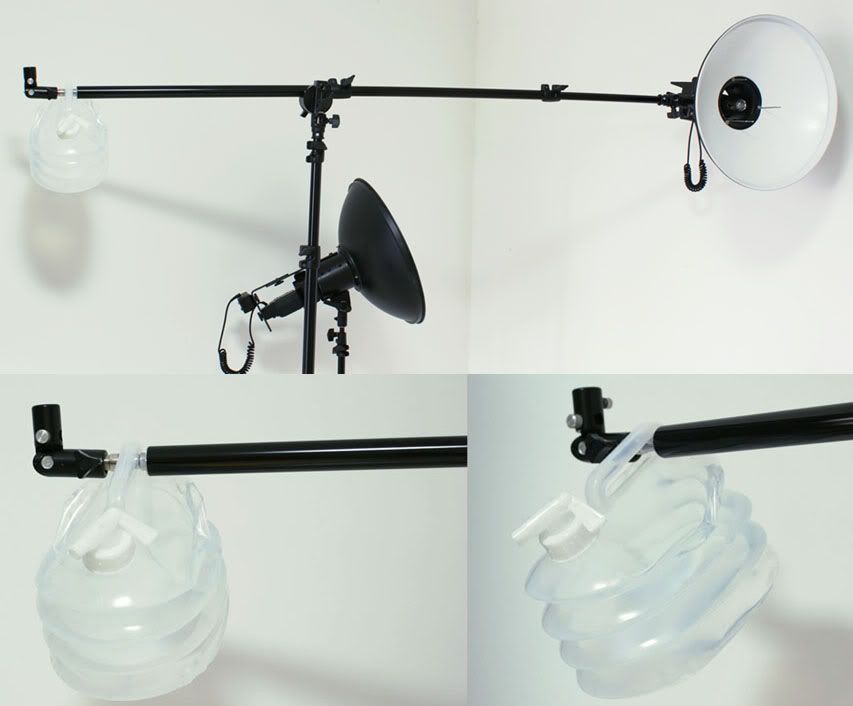
After finished shooting with 7 lights, I am sort of overwhelmed and a bit tired. So I decided to tone down the lights from 7 to 2.

LACE10.jpg

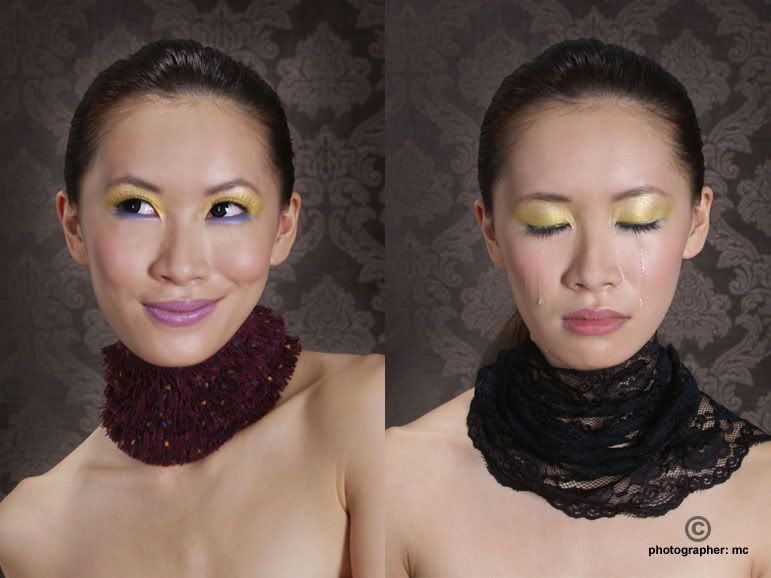
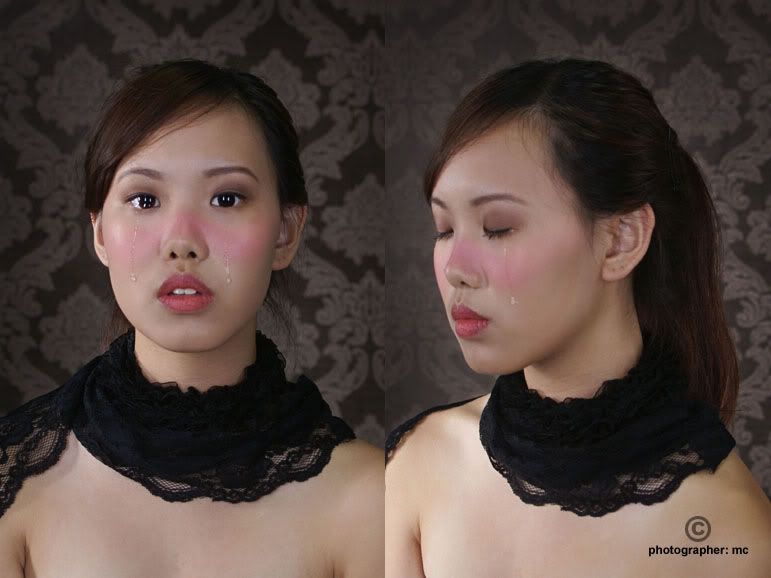
Now, I know the photo on the left April was not crying. I just put it in to form an interesting spread. Sort of a Yin and Yang approach. There is a slight in-perfection on the shoulders in term of layout but heck I still love it. Now come to execution, how Wyn did it was simple, she will stand beside April who was sitting with her head tilting up. Wyn will than drop the eye drop into her eyes and jump off from the frame and I will take the shot. For my side, I will pre-focus on April eyes before the eye drop was release. And since I am shooting at F8, I pretty much get the whole face in focus. It was a hit or miss method. The first 4-6 tries was misses. I got two okay shots on the 7-8 tries. April being a great sport was okay to go for a second time with a new eye drop capsule and I manage to got the shot above.

LACE09.jpg

Vanessa's term, love the one on the left with the watery left eyes filled with eye drops (tears).​

Lastly I am going to say a Big Thank You again to April, Vanessa, MUA Miss Ronalou and stylist/old friend Wyn for believing in me and help me kick start “LACE”. Thank you so much ladies.

Continuous Fluorescent Light (Technical), Photography with Continuous Fluorescent Lights
 

h2oweightC.jpg

Sand bag/weight have always been a pain in the butt for photographers when doing photo shoots indoor or outdoor. For me, most of the time I don't need these heavy burdens as many of my shoot was done indoor. For outdoor, I shoot mainly with only one or 2 lights max. And I will try my best to find an assistant who will help me make sure that “gone with the wind” scenario will not happen.

Still, there are times when I found myself in need of using sand bag/weight. Especially photo shoots when I need to use a “boom arm”. Normally for commercial shoot where budget is not high, the shoot was mainly done “one man show” style. And since it was a one man show, I tried my best to reduce my gear load. And sand bags is one “essential” piece of item that I am very reluctant to bring along. So instead of sand bag, I tried to use my camera bag as a substitute. I found that I don't favor this method. First, I always worry that the camera bag with all the lens inside may drop and get damaged. And some time, the camera bag load is not heavy enough to add as counter weight. It was also a hassle to take and store things when the bag is hanging as a weight.

About 3 yrs back, me and my wife went to a warehouse sale and I saw a piece of interesting “outdoor sport/camping” product which solved my “WEIGHT” problem.

h2oweight.jpg
A collapsible water jug/container, the solution is simple. When I go to my client's factory to photograph products or work processes. All I need to do was to fill the container with water and I got a H2O weight. And when the photo shoot ended, I just empty the container, and the weight is gone. I know that this may sound a bit environmental unfriendly, I always try my best to empty the water by watering any plants/tree that seems to be dehydrated around the factory vicinity. Sometime I do get occasion “WTH” stares from factory employees when I am watering.

h2oweightB.jpg
For me, I bought the 3 liters container which I found that it was adequate as a “weight” for most photo shoots. One liter of tap water is equal to 1 kg. If you are shooting near a beach and you decide to use sea water, that is roughly about 1.027 kg. If you are going to shoot at a location where you can't find any water tap. You can always filled up the container first, do the shoot and than emptied it when the shoot is done.

So that's it, hope you guys find it useful. And if any of you have your own sand bag/weight substitute solutions, please do share with us.

Continuous Fluorescent Light (Technical), Photography with Continuous Fluorescent Lights
 

Bro wahgongzai, thank you for sharing your wonderful tips. I have been using the "modelling" light since you shared with me a year ago. Thanks!
 

Thumbs up to your thread!

Its not easy doing up those shots and even more, taking the effort to share the 'How Tos' here.
 

Bro wahgongzai, thank you for sharing your wonderful tips. I have been using the "modelling" light since you shared with me a year ago. Thanks!
Hi bro daredevil123, thank you very much for the comment. I learn the modeling light tip from an old timer who share with me so I share with others. I also learn things from you when you share with me your own experience. Hope we get to meet again and chit chat on strobist stuff :bsmilie:.

Its not easy doing up those shots and even more, taking the effort to share the 'How Tos' here.
Thanks pinholecam :), appreciate your comment and ups. Hope more SUNPAK 120J owners and non owners will start to share their "strobist" techniques here.
 

Last edited:
A Teaser Pic from LACE 2 shoot. No backdrop just a white wall with two lights. Looking at the eye's catch lights you already know the name of this classic setup :think: ...

L2bts01.jpg

Stay tuned for more updates this week :bsmilie:​
 

Last edited:
Hi all, lets talk about the LACE II shoot that we did last month. The shoot went great although we had one model played us out by using the “disappearing trick”. Instead of taking it as a bad experience, we looked at it in a positive way. All of us got to know how “responsible” this model :thumbsd: really is, and agreed that she is definitely not someone that you can trust or depend on regardless its a tfcd or commercial project.

And thanks to her, we got more time to work with a real model who turns out so good and dedicated to her passion that it got all of us pump up and went hyper. Instead of 3 hours, the shoot went on for 5 and ½ hours. We had lots of laughter and the shoot seemed more like a group of old friends hanging out. Its was a blast : >


L2bts2b.jpg
For this shoot, I decided to go simple, no backdrop and just 2 lights. The setup is the classic “clamp shell”. Model is Jackie. Her bubbly personality, willingness to try new ideas and a secret aura that surround her made all of us feel comfortable working with her. A great model in the making. Makeup artist is Xavier Sim, cool guy with great MU skills. Stylist is Wyn (old friend) and we also had a special guest who graciously agreed to come down and help us with the shoot. Tracy from lulutracy photography, a talented young female photographer who has stunning images all shot under available natural light. Not even a reflector was ever use in any of her shoot. She is good, really good. And half way through my good friend pal Wee came back to Singapore for a shoot also dropped by and visited us. Coolest day ever .


L2bts03.jpg
There are quite a number of variations on “Clamp Shell”, for me I tried beauty dish with a reflector, two rectangle softboxes. This time I used two beauty dishes. The top one is white surface; the one below also white surface but has a diffuser “sock” on it. Lighting ration is 1:2 (almost), the top 120J set @1/8 and the below 120J @ 1/16 power. Just to note, some photographers also call “Clamp Shell” 1:1, which the top and bottom have the same flash output. This is to fill up and eliminate all shadows of all wrinkles and pores on a person's face and make it look “very pretty” and “glamor look”. However, the power ratio is up to individual photographers to tweet and play with. I tilted both beauty dishes at a 60° angle, it sort of almost killed all the shadows and give a glowy feel. If a photographer prefers to have a bit shadows under the nose or chin, he/she can just tilt the modifiers to a 45° or 50° or lift and lower it to get the effects.

Continuous Fluorescent Light (Technical), Photography with Continuous Fluorescent Lights
 

Last edited:
Hi All, been busy lately and have not updated the thread for a while. Will share more after mid September when I have some free time.

Below is the "Black Lace” version of Jackie shoot. The cool feathery neck raffle was created by my talented old friend Wyn with the assistance of Tracy. They created this beautiful lace raffle on the spot from scratch in less than 30 mins. Amazing feat, thank you Gals.
L2bts08.jpg

The “Crow Neck Raffle” looked amazing but in a way also extremely ticklish... Wearing it and looked cool without bursting into laughter from the non stop tickling demand great concentration. Jackie pull it off brilliantly, even wearing it for one hour plus. Amazing model, kudos to you Jackie.

L2bts09.jpg
Basically the setup was the same "clamp shell", except I pulled the lights and model further away from the white wall. Thus you see the wall turned more greyish and darker as compared to the “White Lace” photo above.

Continuous Fluorescent Light (Technical), Photography with Continuous Fluorescent Lights
 

Greetings from Tokyo!

I only joined to celebrate the little beauty that is the 120J. Please accept my apologies if I am duplicating something already stated, because in my exuberance I did not read all the way thru the thread.

As previously mentioned, they are pretty hard to come by. Only found 3 in 6 years of living in Tokyo, and bought 2 of those....the first one I just didn't have the imagination I guess...

What I am wondering is, the latest addition is the TTL version. I am fairly sure the TTL part will only work on film cameras, so that won't concern me BUT, the accompanying plastic hotshoe IS a concern. I see that this is a potential weakness - where the regular model is plenty strong.

So what I am asking is, has anyone modified the regular Sunpak module to 1/4" fitting? I bought the Nikon TTL shoe (NE2D) and the STD-1D (standard) - the latter has a socket for Sunpak sync lead (which is of course different to the HH type lead for the regular 120J). I would love to try to mod the NE2D shoe first, that way if I foul it up at least the STD-1D still works.
 

dsc00982h.jpg


120j with QTDish boomed maybe 3 feet above and 4 feet away from, him. Couple of SB26 either side in back, zoomed to 85mm
 

Last edited:
Wahgongzai, tell me more about the stripboxes.

I had planned on buying a couple but wasn't sure which to get. will be for either the 120j heads or more likely either SB26 or Metz 40MZ. prefer to keep the 120s free for QTdish applications or spotlighting the background/etc
 

Hi InTokyo, first of all welcome to Singapore Clubsnap and nice to meet you :D

Regarding your question on modifying your SUNPAK hot shoe module, in my opinion not worth the trouble. Its true that the plastic hot shoe seem flimsy, but SUNPAK 120J is not a heavy flash as the body is identical to SUNPAK 433. Even with the parabolic metal hood mounted, the weight is only 100-150 grams heavier than my Minolta 5400HS. Unless you are subjecting the 120J to very violent actions like mounting it on a mountain bike and went dirt derby with it. The 120J TTL version will hold just fine to normal strobist usage. I know a few guys who own the TTL 120J, so far I only heard one case that the hot shoe edge become brittle due to aging. The owner bought a cheap module from eBay and the flash is as good as new.

If you have worries that the 120J TTL's hot shoe will snap and break, sending the flash to ground. You can consider a simple L bracket rig feature in #62 and 63 above. Using this rig, the flash weight will be on the L bracket and the weight stress on the plastic hot shoe will reduced a lot.

For the strip boxes, its just a rectangle softbox with a modified diffuser like the one below. I think you can find these softboxes selling in Tokyo camera stores. For the "custom made" diffuser, if you are a hobbyist and not using it for commercial purpose. A few layer of thick black cloth + white silk with good sewing skill will do the job.
4542.jpg

Lastly thanks for sharing the black and white hard light setup. Hope to see more of your work in the future. :thumbsup:
 

hi all, just to share a "radio trigger test" with the 120J that I did a few weeks ago.


< snip >

As mention before on page 1 thread two,my Sony A100 have a sucking flash sync of 1/160 :sticktong. So after waiting and waiting... I finally got my hands on a used D70. This cam simply rock my strobist world. I finally got to try things that I can't do... Shooting at flash sync at 1/1250

:eek: Yes sir, you are not reading it wrong. Flash sync @ 1/1250sec. The pocket wizard truly can sync @ 1/1250sec with the Nikon D70, now come the other surprise, I own a few China-made PT-04, normally these trigger according to manufacturer only have flash sync of 1/250.

These PT-04 can also sync @ 1/1250 with my D70, :eek: surprised!

< snip >

I bought a D1x for just this purpose. Like you I find myself limited to 1/1250. Which is a bit disappointing given that we can achieve 1/16000th with a cable! Even PWs top out at 1/1250?

However, I did correspond with a fellow on Flickr, who was using Cybersyncs, and reckoned to get 1/3200, with his D70. An improvement of one and a third stops.

Oh and today at a different dealer in Tokyo, i managed to pick up an as new TR-Pak II, with the original Tophoto nicads, and charge pak. Will find out shortly if those batteries are any good! So now have 2 120J flashes both with external packs (one has a Quantum Battery 1). will be interesting to see if the TR-Pak beats the Battery 1 (I think it will).
 

WOW!!! the Nicad Batteries charged up fine, left them on overnight, got maybe 12 hours charge. I didn't time it very exactly, but easily 1 second maybe less, to recycle a full power flash. These are marked 'PhotoCad' KR-C 1.2v 2000mAh. They are C-cell batts just like the Eneloop? batteries the OP used, except for the need to discharge them fully before recharge. Easily beats the Quantum Battery 1, which seems to take around 4 seconds to full power. The Quantums have their uses however, because I own and use 3 different types of camera flash - SB26, Metz 40MZ, and the 120J - so having common power source is quite useful, just cables differ.
Back in the day I used those Quantum Turbo batteries, with Metz 45CT, and Canon 430EZ flashes, which would perhaps equal the TR-Pak in speed of recycle. However the cost is astronomical! So very happy to recommend the TR-Pak with rechargeable cells, to anyone reading.