
Discussion on exposure techniques with dslrs
- Thread starter PeterD
- Start date
You are using an out of date browser. It may not display this or other websites correctly.
You should upgrade or use an alternative browser.
You should upgrade or use an alternative browser.
While it looks good, I prefer view more closer to what the human eye can get.
Thanks fo your reply
")
Do you mean the tutorial image?
Nvm, I mean the image posted where multiple images are stitched as one.
The method in the tutorial actually uses two raw files to combine giving you a truer to life image by improving the dynamic range limitation of dslr.
allenleonhart used only one RAW file so was stuck with his own cameras dynamic range. His image is non-the-less appealing but when you venture away from true-to-life images, it becomes very subjective and what may appeal to some will be disliked by others. Had we not had this image, we would not now be exploring increasing the cameras dynamic range in a single image.
For anyone else trying this tutorial, I have come across a problem. I cannot find how to paste each image as separate layers directly into Photoshop CS4. What I have done is to load them into Lightroom 3 then select both images. Right click on one of the images and select Edit In/Open as layers in Photoshop... This worked. I am now proceeding with the tutorial. Any other issues I find I shall post the fix, or pose a question here.
I have a question but should actually be asking the author. But I will post here anyway and someone may enlighten.The method in the tutorial actually uses two raw files to combine giving you a truer to life image by improving the dynamic range limitation of dslr.
The author insist the 2 pic to be taken in RAW but yet he said do not tweak anything in ACR.
So why bother to take in RAW (although nothing wrong with that). It was his insistent that puzzle me. I believed jpeg will equally gives almost the same end result. It scenery is not dim at all.
While it "increase" the dynamic range of the photo by combining 2 photos into 1 (which human eyes aren't suppose to), it doesn't helps in shadow or lighted area where it is either no blown highlight that still can see some detail or dark area where there are items or texture inside the shadow. I find it hard to display a example as the monitor has limited display in bits.
While it "increase" the dynamic range of the photo by combining 2 photos into 1 (which human eyes aren't suppose to), it doesn't helps in shadow or lighted area where it is either no blown highlight that still can see some detail or dark area where there are items or texture inside the shadow. I find it hard to display a example as the monitor has limited display in bits.
hmm? human dynamic range I remember was really large... way beyond any camera. high dynamic range is simply being able to have more details in highlights and shadows region.
hmm? human dynamic range I remember was really large... way beyond any camera. high dynamic range is simply being able to have more details in highlights and shadows region.
It is actually possible to get details in highlights and shadows region thought not as good as human eye, but thats a bit too techincal ba. I did prove it to my friend once, but a bit troublesome so nvm.
Last edited:
While technology is getting better. The first problem why you cannot SEE details in highlights and shadows region lies in this
http://www.wpdfd.com/issues/20/monitor_colour_depth/
http://www.wpdfd.com/issues/20/monitor_colour_depth/
If I'm not wrong, the monitor cannot read total black (o) anyway unless its plasma. Sometimes this bit thing get into my nerves. We talk so much about adjusting images in 32 bit or 64 bit, but lab only print 8 bit in jpeg (if I'm not wrong) unless you have a very good printer that you tweak it at home. But how many of us do that. I'm happy just viewing from my monitor in ages to come.
If I'm not wrong, the monitor cannot read total black (o) anyway unless its plasma. Sometimes this bit thing get into my nerves. We talk so much about adjusting images in 32 bit or 64 bit, but lab only print 8 bit in jpeg (if I'm not wrong) unless you have a very good printer that you tweak it at home. But how many of us do that. I'm happy just viewing from my monitor in ages to come.
I view on slide projector.
Printers cannot produce that well because you are printing and viewing on paper. It will be better if you use it to print on transparentcy with the 3 shade of black printer, then view on a 5600k light source. But will you go that much?The idea is to be happy with what you have. Ignorance is blessing something.
Last edited:
Sorry, topic is getting off again. Inital topic is actually more towards exposure technique with a DSLR. Seriously, I prefer to talk more about WB and lighting technique as it will be more towards what the thread is intend for.
Sorry, topic is getting off again. Inital topic is actually more towards exposure technique with a DSLR. Seriously, I prefer to talk more about WB and lighting technique as it will be more towards what the thread is intend for.
Thank you for raising your questions and also for the thread you have attached with your earlier post.:thumbsup:
I have to go out to meet someone to take photographs but reply more fully when I return. Darn the time differences
.I would like though to say, we produce images not just for ourselves but in the hope they are published and seen in print. The dynamic range of most cameras does not reach the dynamic range of monitors. The details are hidden in the variation of colour shades. The greater the dynamic range, the more detail is available.
Taking an image and setting the best exposure are the start of the story. Get this wrong and the opportunities fade.
I shall post again later. Have a good evening and thanks again to all who have responded to this thread.
Hello all,
Firstly, an apology. I have not been well these last few days and therefore I have not been able to post on this thread. Now that I am back, perhaps we can continue this interesting topic.
To recap,
(1) We discussed dynamic range in the camera, printers and monitors above. I believe we all agree that the camera dynamic range is the weakest link.
(2) We discussed how data is lost when clipping occurs at either end of the tone curve and this lost data cannot be recovered.
(3) We discussed various means of in-camera exposure methods and described what each method does.
(4) We moved on from there and looked at exposure blending. A technique to increase the dynamic range of an image by overlaying two exposures. One to expose the highlight detail and one to expose the shadow detail. Both combined in post processing.
Now, I have a problem. I tried to follow the tutorial but it must have been written with an early version of Photoshop. I am no expert in this package and wonder if any of you can bring this technique up to date with CS4? It certainly is worth exploring and if I can PP images, I shall experiment and post the images on here.
Finally, I took a couple of images of the Little Egret last Tuesday - see below:-
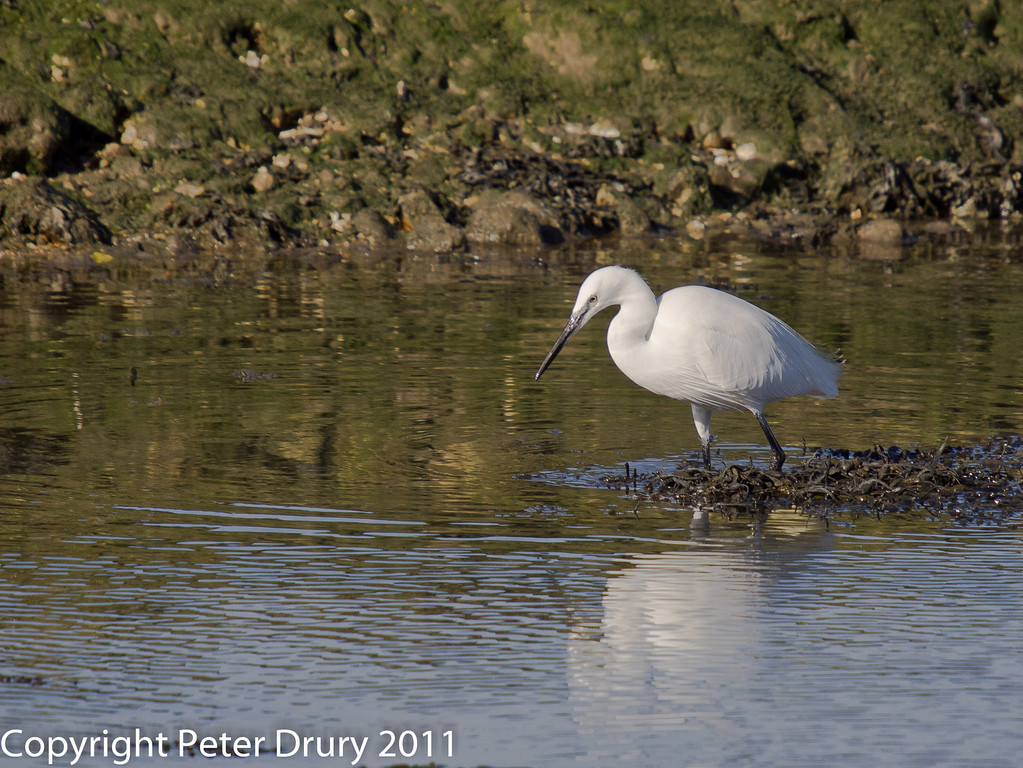

These were taken with Camera evaluative (ESP in my case) metering. The camera has done quite a good job in balancing the brightness levels through the image but is very much limited by the dynamic range. Even more detail may well be available using the exposure blending technique. I think this will be good subject matter to try it on.
Please give me any comments on the summary above and I would be very appreciative if someone can unravel the exposure blending technique as applying to CS4.
Cheers for now.
Firstly, an apology. I have not been well these last few days and therefore I have not been able to post on this thread. Now that I am back, perhaps we can continue this interesting topic.
To recap,
(1) We discussed dynamic range in the camera, printers and monitors above. I believe we all agree that the camera dynamic range is the weakest link.
(2) We discussed how data is lost when clipping occurs at either end of the tone curve and this lost data cannot be recovered.
(3) We discussed various means of in-camera exposure methods and described what each method does.
(4) We moved on from there and looked at exposure blending. A technique to increase the dynamic range of an image by overlaying two exposures. One to expose the highlight detail and one to expose the shadow detail. Both combined in post processing.
Now, I have a problem. I tried to follow the tutorial but it must have been written with an early version of Photoshop. I am no expert in this package and wonder if any of you can bring this technique up to date with CS4? It certainly is worth exploring and if I can PP images, I shall experiment and post the images on here.
Finally, I took a couple of images of the Little Egret last Tuesday - see below:-
These were taken with Camera evaluative (ESP in my case) metering. The camera has done quite a good job in balancing the brightness levels through the image but is very much limited by the dynamic range. Even more detail may well be available using the exposure blending technique. I think this will be good subject matter to try it on.
Please give me any comments on the summary above and I would be very appreciative if someone can unravel the exposure blending technique as applying to CS4.
Cheers for now.
Last edited:
:bigeyes:
dun see a need for it leh. it looks good enough. i can see the bird and it looks well defined...
try google for HDR photoshop. it shld help a little.
:bigeyes:
dun see a need for it leh. it looks good enough. i can see the bird and it looks well defined...
try google for HDR photoshop. it shld help a little.
I think it is better not using any exposure blending technique or HDR. The idea is because the shot stay good on it's own like this and using such techinque only makes the photo looks artificial thought it might looks nice. I think it is more of a personal preference nowadays, but certain photos that and modified to look very nice (people who just wants the photo to looks nice only...) but are like CGI images which aren't really very bad from my POV. Imagine your swam got sharpened and contrast increased till it looks like some cartoon character...:dunno: The bokeh isn't really good as well for additional sharpening btw.
I comment from a photo journalist and one who focus more on the olden film technique POV where imagine you have a national geographic magazine or newspaper where all the photos are exposure blended or HDR...:bsmilie:
:bigeyes:
dun see a need for it leh. it looks good enough. i can see the bird and it looks well defined...
try google for HDR photoshop. it shld help a little.
Thanks for your comments and suggestion
I think it is better not using any exposure blending technique or HDR. The idea is because the shot stay good on it's own like this and using such techinque only makes the photo looks artificial thought it might looks nice. I think it is more of a personal preference nowadays, but certain photos that and modified to look very nice (people who just wants the photo to looks nice only...) but are like CGI images which aren't really very bad from my POV. Imagine your swam got sharpened and contrast increased till it looks like some cartoon character...:dunno: The bokeh isn't really good as well for additional sharpening btw.
I comment from a photo journalist and one who focus more on the olden film technique POV where imagine you have a national geographic magazine or newspaper where all the photos are exposure blended or HDR...:bsmilie:
Thanks for your comments.
I agree with you that HDR must be very carefully applied. I too have seen rather harsh treatment which does nothing (in my opinion) for the image other than ruin it
.What I am interested in trying, is to blend two images together with the camera's dynamic range being used more effectively for the upper and lower end of the tone curve. This will not add sharpening, contrast or any other technique which potentially 'spoils' the natural look of the image. Once merged, standard PP techniques will come into play. Anyway, thats the theory. It will take me a bit of time to read through HDR in CS4 and develop my blending technique.
Any other thoughts about this? Does anyone want to have a go themselves?
Cheers for now
Now, I have a problem. I tried to follow the tutorial but it must have been written with an early version of Photoshop. I am no expert in this package and wonder if any of you can bring this technique up to date with CS4? It certainly is worth exploring and if I can PP images, I shall experiment and post the images on here.
Some has replied you about HDR which I assumed using PP to auto blend it and I don't think that is your prefered route. I'm also not a strong proponent of auto HDR as the end result is normally artificial and should I say "flat" though it started with many HDR. Quite irony. What the tutorial mentioned is manual blending (I think also called tone mapping if I'm not wrong) can be done with CS2, let alone CS4. I used this most of the time and by far the end result is most natural.
1) You have 2 images, one taken at +1 ev and the other at-1ev. So lets named it +1 ev and -1 ev. Stack +1ev on top of -1 ev and there will be 2 layers. It can be other way around, doesn't really matter.
2) After stacking, you will see the brighter image because +1ev is stack above -1ev.
3) Ensure black square is foregrd and white square is at backgrd by toggling it. These square are just below the magnifying glass (CS5 for my case).
4) Use a brush tool, set flow and opacity to 50% and brush over +1ev layer to expose the benealth layer which is - 1ev layer.
5) By selective brushing, you will able to retain the highlights and expose the low lights and you will have full control over the picture. Brush size and hardness to adjust accordingly.
Hope that helps
Similar threads
- Replies
- 0
- Views
- 109
- Replies
- 0
- Views
- 78
- Replies
- 0
- Views
- 121
- Replies
- 0
- Views
- 115
- Replies
- 0
- Views
- 135