
Well, I hope this becomes a lil sticky. Alright maybe not, but I have to conduct an exposure workshop after my exams and I reckon I need to think through what I want to talk about. Let's see if I'm gonna be a mumbled headed nutcase or a really good teacher.
Plus the other zone system thread had gone the way of intellectual insurgency.
Dedicated to tuck and his crew for kindly allowing me to rape their enlarger while I was back in singapore for hols (Okay..maybe rape isn't quite a proper word but I'm feeling abit kinky today..)
Anyway, despite the sites provided by various members of the group, most people here don't quite get what the zone system is about. Primarily is that the websites tend to be technical and cryptic (Not to me anyway...but hey I'm a damn engineer to be!). So, I would like to take the chance to unravel the logarithmic curves and printing densities into something more palatable.
Why learn the zone system? Simply because, minus the cryptic and detailed wholly technical descriptions, it is simply one of the easiest and best ways to learn about exposure. And the fastest way to get around getting a good exposure. Instead of running around observing the meter and making assumptions how it works, or learning everything by trial and error, you could easily take any camera, and after a short read on the manual make perfect exposures nearly every single time.
Secondly, it is the basic foundation for the technical aspects of photography. Alot of other exposure techniques are derived from the zone system itself, even estimated exposure.
So what is the zone system? It is simply a method of determining exposure by using a meter.
Namely the spot meter. Most cameras (or good ones anyway) come with this setting, check your manuals ! What this meter does it reads a 'spot' or a very small area on the scene you want to photograph, and gives you a value for aperture and shutter speed depending on the iso you dialed in. This exposure is what we called 18% gray. This exposure is simply a reference, and any part of the scene you put that spot on, will be rendered to 18% gray.
So why can't we just use this exposure and whack it out? Well, 18% gray has the tonality of concrete on a light hazey day. Okay, I get studio lights, I diffuse it up to make my model's face a pearly white and when I put the spot on her lighted skin and used the dialed in value, my model's face is going to have the tonality and exposure of dull concrete. Great, now she's as seductive as an egyptian mummy. Similiarly, if you happily put that spot on the shadows, you aren't going to get black, but pretty much gray. Doesn't sound quite right doesn't it?
In comes the zone system. Here goes! Now, imagine the scene as a series of tones. If you don't know what tones is, just look below. As you know, light is not always constant throughout the scene, so each part of the scene will have different tones . Now simply divide each part of the scene into a table of 11 tones.
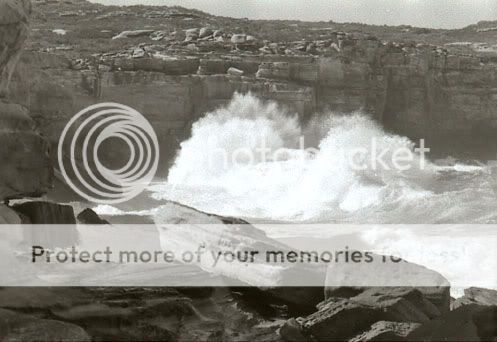
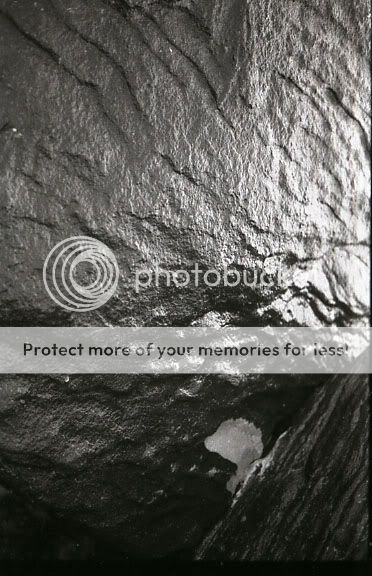
Below is an exercise..just match any area of the photograph to the table of tones below.

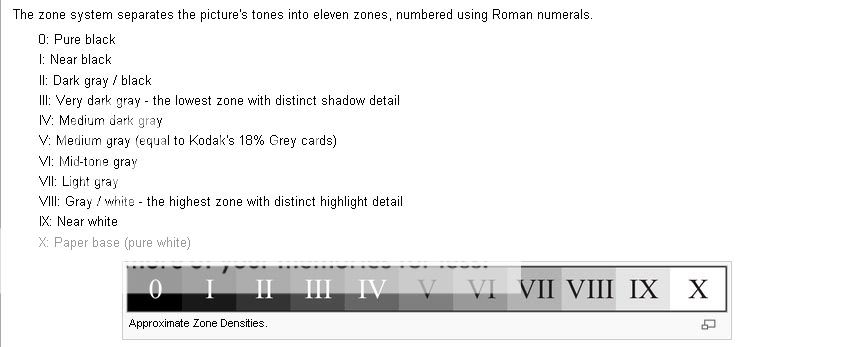
(Credits to Wikipedia for the tone charts)
Simple exercise isn't it? Now you're get the idea about dividing up a scene into an exposure of 11 tones. Now, the spot meter reading gives the tonality (dull concrete rem?) of Zone V.
Ah, now it makes sense why you can't always use the reference reading. Cause not everything in the scene is in Zone V! So what do you do?
Firstly, the range of tones a photograph should ideally possess should be from Zone III for your deepest shadows (black with some detail) to Zone VII (white with good details).
The idea is to get all parts of the scene into the what I call the G spot (it's easy to remember..), in between Zone III and Zone VII
When you descend from Zone V to Zone IV, It's called stopping down 1 stop of light (a relative measurement: stopping down 1 stop means cutting the exposure by dividing the light hitting the film by half.). Your aperture and shutter speed are arranged in 1 to 1/2 a stop. So to stop down, you either go 1 interval up from your aperture (e.g. f8-> f16) or click one interval up from your shutter speed (1/250-> 1/500)
Likewise, going from Zone V to Zone VI involves opening your aperture up (e.g. f8 -> f 5.6) or going one down on your shutter speed (1/250 -> 1/125).
So you put the spot over the girl's face. Her face is pretty white..definately not concrete texture. But you want details of her eyelashes. What do you do? Looking at the chart, you see that zone VII fits the requirement. So from the reference reading, you open up 2 stops. Let's say your reading is f5.6 1/500. So it's either f2.8 1/500 or f5.6 1/125.
Let's say instead of her face you want to expose shadows instead. You look for the darkest spot, namely under the shed behind the right tree. It's pretty black, but you want some details at least. So you look up the chart, and Zone III fits the requirement of having residual detail. So from Zone V you descend 2 stops down. Let's say your reading is f 5.6 1/30. That would make your reading either go f11 1/30 or f5.6 1/125.
Needless to say the best combination would show fluctuations in tones whenever you shift the spot around the area of the scene, but they would be within the G spot, and be at the numerals or tone where you want them to be.
So let's say you have a setting, and you measure various part of the scene against the reference value of 18% gray you have and the readings given out by the meter for each area is exactly where you want to be (2 stops down, 1 stop up, etc etc). There's nothing left to do but...*click*
Plus the other zone system thread had gone the way of intellectual insurgency.
Dedicated to tuck and his crew for kindly allowing me to rape their enlarger while I was back in singapore for hols (Okay..maybe rape isn't quite a proper word but I'm feeling abit kinky today..)
Anyway, despite the sites provided by various members of the group, most people here don't quite get what the zone system is about. Primarily is that the websites tend to be technical and cryptic (Not to me anyway...but hey I'm a damn engineer to be!). So, I would like to take the chance to unravel the logarithmic curves and printing densities into something more palatable.
Why learn the zone system? Simply because, minus the cryptic and detailed wholly technical descriptions, it is simply one of the easiest and best ways to learn about exposure. And the fastest way to get around getting a good exposure. Instead of running around observing the meter and making assumptions how it works, or learning everything by trial and error, you could easily take any camera, and after a short read on the manual make perfect exposures nearly every single time.
Secondly, it is the basic foundation for the technical aspects of photography. Alot of other exposure techniques are derived from the zone system itself, even estimated exposure.
So what is the zone system? It is simply a method of determining exposure by using a meter.
Namely the spot meter. Most cameras (or good ones anyway) come with this setting, check your manuals ! What this meter does it reads a 'spot' or a very small area on the scene you want to photograph, and gives you a value for aperture and shutter speed depending on the iso you dialed in. This exposure is what we called 18% gray. This exposure is simply a reference, and any part of the scene you put that spot on, will be rendered to 18% gray.
So why can't we just use this exposure and whack it out? Well, 18% gray has the tonality of concrete on a light hazey day. Okay, I get studio lights, I diffuse it up to make my model's face a pearly white and when I put the spot on her lighted skin and used the dialed in value, my model's face is going to have the tonality and exposure of dull concrete. Great, now she's as seductive as an egyptian mummy. Similiarly, if you happily put that spot on the shadows, you aren't going to get black, but pretty much gray. Doesn't sound quite right doesn't it?
In comes the zone system. Here goes! Now, imagine the scene as a series of tones. If you don't know what tones is, just look below. As you know, light is not always constant throughout the scene, so each part of the scene will have different tones . Now simply divide each part of the scene into a table of 11 tones.
Below is an exercise..just match any area of the photograph to the table of tones below.
(Credits to Wikipedia for the tone charts)
Simple exercise isn't it? Now you're get the idea about dividing up a scene into an exposure of 11 tones. Now, the spot meter reading gives the tonality (dull concrete rem?) of Zone V.
Ah, now it makes sense why you can't always use the reference reading. Cause not everything in the scene is in Zone V! So what do you do?
Firstly, the range of tones a photograph should ideally possess should be from Zone III for your deepest shadows (black with some detail) to Zone VII (white with good details).
The idea is to get all parts of the scene into the what I call the G spot (it's easy to remember..), in between Zone III and Zone VII
When you descend from Zone V to Zone IV, It's called stopping down 1 stop of light (a relative measurement: stopping down 1 stop means cutting the exposure by dividing the light hitting the film by half.). Your aperture and shutter speed are arranged in 1 to 1/2 a stop. So to stop down, you either go 1 interval up from your aperture (e.g. f8-> f16) or click one interval up from your shutter speed (1/250-> 1/500)
Likewise, going from Zone V to Zone VI involves opening your aperture up (e.g. f8 -> f 5.6) or going one down on your shutter speed (1/250 -> 1/125).
So you put the spot over the girl's face. Her face is pretty white..definately not concrete texture. But you want details of her eyelashes. What do you do? Looking at the chart, you see that zone VII fits the requirement. So from the reference reading, you open up 2 stops. Let's say your reading is f5.6 1/500. So it's either f2.8 1/500 or f5.6 1/125.
Let's say instead of her face you want to expose shadows instead. You look for the darkest spot, namely under the shed behind the right tree. It's pretty black, but you want some details at least. So you look up the chart, and Zone III fits the requirement of having residual detail. So from Zone V you descend 2 stops down. Let's say your reading is f 5.6 1/30. That would make your reading either go f11 1/30 or f5.6 1/125.
Needless to say the best combination would show fluctuations in tones whenever you shift the spot around the area of the scene, but they would be within the G spot, and be at the numerals or tone where you want them to be.
So let's say you have a setting, and you measure various part of the scene against the reference value of 18% gray you have and the readings given out by the meter for each area is exactly where you want to be (2 stops down, 1 stop up, etc etc). There's nothing left to do but...*click*
")

