You are using an out of date browser. It may not display this or other websites correctly.
You should upgrade or use an alternative browser.
You should upgrade or use an alternative browser.
You are the reason I smile...
- Thread starter NormanSelvaraju
- Start date


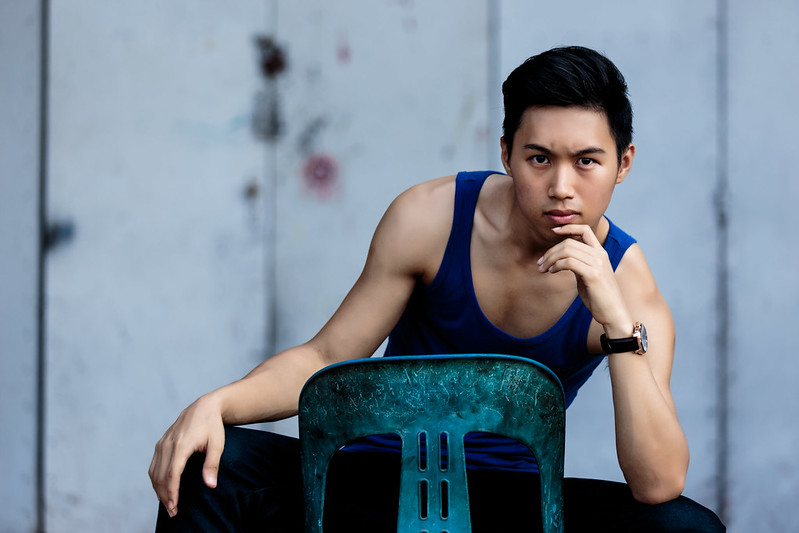
This series can really benefit from the use of another grided rim light to light up the back of the head,shoulders and arm. or you can move the rim light from camera right to camera left, seeing how your key is coming in from camera right.
Last edited:
NormanSelvaraju
Senior Member
This series can really benefit from the use of another grided rim light to light up the back of the head,shoulders and arm. or you can move the rim light from camera right to camera left, seeing how your key is coming in from camera right.
DD123, thanks for the tip. You are definitely right about that. A rim light will be really nice in providing a bit more separation. Thanks!
NormanSelvaraju
Senior Member

NormanSelvaraju
Senior Member

one eye jack
Senior Member
Hello Mr. Norman, did not know you have a series here.Please tell me what is the intent of #28 and #29? Are you satisfied by (photos) what you have envisioned it to be?
NormanSelvaraju
Senior Member
Hello Mr. Norman, did not know you have a series here.Please tell me what is the intent of #28 and #29? Are you satisfied by (photos) what you have envisioned it to be?
Heya!
Yeah I have this thread that I like to put up some of my favourite photos. Thought of organising them in one thread instead of putting them up in individual threads like I used to. It serves as a collection of sorts for me!
#28 and #29 are of a model whom I collaborated with in a studio shoot. It was an experiment in studio photography with the end product being a suitable set of images with her in different looks.
i like 28 cos it's dramatic. I used a huge soft box on one side and a strip light on the other side of the model to create some harsh rim rim light. The soft light and the harsh rim light did give me some acceptable results.
29 was when she was trying out more fun poses and we were going for a light hearted theme. I like it a lot cis it just shows vibrancy and I thought it could be a nice add for a fresh mint as well. Haha. What are your thoughts? Do share, please!
one eye jack
Senior Member
Pic #29 is a winner but critics will say shooting beautiful girl anyhow shoot also
will produce good result...it's a no brainer.Well yes and no..it's in the context of
the photo.If it's a magazine page layout then it scores full marks in terms of lighting
,colour (seemless background),model's outfit and expression/pose.While if it's for a
portrait/glamour then it is 50%.Reason being the choice of background colour ( colour of
clothing also has a corelation).We know colours can influence moods, blue,cyan and green
are known as cool colours, it conveys a feeling of coolness,distance like saying " I am
cool but keep your distance as I'm not that friendly or inviting".The photo works because
of the bright high key lighting and the eye will automatically see the brightest part
first which is the sexy white outfit. Bam!...the eyes cannot avoid.
Warmer colours are prefered in portraits, this gives the feeling of warmth,and openess.
Like saying " Look at me,I'm friendly...come closer we can be friends,get to know me".
Warm colours are red,orange and yellow.When you examine the portraits shot by experts
they are invariably shot from an angle in relation to the model's frontal plane.It's
nicer this way.Although pic#29 is shot frontal it has it's redeeming points.Model is
probably experienced so she poses to her advantage.She's bent slightly forward,one
shoulder is slightly higher and one feet is in front of another imparting a feeling of
motion plus Norman clicked and captured the right moment of her facial expression
( looks natural).There is one minor flaw if you can call it that, the crease of flesh at
the right armpit and a lesser one at her left ( red circle).Do people really notice at all
or are we nit picking? The pros will photoshop it away.Fulfilling dreams and perfection is
photograher's duty..yes?

Pic#28 can be thought of as an experiment.I notice there is a hint
of knitted eyebrows which means the lighting may have cause some discomfort to model.
Perhaps the positioning of the strip light could be better.
Somehow it does not work for me.
Looking through the 3 pages it's apparent that you have talent.The best way to learn is
to study the work of masters.
will produce good result...it's a no brainer.Well yes and no..it's in the context of
the photo.If it's a magazine page layout then it scores full marks in terms of lighting
,colour (seemless background),model's outfit and expression/pose.While if it's for a
portrait/glamour then it is 50%.Reason being the choice of background colour ( colour of
clothing also has a corelation).We know colours can influence moods, blue,cyan and green
are known as cool colours, it conveys a feeling of coolness,distance like saying " I am
cool but keep your distance as I'm not that friendly or inviting".The photo works because
of the bright high key lighting and the eye will automatically see the brightest part
first which is the sexy white outfit. Bam!...the eyes cannot avoid.
Warmer colours are prefered in portraits, this gives the feeling of warmth,and openess.
Like saying " Look at me,I'm friendly...come closer we can be friends,get to know me".
Warm colours are red,orange and yellow.When you examine the portraits shot by experts
they are invariably shot from an angle in relation to the model's frontal plane.It's
nicer this way.Although pic#29 is shot frontal it has it's redeeming points.Model is
probably experienced so she poses to her advantage.She's bent slightly forward,one
shoulder is slightly higher and one feet is in front of another imparting a feeling of
motion plus Norman clicked and captured the right moment of her facial expression
( looks natural).There is one minor flaw if you can call it that, the crease of flesh at
the right armpit and a lesser one at her left ( red circle).Do people really notice at all
or are we nit picking? The pros will photoshop it away.Fulfilling dreams and perfection is
photograher's duty..yes?
Pic#28 can be thought of as an experiment.I notice there is a hint
of knitted eyebrows which means the lighting may have cause some discomfort to model.
Perhaps the positioning of the strip light could be better.
Somehow it does not work for me.
Looking through the 3 pages it's apparent that you have talent.The best way to learn is
to study the work of masters.
NormanSelvaraju
Senior Member
Thank for taking the time to comment one eye jack! Appreciate it.
I thought I had shopped #29 quite sufficiently. But you are right. The two spots you pointed out require more work. And now that you have mentioned it, I do see some more areas for improvement. Haha. You are right. It's the photographer's job to ensure that the out out meets expectations. Must develop an even more keen eye for detail before pushing out the final photo. Will keep that in mind. Thanks.
The dramatic lighting techniques are still somewhat of a experiment to me. And given the vast number of available modifiers I had at hand at the rented studio, I thought of trying this setup. But I understand where you are coming from with theses comments about #28. Oh yea. That's a furrow in the brow. Not the fault of the lighting. But the fault of the photographer who didn't correct it when he first noticed it. Haha.
When it comes to learning from masters, would you be able to share or suggest some to learn from? Right now I try to see the works of photographers of the various popular fashion magazines and ppl whose work I admire on Flickr And of course on clubsnap. My favourites are... Agetan, eijunlow, berrihappy, heartpatrick, dd123 and Kongo.I think these ppl are at an awesome level of photographic proficiency and consistently produce stunning work in portraiture. Looking forward to learning more from them through their photos!!
Once again one eye jack, thanks for commenting! Appreciate your feedback.
Cheers!!
one eye jack
Senior Member
Sorry for deleting my own posts #50 - 54 because of copyright issue.My apologies. :kok:
I am unable to share this away..haha.
I am unable to share this away..haha.
Last edited:
one eye jack
Senior Member
Sorry for deleting my own posts #50 - 54 because of copyright issue.My apologies. :kok:
I am unable to share this away..haha.
I was stupid yesterday.Now I can share without getting into trouble.:bsmilie:
Posing is half the battle won.This is for wannabe photographers who still have not got a clue about
posing.It's painful to see some of the photos here ( oops! the forum I mean ).Not all posing tutorials on the web are good or useful and I have sorted out the better ones on the list.Rest assured if you copy them you will have at least have a nice photo.The more important thing is expression, if there is no feeling or mood the photo is useless even if the posing and lighting are perfect.Also take note hand resting at face may be acceptable but pressing into it will interupt the jaw line so is hand/elbow resting on thighs that will leave indentation mark and redness which will take time to look normal again during a shoot.Pay attention to how legs and feet (shoes) are posed.
") Good luck.
Good luck.PS Always remember to think slim,slim,slim and thin,thin,thin.The women will love you for it.That's actually your job or important goal and don't forget it.
This is for girls who are not models but want to look like one..haha.
http://stylecaster.com/how-to-pose-for-pictures/
This is the best and most useful so far.
http://photography.tutsplus.com/tutorials/7-posing-techniques-for-non-models--photo-15608
http://petapixel.com/2013/05/24/dear-model-posing-tips-for-how-to-look-your-best-in-photographs/
This one is inspiring too..notice the hand/fingers is never at the face ( it interupts the jaw line).
http://brightside.me/article/20-of-the-best-poses-for-a-photo-shoot-8555/
One of the masters..
http://neilvn.com/tangents/tips-on-posing-people/
The rest can have a look..
https://fstoppers.com/portraits/posing-perfection-10-crucial-steps-pose-model-9582
http://photography.tutsplus.com/tutorials/how-to-achieve-the-perfect-portrait-pose--photo-1940
http://digital-photography-school.com/21-sample-poses-photographing-female-models/
The Men..
Photographing men..LKY pose..haha I respect the man btw. ( last one at bottom)
http://digital-photography-school.com/21-sample-poses-to-get-you-started-with-photographing-men
Men..contains nudity..I don't think ladies would mine..haha.
http://www.thefashionisto.com/pose-like-top-male-model/
Videos:
How to do model stance:
https://www.youtube.com/watch?v=sE--mNO8xq8
How to do modeling poses.
https://www.youtube.com/watch?v=mWRzgc2t4vY
Last edited:
NormanSelvaraju
Senior Member
Thank you so much one eye jack, for all the links. Am gonna slowly Savour each one! Appreciate the sharing!
one eye jack
Senior Member
After you select a pose then you need to light the scene.Natural sunlight is the best which
the eyes are used to seeing.Of course one can make use of available/existing light, window
light if you are indoors.Here we show the 5 basic lighting commonly used for studio/indoor
( home studio) methods.All artificial lighting try to simulate natural daylight.
Do note that using continuous hot lights like tungstun/incandescent or LED light panels has the
advantage of seeing the effects immediately whereas studio strobes or portable on-camera
flash is harder to judge although studio strobes may have built-in continous "modeling light"
for you to see the effect of lighting but it cannot show the full effect of the flash when
fully fired, use camera's LCD for review results.Assuming you know how to control the
output power of the flash.Test shooting one flash at a time should help.Do note that
if more than one light is used there will be more than one catchlight showing in
the subject's eyes which may not be ideal ( Especially head and shoulder shots,depends on
personal tastes,we may come to this problem later). All you need to do is raise or lower
the light until the catchlight is visable and pull the light closer or farther as you deem
suitable for the subject.Not all lighting are suitable for all faces.Key/main light should
not go below subject's head as it does not happen in nature.
Ultimately whether you use one or more lights for your photo depends on your vision.
Both methods can achieve good results but one master said less is more and look most
natural.It's your decision and judgement.Good lighting always can stand the test of time.
The parabolic reflectors shown in the diagrams are very basic.The trend is to use light
modifiers like softbox, beauty dish ,grids and reflectors plus "flags"(to absorb light).
These are the "secrets" to the images you see now plus having a good make up artist(MUA),
hairstylist in the studio and proper selection of clothing/styling.Not to forget background.


Paramount Lighting.
Paramount lighting,sometimes called butterfly lighting or
glamour lighting, is a traditionally feminine lighting pattern that produces a symmetrical,
butterfly-like shadow beneath the subjects nose. It tends to emphasize high cheekbones
and good skin. It is generally not used on men because it tends to hollow out their
cheeks and eye sockets.
NB: Paramount movie studio
Loop Lighting.
Loop lighting is a minor variation of Paramount lighting. The key light is lowered and moved
more to the side of the subject so that the shadow under the nose becomes a small loop on
the shadow side of the face. This is one of the more commonly used lighting setups
and is ideal for people with average, oval-shaped faces.
Rembrandt Lighting.
Rembrandt lighting (also called
45-degree lighting) is characterized by a small, triangular highlight on the shadowed cheek
of the subject. The lighting takes its name from the famous Dutch painter who popularized
this dramatic style of lighting. This type of lighting is often considered a masculine style
and is commonly used with a weak fill light to accentuate the shadow-side highlight.
Split Lighting.
Split lighting occurs when the key light illuminates only half the face. It is an ideal
slimming light. It can be used to narrow a wide face or a wide nose. It can also be used
with a weak fill to hide facial irregularities.Split lighting can be used with no fill
light for a highly dramatic effect.
Profile Lighting.
Profile or rim lighting is used when the subjects head is turned 90 degrees from the
camera lens. It is a dramatic style of lighting used to accent elegant features. It is used
less frequently now than in the past,but remains a stylish type of portrait lighting.
In rim lighting, the key light is placed behind the subject so that it illuminates the profile and leaves a highlight
along the edge of the face. The key light will also highlight
the hair and neck of the subject. Care should be taken so that the core of the light is
centered on the face and not too much on the hair or neck.
the eyes are used to seeing.Of course one can make use of available/existing light, window
light if you are indoors.Here we show the 5 basic lighting commonly used for studio/indoor
( home studio) methods.All artificial lighting try to simulate natural daylight.
Do note that using continuous hot lights like tungstun/incandescent or LED light panels has the
advantage of seeing the effects immediately whereas studio strobes or portable on-camera
flash is harder to judge although studio strobes may have built-in continous "modeling light"
for you to see the effect of lighting but it cannot show the full effect of the flash when
fully fired, use camera's LCD for review results.Assuming you know how to control the
output power of the flash.Test shooting one flash at a time should help.Do note that
if more than one light is used there will be more than one catchlight showing in
the subject's eyes which may not be ideal ( Especially head and shoulder shots,depends on
personal tastes,we may come to this problem later). All you need to do is raise or lower
the light until the catchlight is visable and pull the light closer or farther as you deem
suitable for the subject.Not all lighting are suitable for all faces.Key/main light should
not go below subject's head as it does not happen in nature.
Ultimately whether you use one or more lights for your photo depends on your vision.
Both methods can achieve good results but one master said less is more and look most
natural.It's your decision and judgement.Good lighting always can stand the test of time.
The parabolic reflectors shown in the diagrams are very basic.The trend is to use light
modifiers like softbox, beauty dish ,grids and reflectors plus "flags"(to absorb light).
These are the "secrets" to the images you see now plus having a good make up artist(MUA),
hairstylist in the studio and proper selection of clothing/styling.Not to forget background.
Paramount Lighting.
Paramount lighting,sometimes called butterfly lighting or
glamour lighting, is a traditionally feminine lighting pattern that produces a symmetrical,
butterfly-like shadow beneath the subjects nose. It tends to emphasize high cheekbones
and good skin. It is generally not used on men because it tends to hollow out their
cheeks and eye sockets.
NB: Paramount movie studio
Loop Lighting.
Loop lighting is a minor variation of Paramount lighting. The key light is lowered and moved
more to the side of the subject so that the shadow under the nose becomes a small loop on
the shadow side of the face. This is one of the more commonly used lighting setups
and is ideal for people with average, oval-shaped faces.
Rembrandt Lighting.
Rembrandt lighting (also called
45-degree lighting) is characterized by a small, triangular highlight on the shadowed cheek
of the subject. The lighting takes its name from the famous Dutch painter who popularized
this dramatic style of lighting. This type of lighting is often considered a masculine style
and is commonly used with a weak fill light to accentuate the shadow-side highlight.
Split Lighting.
Split lighting occurs when the key light illuminates only half the face. It is an ideal
slimming light. It can be used to narrow a wide face or a wide nose. It can also be used
with a weak fill to hide facial irregularities.Split lighting can be used with no fill
light for a highly dramatic effect.
Profile Lighting.
Profile or rim lighting is used when the subjects head is turned 90 degrees from the
camera lens. It is a dramatic style of lighting used to accent elegant features. It is used
less frequently now than in the past,but remains a stylish type of portrait lighting.
In rim lighting, the key light is placed behind the subject so that it illuminates the profile and leaves a highlight
along the edge of the face. The key light will also highlight
the hair and neck of the subject. Care should be taken so that the core of the light is
centered on the face and not too much on the hair or neck.
CaravanDuke
Member
Just ONE exclamation - THUMBZUP!
NormanSelvaraju
Senior Member
Just ONE exclamation - THUMBZUP!
Thanks!
NormanSelvaraju
Senior Member
NormanSelvaraju
Senior Member

NormanSelvaraju
Senior Member

NormanSelvaraju
Senior Member

NormanSelvaraju
Senior Member

Similar threads
- Replies
- 0
- Views
- 69
- Replies
- 0
- Views
- 203
- Replies
- 0
- Views
- 150
- Replies
- 0
- Views
- 230
- Replies
- 0
- Views
- 280