
Negative Scanner
- Thread starter emilang
- Start date
You are using an out of date browser. It may not display this or other websites correctly.
You should upgrade or use an alternative browser.
You should upgrade or use an alternative browser.
hey,
i do scanning by myself from time to time with either a v500 or 9000f. my opinion it is that i only do it if i need a resolution of higher than 1600DPI (commerical work) or if my workflow requires digital editing (rather than sticking to traditional means).
it's a pricey process to scan (scanner is expensive) and it can be very time consuming.
otherwise, i usually process at either Shalom (bras basah) or tripled.
Have heard of a place at beauty world that does for cheaper, but haven't confirmed.")
all the best.
i do scanning by myself from time to time with either a v500 or 9000f. my opinion it is that i only do it if i need a resolution of higher than 1600DPI (commerical work) or if my workflow requires digital editing (rather than sticking to traditional means).
it's a pricey process to scan (scanner is expensive) and it can be very time consuming.
otherwise, i usually process at either Shalom (bras basah) or tripled.
Have heard of a place at beauty world that does for cheaper, but haven't confirmed.
all the best.
Used to use scanner but I was never happy with the results. Then I switched to using DSLR with macro lens, cost effective and so much sharper than flatbed
Spidey, may I ask if you do that for colour film as well? I hear it's quite a chore to do colour correction. Any tips for them?
Yes, I do that for color negs, BnW and slides as well. 645 and 135 formats. It is a chore, but you just gotta suck it up and do it. My method for color negs is to use Vuescan to invert the "scan" of the color neg and then color correct there before doing color correction in photoshop with levels and color picker in the levels.
For BnW, I just invert levels in lightroom and white balance for slides. Then bring all into photoshop for dust and scratch cleanups and sharpening.
It's a pain but for the cost and sharpness, I think it's fine. A dedicated film scanner is pricey, flatbeds aren't sharp. But once you're used to it, it's pretty fast and fuss free. Use a tablet for dust cleanup.
For example, scanning with a flatbed a 36 exposure roll would take maybe an hour for high res. Shooting my film probably took less than 10 minutes with setting up (which is very fast). Then conversion and editing can be done in about an hour as well, black and white and slides would be faster. Only downside is, I don't know how the color of the film is like since I'm doing it according to what I like as opposed to how the film is suppose to be like
I bought a Jumbl 22MP budgety scanner a while ago, waiting for it to come. But i have a crop sensor DSLR with no macro lens. But i'll give it ago. I also have a compact G15 with a pretty good macro which ill try too haha probably update here when stuff arrives!
Yes, I do that for color negs, BnW and slides as well. 645 and 135 formats. It is a chore, but you just gotta suck it up and do it. My method for color negs is to use Vuescan to invert the "scan" of the color neg and then color correct there before doing color correction in photoshop with levels and color picker in the levels.
For BnW, I just invert levels in lightroom and white balance for slides. Then bring all into photoshop for dust and scratch cleanups and sharpening.
It's a pain but for the cost and sharpness, I think it's fine. A dedicated film scanner is pricey, flatbeds aren't sharp. But once you're used to it, it's pretty fast and fuss free. Use a tablet for dust cleanup.
For example, scanning with a flatbed a 36 exposure roll would take maybe an hour for high res. Shooting my film probably took less than 10 minutes with setting up (which is very fast). Then conversion and editing can be done in about an hour as well, black and white and slides would be faster. Only downside is, I don't know how the color of the film is like since I'm doing it according to what I like as opposed to how the film is suppose to be like
Thanks for sharing spidey89. May I know what lighting method do you use for the capture? I was thinking of getting a lightbox but then realised that those with high CRI are few and far between, and not particularly cheap. Just normal speedlight for you perhaps?
Last time I was reading people talking about getting "real" film colour and it seems that it's so highly dependent on even the paper you use to make the print that it's be better to not pursue it...
I bought a Jumbl 22MP budgety scanner a while ago, waiting for it to come. But i have a crop sensor DSLR with no macro lens. But i'll give it ago. I also have a compact G15 with a pretty good macro which ill try too haha probably update here when stuff arrives!
Do share your results! I'm interested to see the results in this budgety scanner. It's ok to have a crop sensor, but it's important to have a macro lens, or a lens that can focus closely, so you get the highest resolution your camera has without cropping too much. If you G15 has raw files, it's a good alternative.
A shop (I know the owner) helped me do a scan with a drum scanner, I came home and scanned with my flatbed and D700 and did a comparison some time ago. I found the photo on my facebook.

From the results, quite clear cut which is the sharpest and which isn't. And the price for the different scanners speak for itself too.
Thanks for sharing spidey89. May I know what lighting method do you use for the capture? I was thinking of getting a lightbox but then realised that those with high CRI are few and far between, and not particularly cheap. Just normal speedlight for you perhaps?
Last time I was reading people talking about getting "real" film colour and it seems that it's so highly dependent on even the paper you use to make the print that it's be better to not pursue it...

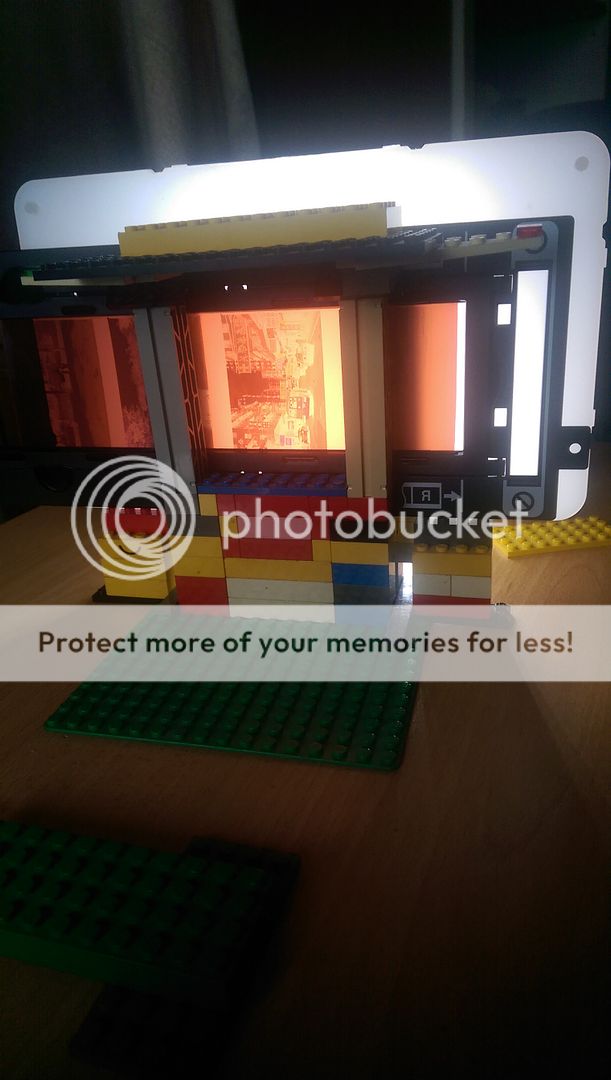
This is how I scan my film. I use those small LED lights that I use for my video camera. You could use flash too, but I find it hard to align the frame without a constant light. Pros and cons. Constant light easy to see and align, tough on the eye. Flash is easy on the eye, but hard to see and align. Since I'm editing the colors anyway, I don't think the CRI matters a lot. The photos shows when I initially started doing the scanning. Now the light is closer and vertical instead. I've also rearranged the legos so that the lego doesn't reflect the color back onto the film, or it's reduced. I didn't want to spend money to buy black legos hahaha
It is true that the type of paper will affect the final results, and I still edit to what I think is pleasing, but I would like to get the "original" film color as much as I can, but it's not an important factor to me
Last edited:
i work a
vuescan -> colourperfect correction.
use a anti-glare glass to flatten my negatives.
I think it's better than using another camera, but at times it can backfire on me as it takes a waaaay longer time.
scanning at 6400DPI can take 1 hour for one strip.
vuescan -> colourperfect correction.
use a anti-glare glass to flatten my negatives.
I think it's better than using another camera, but at times it can backfire on me as it takes a waaaay longer time.
scanning at 6400DPI can take 1 hour for one strip.
You're welcome, result of someone without engineering knowledge, cannot build automated lego ones lol
Sorry for the slow update.. Anyway I got my budget Jumbl 22MP scanner which actually turned out not too bad! Really easy to use and pretty sharp, nice colour too for the most part.. HOWEVER, it would always crop off the left or right. It's impossible to get the whole frame. (This is for 35mm.. I don't know about the other sizes) So if you're scanning old negatives and don't really care about a bit of croppage then it's pretty awesome! I got it for around $90SGD.
I tried using my Canon Rebel T2i (550D) with some macro attachments as well as my G15 in macro mode, used my external flash.. Turned out pretty good! But I got a bit lazy to keep adjusting and fiddling with everything physically, then moving on to editing the image on Lightroom/Photoshop.. Got really tedious!
SO!.. (I'm sounding pretty rich right now but I'm hella broke.. I just have compulsive purchasing issues I'm working on it) ..My CanoScan 9000F Mark II arrived today. It's rather large.. Like 6 times the size of the little Jumbl. Also really simple to load.
Scanning at 4800dpi takes quite a long time, 9600dpi takes longer. Around 10 minutes for 6 exposures? The Jumbl was basically instant.
The image is nice and sharp as expected, definitely good enough for Facebook, but I will still tweak on Lightroom.
The only thing is the colour. It doesn't come out looking as filmy as I like (that "real" film colour). This can be edited on Lightroom but does anyone know a better way?
Vuescan.. Colourperfect.. Any way to fix the colour for free? Otherwise is Vuescan really that good?
Or should I just be less lazy and edit each one on Lightroom to get the look I'm looking for?
Thanks!
Thanks for sharing, good to know the little Jumbl isn't too bad! Unfortunately, haven't figured out a way to do that "real" film colour because I don't know what "real" is suppose to be like, so I just tune to what I like can already
Similar threads
- Replies
- 0
- Views
- 140
- Replies
- 0
- Views
- 275
- Replies
- 0
- Views
- 351
- Replies
- 0
- Views
- 403