
Recently a squirrel noticed our nut box that was waiting to be raided for almost a year now. But as our squirrels here are a bit skittish, I needed to come up with a way to get in close to take nice pictures of them.
Remembering my project where I used my old Sony Alpha NEX-5T for 3d printing timelapses, I decided to set up a photo trap based on the WiFi remote feature of this camera and it worked perfectly.
This should work on any Sony Alpha since the NEX-5R, including the a6000 series and any of the a7s and the controlling script should run on any computer with WiFi access to the camera. In my case, it was a spare Raspberry Pi.
The Results
So, to be clear: to understand what you can expect from this setup, let me describe my experience with it. I wrote the code for the photo trap one evening and set up the camera the next morning before leaving with the kids to a playground. Ten minutes later, I could see the following picture on my phone (note: Getting the photos onto my phone is not part of the script. I simply synchronized the output folder of the script to my Nextcloud instance.):
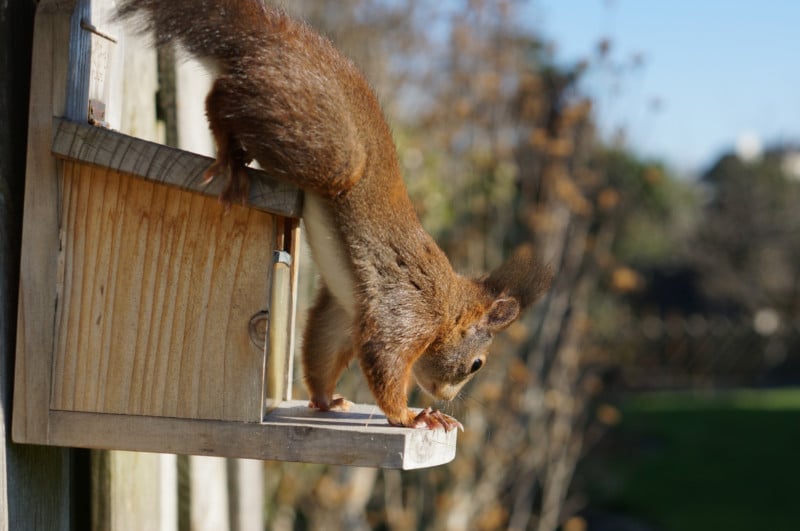
The first squirrel caught by the photo trap.
To achieve this, I only had a camera on a tripod and a Raspberry Pi nearby that controlled the camera, automatically pulled the trigger when the squirrel was in sight, and that downloaded the preview image of the resulting picture. No more hardware is needed and except for protecting your gear from theft and weather; it does not need any more oversight.
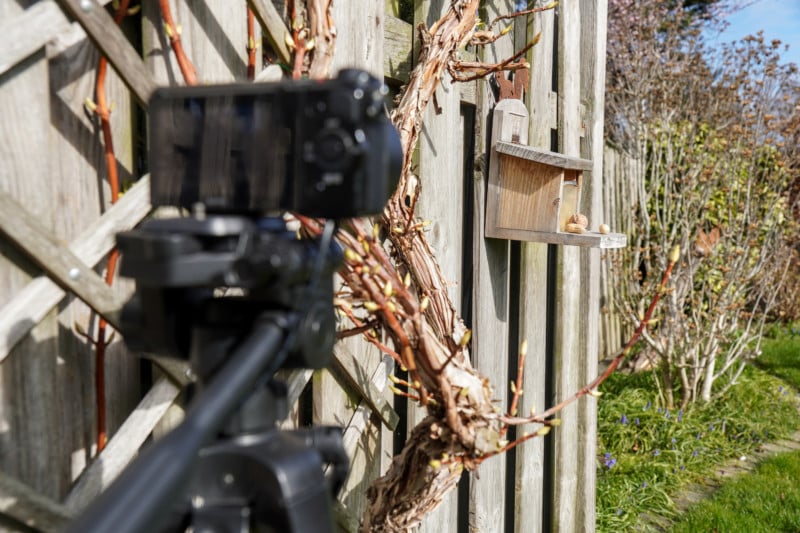
My setup. Our nut box has recently been visited regularly, so the camera is fixed onto that scene parallel to the fence to separate the squirrel from a distant background.
To avoid moisture I moved the setup into my garage overnight, but besides that, I could leave it ready all day and the images just kept coming in.
What You Need
You only need a suitable camera and a computer to run my code.
The camera needs to be a Sony Alpha with the WiFi remote feature. So, if your camera can be controlled by the Imaging Edge Mobile app, it should work and according to Sony’s compatibility list that should be any Sony Alpha since the NEX-5R.
Another occasion to get out my old NEX-5T to leave it outdoors all day while I can still use my main camera for other things.
Next, you need a computer that can run my script and that is connected to the camera’s WiFi. Since the script is written in Python, this should be possible on any laptop on any operating system as long as it has WiFi and can run Python. Unfortunately, as always, it is quite a pain to run Python on Windows. Yes, there are plenty of tutorials and once it is set up it is not that hard, but compared to the “just run it” process on Linux and MacOS, it is a nightmare.
I used a spare Raspberry Pi 3 that was not in use since I had replaced it with a Raspberry Pi 4 for my home automation. I am quite sure that an older Raspberry Pi 2 is also fast enough, but you will need to add a WiFi stick to it as it does not have built-in WiFi.
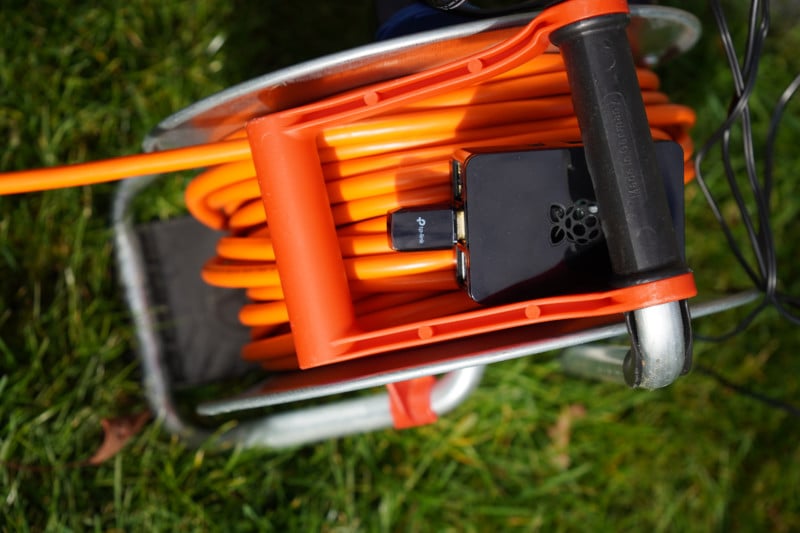
The camera is controlled by a Raspberry Pi 3, which just needs to be nearby, so the cable drum seemed like as good a place as any. Note that the USB stick adds a second WiFi interface and is not strictly necessary (see below).
You might want to add a dummy battery AC adapter to your setup if you do not use one of the newer Sony cameras that can run on USB power while taking pictures. The idea is to leave it running for a long time unattended and you can collect the images later. It would work on the camera’s battery, but that drains fast. Since you need the computer or Raspberry Pi nearby, you will need a power solution for this anyways so plugging the camera into power isn’t much additional ask.
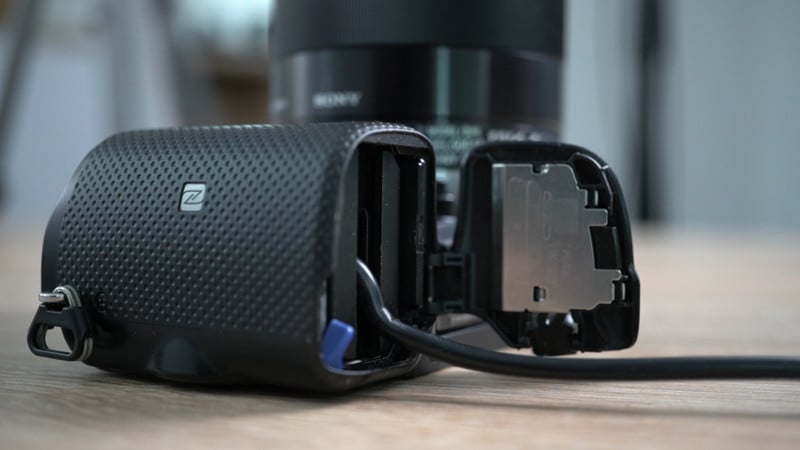
A dummy battery AC adapter can be used to run old Sony Alphas all day long. Newer Sonys can simply be powered via USB.
The Scene
As you will see below, there are some limitations to the scene you can shoot with my script. The trigger mechanism is based on the animal being in focus in front of a blurry or uniform background. In any case, you will certainly want to use manual focus and aim for the location where you expect your animal to be. You also want to shoot at an angle that gives a nice background separation and open up your aperture wide enough to blur the background properly.
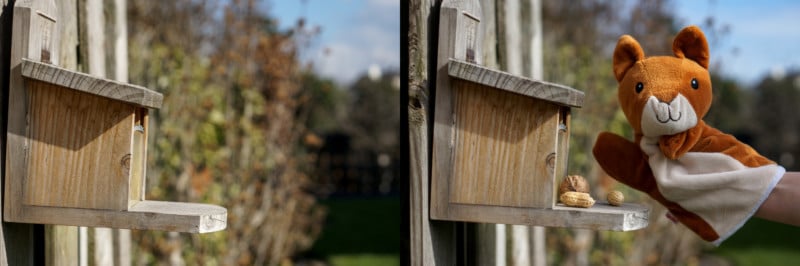
Left: Most of the image is blurry Bokeh background except for the nut box. Right: When a squirrel is in focus, a larger portion of the image is sharp, so the overall sharpness can be used as a trigger.
Other objects may be in focus, too, but it is important that a large part of the image is blurry unless that part is occupied by an animal.
How the Script Works
When everything is in place and you start the script, it will first try to connect to your camera through its WiFi remote feature. This is a simple HTTP REST API that is well documented by Sony, so it was easy for me to do a handshake with the camera, request a video stream of the viewfinder, and trigger actual photos when it detects an animal.
The only slightly trickier part is detecting squirrels (or animals in general). For that, I use OpenCV. It is an Open Source library for all sorts of tools for image processing and computer vision and if you have heard of it before, you are probably thinking of complicated deep learning algorithms for facial recognition. But, fortunately, there is a much simpler method to detect squirrels than teaching an AI with gigabytes of squirrel pictures how to recognize a squirrel.
Instead, we use the fact that we have a proper camera and the scene as described above. Instead of actually recognizing any feature in the image, the script just determines how much of the image is in focus. This is a rather simple mathematical task, which can be done in few lines of code (with OpenCV). We simply look at the standard deviation of the Laplace operator on the grayscale version of the image.

If neither “standard deviation” nor “Laplace operator” have any meaning to you, don’t worry. The Laplace operator is the “divergence” of the “gradient,” so one could say that it is an indicator for how much the brightness gradient between nearby pixels changes direction. On a blurry or homogeneous background, there is not much of a gradient, but if there is a lot of detail with sharp lines, the pixels quickly alternate, and the gradient points all over the place. It is basically how contrast autofocus works.
So, the script calculates this measure for “focus” for each frame of the preview video and takes a gliding average of this value for over a minute. The value changes and drifts slightly as lighting changes over the day and this average will keep track of the current “base” focus of the empty scene. But when a squirrel enters the frame and occupies the area that is otherwise out of focus, this “focus measure” suddenly increases significantly. And that is when the script triggers the camera.
I think that this is a nice example where a simple approach is much better than throwing everything into a machine learning algorithm. Besides being easy to set up and code, I would expect that this code can run on rather slow devices, too. Oh, and of course it triggers everything interesting – not just squirrels.
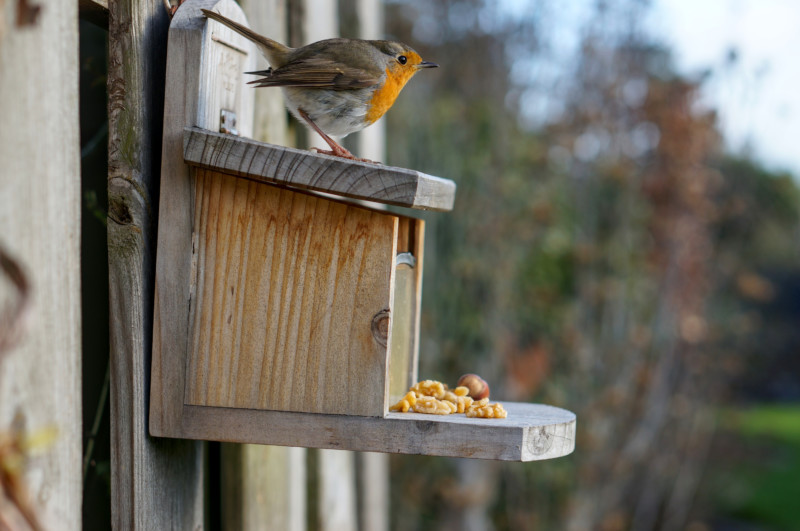
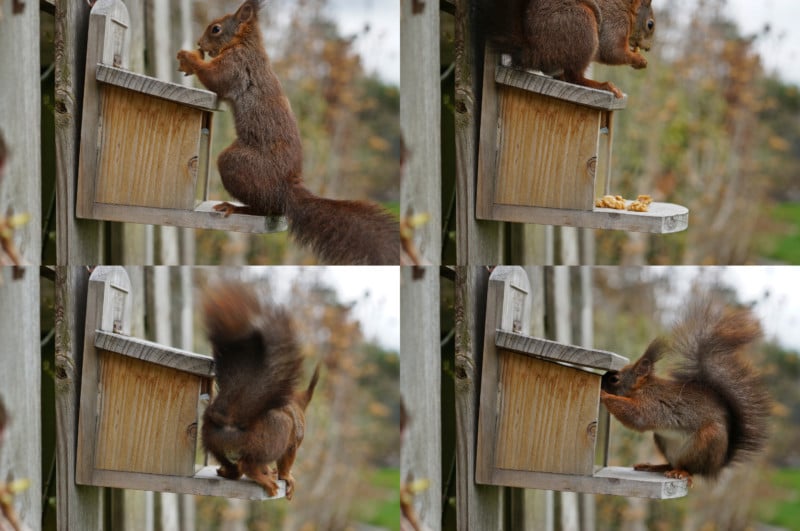
One advantage of only reacting to objects in focus is that it can react to other interesting events like this robin landing on top of the nut box.
Using It Yourself
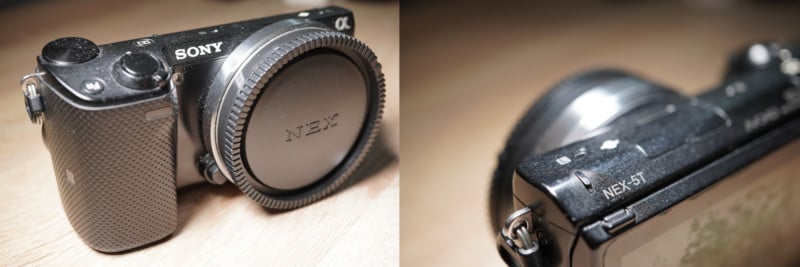
Preparing your camera is the easiest part: You just need to enable the WiFi control feature. On older models, this is implemented as a camera app and on newer ones, it is just an option in the settings menu to enable control with your smartphone.

Sequence to activate the Smart Remote Control app on older Sony Alpha models (here an NEX-5T).
The next step is probably the only tricky part. You need to connect your computer/laptop/Raspberry Pi to the camera’s WiFi. For this simple setup, that should not be too hard. The camera shows the name of the network (SSID) and on a button press also shows the password. You can simply enter these for your WiFi connection as you would set up any other WiFi connection on your device.
The problematic part is that the camera only allows remote control if it is running its own hotspot and that has a few annoying consequences as this means that your laptop and Pi cannot be connected to your “normal” WiFi at the same time. On a laptop, this usually means that it will be offline while controlling your camera and you might need to prevent your operating system from connecting to your default WiFi because of the “lack of internet.”
On a Raspberry Pi, this can be even more problematic if you run it without a screen and keyboard. If its WiFi is connected to your camera, you cannot log into your Pi via WiFi at the same time. So, do not just fire up raspi-config to connect to your camera if you also use WiFi to access your Pi as it will kick you out of your SSH session.
Still, when you are using a Pi, you have a few options here:
Ok, so at this point, you should have a device connected to your camera’s WiFi that can run Python scripts. Depending on your OS and Python distribution you might have to install a few packages, but at least on Raspbian, you should only need to install OpenCV for Python with: sudo apt install python3-opencv.
Then download my script from the Github repository and create a folder “squirrels” in the same folder. This will be the place where the script dumps all the downloaded preview images after triggering the camera. In most cases you do not need to setup anything else, but if you need to, the following values at the top of the script might be interesting:
Continue reading...
Remembering my project where I used my old Sony Alpha NEX-5T for 3d printing timelapses, I decided to set up a photo trap based on the WiFi remote feature of this camera and it worked perfectly.
This should work on any Sony Alpha since the NEX-5R, including the a6000 series and any of the a7s and the controlling script should run on any computer with WiFi access to the camera. In my case, it was a spare Raspberry Pi.
The Results
So, to be clear: to understand what you can expect from this setup, let me describe my experience with it. I wrote the code for the photo trap one evening and set up the camera the next morning before leaving with the kids to a playground. Ten minutes later, I could see the following picture on my phone (note: Getting the photos onto my phone is not part of the script. I simply synchronized the output folder of the script to my Nextcloud instance.):
The first squirrel caught by the photo trap.
To achieve this, I only had a camera on a tripod and a Raspberry Pi nearby that controlled the camera, automatically pulled the trigger when the squirrel was in sight, and that downloaded the preview image of the resulting picture. No more hardware is needed and except for protecting your gear from theft and weather; it does not need any more oversight.
My setup. Our nut box has recently been visited regularly, so the camera is fixed onto that scene parallel to the fence to separate the squirrel from a distant background.
To avoid moisture I moved the setup into my garage overnight, but besides that, I could leave it ready all day and the images just kept coming in.
What You Need
You only need a suitable camera and a computer to run my code.
The camera needs to be a Sony Alpha with the WiFi remote feature. So, if your camera can be controlled by the Imaging Edge Mobile app, it should work and according to Sony’s compatibility list that should be any Sony Alpha since the NEX-5R.
Another occasion to get out my old NEX-5T to leave it outdoors all day while I can still use my main camera for other things.
Next, you need a computer that can run my script and that is connected to the camera’s WiFi. Since the script is written in Python, this should be possible on any laptop on any operating system as long as it has WiFi and can run Python. Unfortunately, as always, it is quite a pain to run Python on Windows. Yes, there are plenty of tutorials and once it is set up it is not that hard, but compared to the “just run it” process on Linux and MacOS, it is a nightmare.
I used a spare Raspberry Pi 3 that was not in use since I had replaced it with a Raspberry Pi 4 for my home automation. I am quite sure that an older Raspberry Pi 2 is also fast enough, but you will need to add a WiFi stick to it as it does not have built-in WiFi.
The camera is controlled by a Raspberry Pi 3, which just needs to be nearby, so the cable drum seemed like as good a place as any. Note that the USB stick adds a second WiFi interface and is not strictly necessary (see below).
You might want to add a dummy battery AC adapter to your setup if you do not use one of the newer Sony cameras that can run on USB power while taking pictures. The idea is to leave it running for a long time unattended and you can collect the images later. It would work on the camera’s battery, but that drains fast. Since you need the computer or Raspberry Pi nearby, you will need a power solution for this anyways so plugging the camera into power isn’t much additional ask.
A dummy battery AC adapter can be used to run old Sony Alphas all day long. Newer Sonys can simply be powered via USB.
The Scene
As you will see below, there are some limitations to the scene you can shoot with my script. The trigger mechanism is based on the animal being in focus in front of a blurry or uniform background. In any case, you will certainly want to use manual focus and aim for the location where you expect your animal to be. You also want to shoot at an angle that gives a nice background separation and open up your aperture wide enough to blur the background properly.
Left: Most of the image is blurry Bokeh background except for the nut box. Right: When a squirrel is in focus, a larger portion of the image is sharp, so the overall sharpness can be used as a trigger.
Other objects may be in focus, too, but it is important that a large part of the image is blurry unless that part is occupied by an animal.
How the Script Works
When everything is in place and you start the script, it will first try to connect to your camera through its WiFi remote feature. This is a simple HTTP REST API that is well documented by Sony, so it was easy for me to do a handshake with the camera, request a video stream of the viewfinder, and trigger actual photos when it detects an animal.
The only slightly trickier part is detecting squirrels (or animals in general). For that, I use OpenCV. It is an Open Source library for all sorts of tools for image processing and computer vision and if you have heard of it before, you are probably thinking of complicated deep learning algorithms for facial recognition. But, fortunately, there is a much simpler method to detect squirrels than teaching an AI with gigabytes of squirrel pictures how to recognize a squirrel.
Instead, we use the fact that we have a proper camera and the scene as described above. Instead of actually recognizing any feature in the image, the script just determines how much of the image is in focus. This is a rather simple mathematical task, which can be done in few lines of code (with OpenCV). We simply look at the standard deviation of the Laplace operator on the grayscale version of the image.
If neither “standard deviation” nor “Laplace operator” have any meaning to you, don’t worry. The Laplace operator is the “divergence” of the “gradient,” so one could say that it is an indicator for how much the brightness gradient between nearby pixels changes direction. On a blurry or homogeneous background, there is not much of a gradient, but if there is a lot of detail with sharp lines, the pixels quickly alternate, and the gradient points all over the place. It is basically how contrast autofocus works.
So, the script calculates this measure for “focus” for each frame of the preview video and takes a gliding average of this value for over a minute. The value changes and drifts slightly as lighting changes over the day and this average will keep track of the current “base” focus of the empty scene. But when a squirrel enters the frame and occupies the area that is otherwise out of focus, this “focus measure” suddenly increases significantly. And that is when the script triggers the camera.
I think that this is a nice example where a simple approach is much better than throwing everything into a machine learning algorithm. Besides being easy to set up and code, I would expect that this code can run on rather slow devices, too. Oh, and of course it triggers everything interesting – not just squirrels.
One advantage of only reacting to objects in focus is that it can react to other interesting events like this robin landing on top of the nut box.
Using It Yourself
Preparing your camera is the easiest part: You just need to enable the WiFi control feature. On older models, this is implemented as a camera app and on newer ones, it is just an option in the settings menu to enable control with your smartphone.
Sequence to activate the Smart Remote Control app on older Sony Alpha models (here an NEX-5T).
The next step is probably the only tricky part. You need to connect your computer/laptop/Raspberry Pi to the camera’s WiFi. For this simple setup, that should not be too hard. The camera shows the name of the network (SSID) and on a button press also shows the password. You can simply enter these for your WiFi connection as you would set up any other WiFi connection on your device.
The problematic part is that the camera only allows remote control if it is running its own hotspot and that has a few annoying consequences as this means that your laptop and Pi cannot be connected to your “normal” WiFi at the same time. On a laptop, this usually means that it will be offline while controlling your camera and you might need to prevent your operating system from connecting to your default WiFi because of the “lack of internet.”
On a Raspberry Pi, this can be even more problematic if you run it without a screen and keyboard. If its WiFi is connected to your camera, you cannot log into your Pi via WiFi at the same time. So, do not just fire up raspi-config to connect to your camera if you also use WiFi to access your Pi as it will kick you out of your SSH session.
Still, when you are using a Pi, you have a few options here:
- Access your Pi with an ethernet cable: If you access your Pi through a cable, you can use the WiFi to access the camera.
- Collect your images later and let the Python script start automatically: Since the point of an automatic photo trap is that you do not need to look after it all the time, you can use one of many tutorials on the web to set the Python script to start automatically. So, in practice you set up your camera (focus, aperture etc.), enable the remote control feature and turn on the Pi. After two minutes you hold your hand where the animals should be and if you hear the shutter, you assume that everything is working as expected. In the evening you collect your camera and simply get the images from its memory card. Of course, you do not have the excitement of receiving new photos immediately after they have been taken.
- Use a keyboard and screen to set up your Pi: Just like you would do with a laptop. It is basically like picking up the images later, but you can check your setup before leaving it unattended (and maybe take the bulky screen and keyboard with you).
- Use a USB WiFi dongle: This is what I did, but I mention it as the last option because it is the hardest to set up and I dread your support requests. In theory, you just need to plug in the USB stick and verify with ifconfig that there are two WiFi interfaces available. If they are called “wlan0” and “wlan1”, you need to rename wpa_supplicant.conf in /etc/wpa_supplicant/ to wpa_supplicant-wlan0.conf and copy it also to wpa_supplicant-wlan1.conf. You now have a configuration file for each adapter and can set a different SSID and password for each to connect to.
The problem with this is that there are a lot of things that can go wrong and that are hard to fix if you do not know your way around Linux. In my case it starts with the USB stick not being supported by the kernel, so I needed to find and compile a separate driver module. Next, the sticks changed their name on each boot, so I had to enable “predictable interface names” in raspi-config to make sure that the same interface connects to the same network5. Finally, for some reason I cannot explain, DHCP failed for one of the WiFi interfaces when no ethernet cable was plugged in. Do not ask why, I cannot explain, but it was absolutely reproducible and the only fix I found was setting a static IP address for both adapters.
The point is that while this is the most convenient solution, it can be very tricky and I cannot help you for your specific hardware and maybe even software. So, please only go this route if you know your way around Linux networking or are ready to research some tutorials and stackoverflow discussions.
Ok, so at this point, you should have a device connected to your camera’s WiFi that can run Python scripts. Depending on your OS and Python distribution you might have to install a few packages, but at least on Raspbian, you should only need to install OpenCV for Python with: sudo apt install python3-opencv.
Then download my script from the Github repository and create a folder “squirrels” in the same folder. This will be the place where the script dumps all the downloaded preview images after triggering the camera. In most cases you do not need to setup anything else, but if you need to, the following values at the top of the script might be interesting:
- camaddress is by default set to “http://192.168.122.1:8080/sony/camera/”, which should be correct for most cameras. I have read that some A7s use port 10000 or maybe the IP address “10.0.0.1”, so if it does not work, you might try to replace “8080” by “10000” and/or “192.168.122.1” by “10.0.0.1”.
- sharpnessAverageCount is the number of frames for the gliding average. It is usually set to 2000 which means that at 25fps about 80 seconds are averaged. This value should be small enough that the average can follow natural variations throughout the day (clouds, shadows), but large enough that an animal in sight is not considered to be “normal” after a few seconds.
- relativeTriggerIncrease determines how much the “focus measure” needs to change above the average value to trigger the camera. I found 1.25 to be good, but you can lower the value to make it more sensitive (only greater than 1 makes sense, though), so you do not miss animals. On the other hand if the cam is triggered too often without anything in sight, you might want to increase it.
When everything is ready, you can just start the script with python3 autocapture.py. If you want to log out from the system while the script keeps running (i.e. on a Raspberry Pi) I highly recommend launching the script with screen (Just search for “screen detach” on the web if you do not know it yet).
Improvements?
Well, one problem with my extremely simple setup is that the squirrels tend to get scared by the loud shutter noise of my old NEX-5T, so you might want to use a longer focal length to place the camera further away or use one of the newer Sony Alphas that can optionally use their electronic shutters to make no noise at all.
I really love the fact that the script can be kept so simple, but there are limits to what it can do. Since it relies solely on the fact that the squirrel will end up as the only object in focus with a very blurry background you are limited to these scenes. While such photos look great, this will not work if you try to catch an animal that is not baited to such a confined space or if you want to have more details in the background (like showing the animal in its natural habitat).
So, while I want to make fun of how simple my solution is compared to computationally complex squirrel-detection systems, more complex algorithms could make such shots possible as well. My script can easily be adapted with any recognition logic, from simple motion detection between frames to deep-learning-based recognition of specific animals. If you have a little experience in that area, take my little code snipped and start playing with it. I would love to see and share more advanced versions of it.
About the author: Sebastian Staacks is a physicist, the developer of the app “phyphox”, father of two, and spends his remaining free time with projects around hardware, 3d printing, coding, and photography. This article was originally published here.
Continue reading...