
Recently, one of my lens was giving me loads of problems, the lens seem loose and it affects the focusing. You could shake the lens and feel the moving parts. Sometimes the lens refuses to focus, you could hear the gear grinding but it won't move. And I notice that it can't focus to infinity at times too. Wanted to send it back to Tamron for repairs but I've decided to open it up and try to fix it. I was lucky to find a few screws loose inside and after tightening those screws, it works like new again. I took some photos during the process so I'm sharing it here.

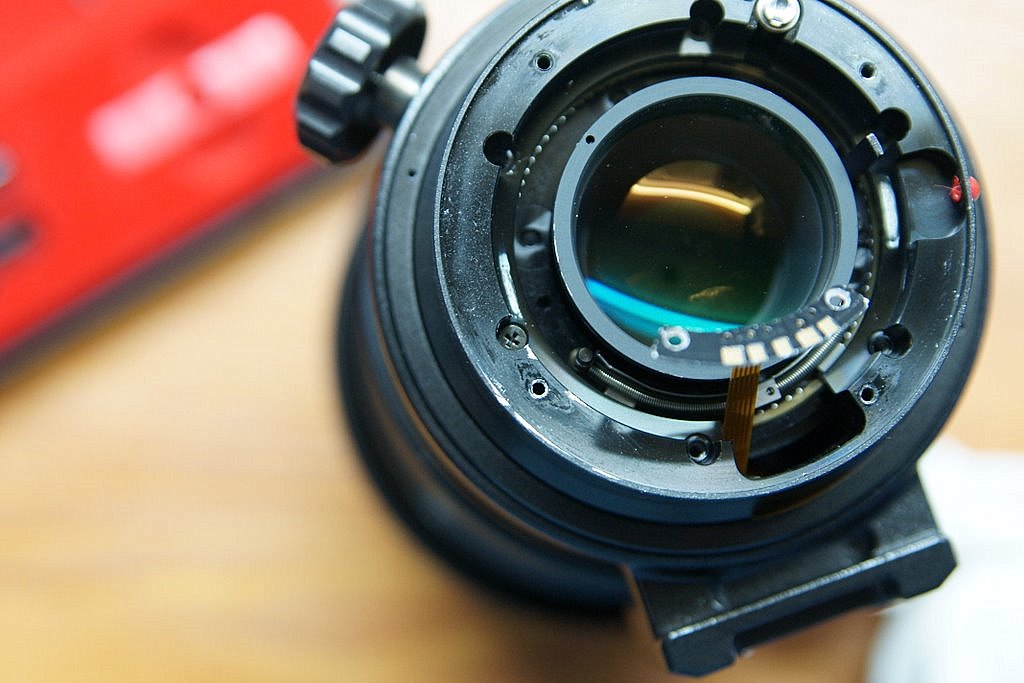
Unscrew the lens mount (held with 4 screws) but be careful as the screws are 'glued' so if you are not careful you might ruin the thread and have to use emergency measures to remove the damaged screw (like me). Unscrew the lens mount contact (2 screws) too and get prepared to remove the metal lens mount.
After removing the metal lens mount, you will find many more screws here. unscrew those 6 screws held 60 degrees apart. You can see that I removed 5 out of 6 of them here. Now when you are done, remove this part of the lens mount too but be careful as the screw that drive the focus mechanism is housed here and if you lose that screw, you lose autofocus.
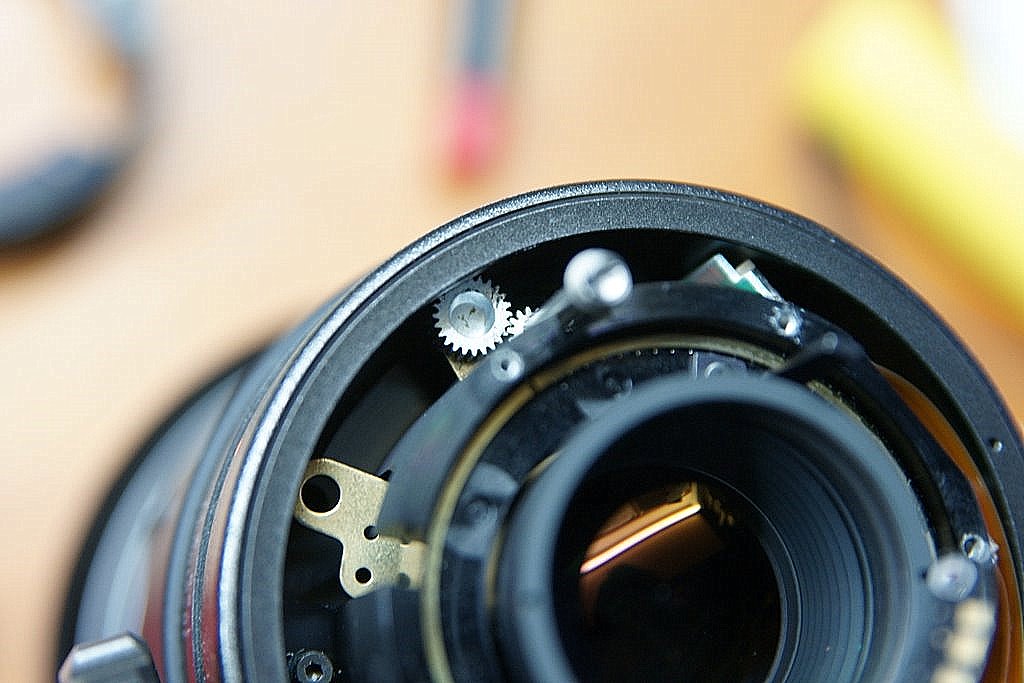
A closer look at the screw that drives the auto focus for Minolta lens. At this stage, the spring that controls your aperture is exposed too. If you have problems with the aperture, I guess you could start to work on it here. Mess up your aperture spring and you will get a true 'constant' aperture lens. Make sure that the gear is aligned and working fine by turning the focus to check.

Now once you removed that part, you will find 4 screws, of which the 2 visible are circled here. Now these screws are hex (allen) style instead of the phillips head type. You could look for a hex key to tighten it or you could just use your screwdriver like I did.
After you are done, put the parts back. The lens assembly was not affected during the process so it is unlikely that you will run into any serious trouble as long as you took care of the screws, gears and the aperture springs

Unless you are like me, left some parts outside the lens so I have to take it open again just to stuff it back in. Sigh...
Luckily, my lens was saved by tightening a few screws and aligning the gears back.
Disclaimer: The author will not bear responsibility for any damages or loss if you tried to repair your own lens after reading this article.
Unscrew the lens mount (held with 4 screws) but be careful as the screws are 'glued' so if you are not careful you might ruin the thread and have to use emergency measures to remove the damaged screw (like me). Unscrew the lens mount contact (2 screws) too and get prepared to remove the metal lens mount.
After removing the metal lens mount, you will find many more screws here. unscrew those 6 screws held 60 degrees apart. You can see that I removed 5 out of 6 of them here. Now when you are done, remove this part of the lens mount too but be careful as the screw that drive the focus mechanism is housed here and if you lose that screw, you lose autofocus.
A closer look at the screw that drives the auto focus for Minolta lens. At this stage, the spring that controls your aperture is exposed too. If you have problems with the aperture, I guess you could start to work on it here. Mess up your aperture spring and you will get a true 'constant' aperture lens. Make sure that the gear is aligned and working fine by turning the focus to check.
Now once you removed that part, you will find 4 screws, of which the 2 visible are circled here. Now these screws are hex (allen) style instead of the phillips head type. You could look for a hex key to tighten it or you could just use your screwdriver like I did.
After you are done, put the parts back. The lens assembly was not affected during the process so it is unlikely that you will run into any serious trouble as long as you took care of the screws, gears and the aperture springs
Unless you are like me, left some parts outside the lens so I have to take it open again just to stuff it back in. Sigh...
Luckily, my lens was saved by tightening a few screws and aligning the gears back.
Disclaimer: The author will not bear responsibility for any damages or loss if you tried to repair your own lens after reading this article.