

Consider this: think like a painter. Painting is basically an additive process: the painter adds paint to a canvas. Photography is basically subtractive: the photographer, through careful composition and cropping (or cloning in the digital darkroom), subtracts unwanted or distracting elements from a scene to create a vision — or impression — of a scene.
Sure, painters subtract and photographers add, but the additive/subtractive analysis is mostly accurate.
Here is something else about painters: they think selectively, selectively controlling the brightness, shadows and highlights, contrast, color, sharpness, and so on, in a painting — every inch of the painting. Most painters would not consider a global adjustment (changing the entire image).
Painters also envision the end result, often starting with a medium (oils, pastels, etc.) that will convey their creative vision. They use what is commonly called, and what Ansel Adams called, “creative visualization.”
Dorothea Lange shares another idea: “The camera is an instrument that teaches people how to see without a camera.”
When photographers think like painters, photographing, and processing images like an artist, images can look more creative and artistic. Here, too, creative visualization is the key.
Yes, we want to get the best in-camera image, but with Photoshop, Lightroom, and other imaging programs and plug-ins, we have the added benefit of being able to control every pixel in every inch within a file and to add a painterly look to a digital file to create a work of art.
As photographers, painters, and illustrators, our ability to capture and shape light is one of the elements that makes or breaks an image. There are many master photographers, for example, from whom to learn lessons about light. More lessons can be learned about light by heading to a museum and studying master painters, sketchers, and sculptors.
For instance, Renaissance portrait painters, such as Leonardo da Vinci, shaped realistic anatomy using highlights and shadows to emphasize angles and fullness.
And speaking of highlights and shadows and Leonardo, my friend John Sinsheimer shared the following with me:
To quote from Walter Isaacson’s biography of Leonard da Vinci: “The first intention of the painter,” Leonardo later wrote, “is to make a flat surface display a body as if modeled and separated from this plane, and he who surpasses others in this skill deserves most praise. This accomplishment, with which the science of painting is crowned, arises from light and shade, or may we say chiaroscuro.”
Isaacson goes on to say: “Chiaroscuro, from the Italian for ‘light/dark,’ is the use of contrasts of light and shadow as a modeling technique for achieving the illusion of plasticity and three-dimensional volume in a two-dimensional drawing or painting.”
As you noted in many of your books: “Light Illuminates and Shadows Define.” Leonardo da Vinci would agree, Rick!
Leonardo also used a technique called “sfumato” (a smoke-like effect) to add softness to his paintings, many of which have soft-edged subjects, as opposed to subjects having hard edges. Look at the lips and eyes of the Mona Lisa, for example. There are no hard edges. What’s more, you will find soft/gradual transitions between the colors.
As an aside: When you are sharpening a photograph and trying to get the sharpest possible image, keep the sfumato technique (which you can somewhat simulate using the Gaussian Blur filter in Photoshop) in mind.
East Asian ink wash art used varying ink densities to provide shadows, capturing the spirit of the subject instead of a realistic reproduction. Impressionists, such as Monet, worked very quickly, emphasizing lighting patterns through the movement, tone, and shape of brushstrokes. Even the modern-day graffiti art of Banksy and the chalk art of Eduardo Rolero rely on key lighting edge placement to make 2D art-pop to perception-fooling 3D.
By examining the highlights and shadows in every art piece, it’s possible to imagine the light source (the sun, a lamp, a reflection) and discern the proximity, strength or additional sources.
By observing these details, you can better understand how each artist perceived light and its relationship to the subject, and light is the main element in every photograph you have ever taken or will take.
When it comes to seeing the effects of light on a subject, which will transfer to your photograph, there are six main things to see:
- The contrast range in the scene, so you can determine if you need high dynamic range (HDR) photography, a flash, a reflector, or a diffuser (all of which compress the contrast range of a scene);
- The direction of light, so you can see where shadows fall and where the light is reflected (remember that light illuminates and shadows define);
- The quality of light, for a hard or soft photograph;
- The color of light, for a warm or cool photograph;
- The Movement of the light (as in moving water or the streaking taillight of a moving car), so you can choose a shutter speed to stop or blur movement/action; and
- The technical and emotional effects of shadows in a scene, which can add to the separation of the elements in the scene to create a sense of separation of 3D elements in a 2D photograph, as well as create a dramatic or mysterious mood.
While you may find one artist whose style best matches your own aesthetic, you may also discover a variety of looks to experiment with when you are in different situations.
Spend some time looking at an artist’s work and try to create a similar work of art. I tried to do that with my Girl with a Pearl Earring photograph that was based on Vermeer’s painting, Girl with a Pearl Earring.
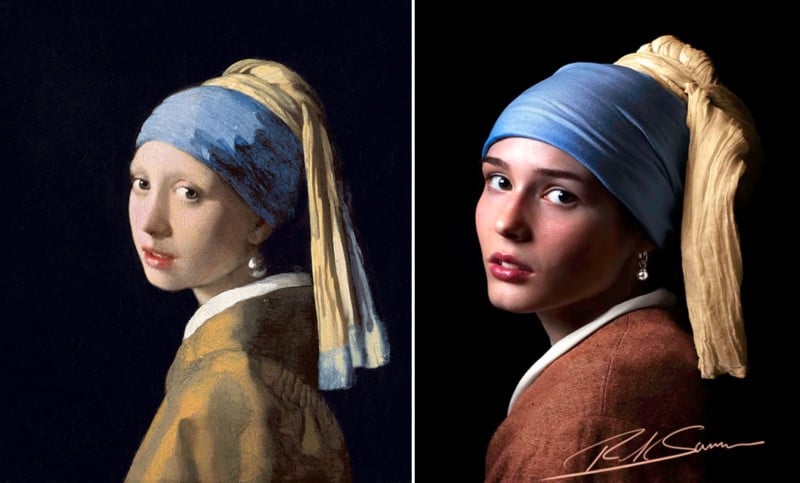
“Girl with a Pearl Earring” by Vermeer (left) and Rick Sammon (right).
When you are thinking and working on an image, keep in mind that every artistic creation — in photography, music, painting, writing, and so on — starts with an idea. Often, an idea goes through several incarnations before it becomes a reality. The idea goes through an evolution, of sorts.
Let’s take a look at Webster’s definition of the word evolution: “The gradual development of something, especially from a simple to a more complex form…the process of gradual, peaceful, and progressive change and development.”
Now let’s take a look at the keywords in that description, and how they apply to your photography and art.
Gradual: If you are new to digital photography or any art form, don’t expect overnight results. Learning takes time; it’s a gradual process. Try not to get frustrated when things don’t turn out as planned and envisioned. Easy to say, I know, having been there and done that.
Peaceful: Oftentimes, we put ourselves under stress, especially when we are photographing, because we have to get the shot and will do almost anything to achieve our goal. Again, “been there, done that.” I do find, however, that the more peaceful I feel when I am working on my images, the better the results. Listening to peaceful music, mostly the Tommy Emmanuel station on Spotify helps keep me mellow.
Progressive change and development: This is the cool part of the evolution of a photograph or work of art. You see your changes and development as a photographer. The more you learn, the more creative you become, and the better you get at photographing and processing.
Of course, sometimes and at some point in the stages of our evolution, we realize that our original idea was not that great to begin with, so we ditch it, or maybe our original idea takes on an unexpected, and even better reality.
The message here is to keep those ideas coming and try to be realistic about them.
About the author: Rick Sammon is a Canon Explorer of Light, book author, Photoshop guy, workshop instructor, musician (keyboards/guitar/bass guitar), and proud dad. The opinions expressed in this article are solely those of the author. You can find more of his work on his website, Facebook, Twitter, and Instagram.
Image credits: Header illustration based on photo by Simon Migaj
Continue reading...