RSSNewsFeeder
Member

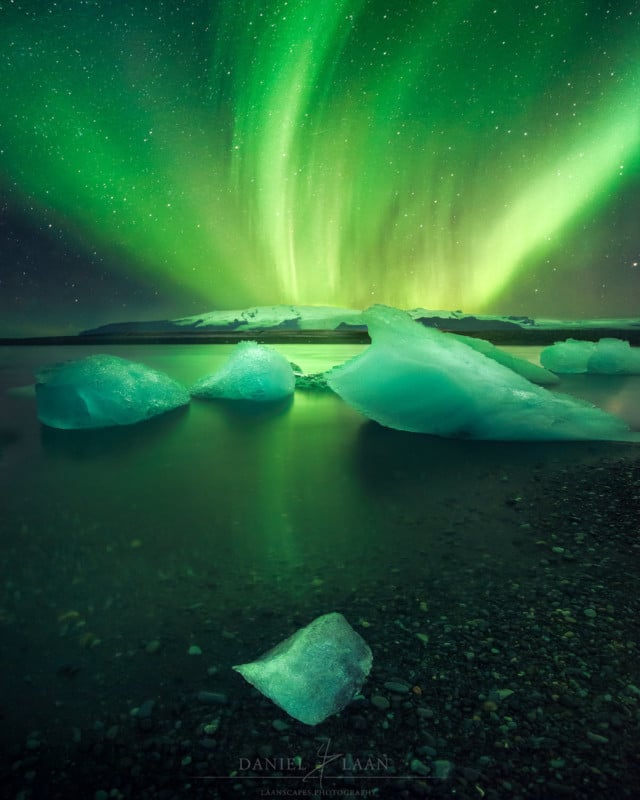
The crown of the (Ant)arctic. Known in the northern hemisphere as the Aurora Borealis (northern lights and as the Aurora Australis in the southern hemisphere, these brightly colored bands of moving and waving light are a majestic display in the night sky.
The sun shoots out a constant stream of charged particles which we call the solar wind. When that stream interacts with the Earth’s magnetic field, these particles are led to the poles through the toroid (donut-like) shape of the field. It’s at our poles where the stream gets concentrated and crashes into particles in the Earth’s upper atmosphere. This high energy reaction emits light in varying visible colors, which we perceive as the northern or southern lights.
Visibility
Sometimes that solar wind stream is stronger and denser than most often is the case. On occasion, it can be so strong that our magnetic field jitters and moves erratically, therefore twisting and bending the aurora in seemingly impossible shapes. But there’s one solar phenomenon that trumps all. The coronal mass ejection. Solar flares can trigger enormous explosions where large chunks of the sun’s mass get flung into space. When those are directed at Earth, it’s a matter for concern. When they’re strong enough, the charged solar particles can destroy electronic circuitry, so naturally we need some kind of warning to protect our modern world.
The strength of such ejections is measured through a fleet of satellites. Some orbit the sun, whereas others orbit somewhere around a point where the Earth’s and the sun’s gravity cancel each other out. The solar wind takes about an hour to travel from that point to Earth. Luckily for us photographers, the satellite data is available to see for ourselves. And if you know how to interpret it, it’s easy to make an aurora forecast for yourself! So let’s talk a bit about the factors that limit or increase your chances to shoot pictures of the magical lights.
1. Your Location
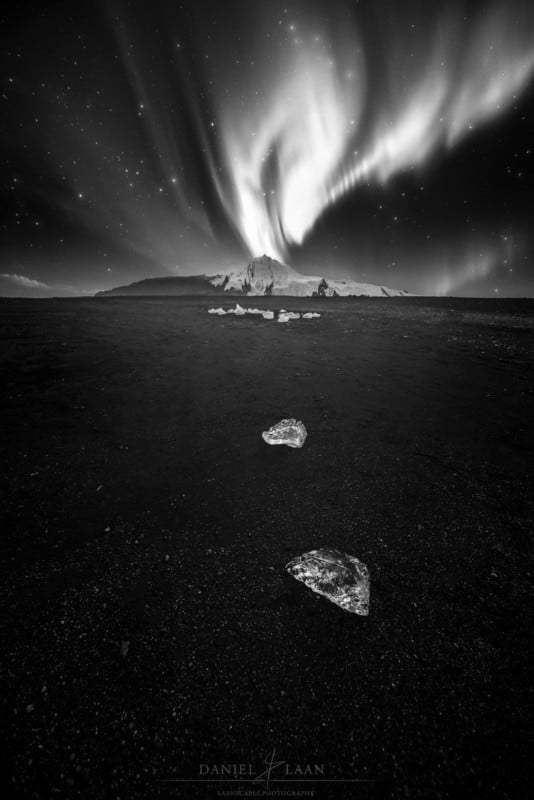
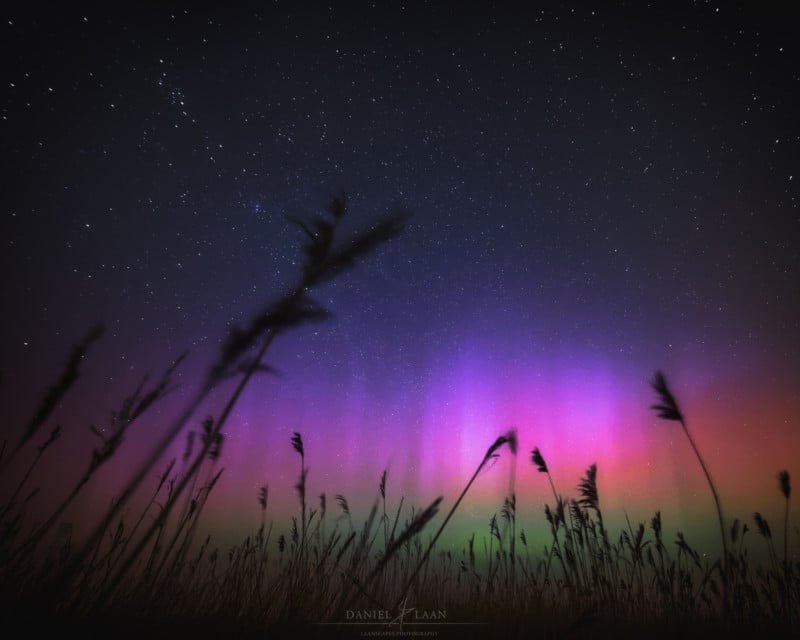
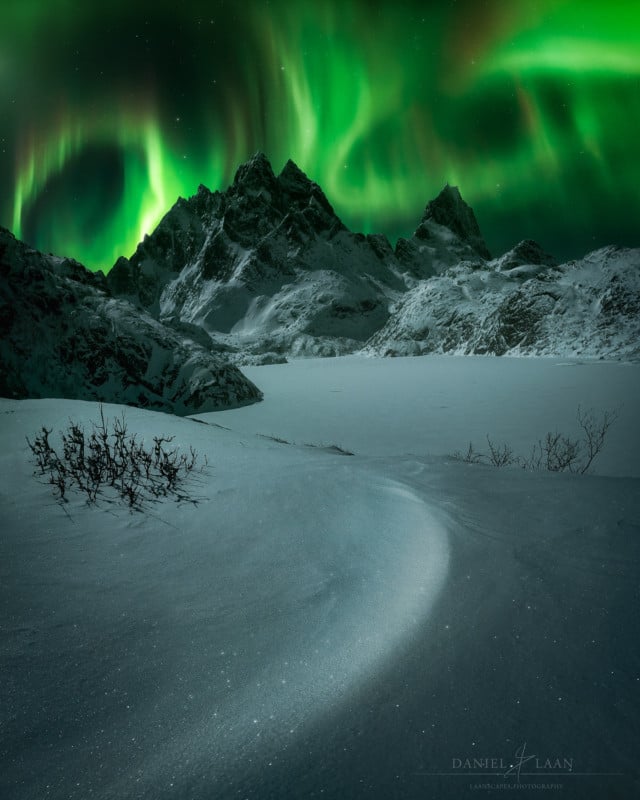
In rare instances, the aurora has been seen as far south as Cuba. But that isn’t the norm. You’re far more likely to capture the lights under pristine skies near the Arctic Circle. There’s almost always some green in those skies, given the fact that it’s clear and if your camera settings are sensitive enough. The images shown in this article are all photographed in the Lofoten or in Iceland, except for one. I’ll tell you about that picture in a minute, but let’s take look at the chart below first.
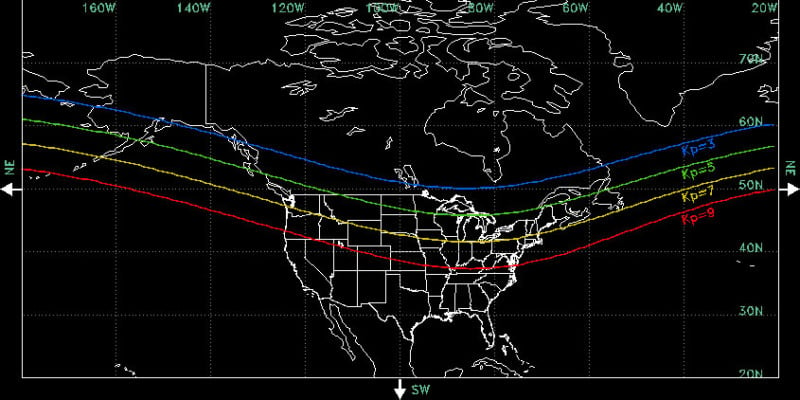
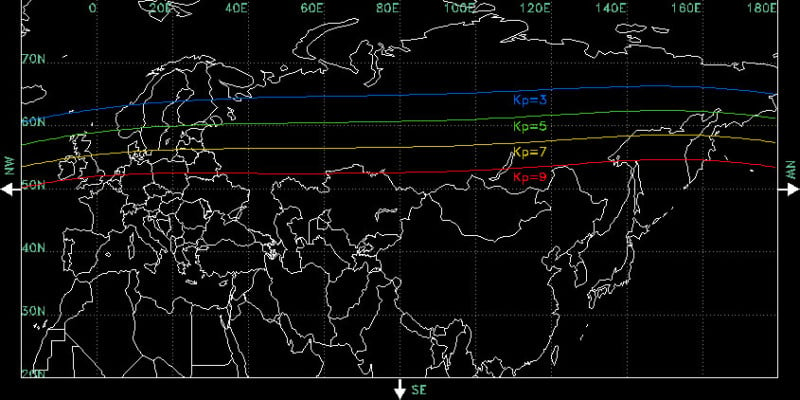
2. Kp-index
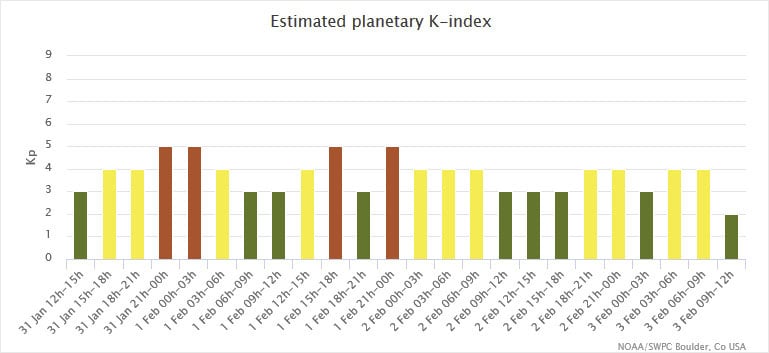
If there’s one thing to learn about forecasting the aurora, it’s the use of the planetary K-index (KP-index). It’s used to characterize the magnitude of geomagnetic storms. Kp is an excellent indicator of disturbances in the Earth’s magnetic field and therefore potential displays of auroras.
The scale goes up from 0 to 9. Where 5 or more indicates a geomagnetic storm. The further up this goes, the farther south the northern lights may be visible.
3. Color
It’s interesting to note that more temperate regions see more colorful displays of the aurora. It’s often misunderstood that the northern lights are green. Magenta, blue and even deep red can be seen and photographed on nights where the aurora is most active. Each gas (oxygen, nitrogen molecules, and atoms) emits a particular color depending on the energy of the precipitating particles, and atmospheric composition varies with altitude.
Since the faster particles penetrate deeper, certain auroral colors, originate from certain heights in the sky. The altitude range at which aurorae can occur is huge. It spans 80 to 1000 km from the Earth’s surface, although typical aurorae are 100 to 250 km above the ground. The color of the aurora at this height is yellow-green, from a specific transition of atomic oxygen. Auroral light from lower levels in the atmosphere is dominated by blue and red bands from molecular nitrogen and oxygen. And above 250 km, auroral light is characterized by a red spectral line of atomic oxygen.
This image was captured in the Netherlands during a very strong geomagnetic storm. Notice that the primary color here isn’t green at all. The color also varies wildly with latititude if the aurora is that strong. The event that sparked visible auroras in Cuba, I told you about? Those looked blood red.
4. Bz
The earlier mentioned Kp-index is derived from the maximum fluctuations of horizontal components observed on a magnetometer during a three-hour interval. In short, it says something about the past three measured hours. That makes it hard to say anything about how it will look an hour into the future. That’s why a couple more advanced measurements should be mentioned before we get into photographing the aurora.
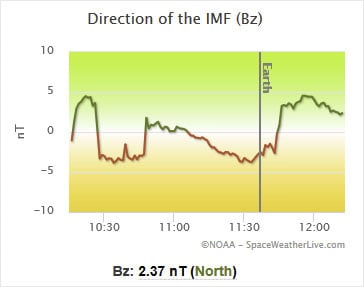
Remember this: When the direction of the magnetic field is southward, geomagnetic disturbances become much more severe than when it’s pointed to the north. In fact, I don’t even try when the Bz is northward. However, this polarity can change at a moment’s notice. And when it does, you have about 45 minutes to get to the location where you want to photograph the lights.
The Bz is a measure of the North/South orientation of the interplanetary magnetic field, measured perpendicular to the ecliptic plane.
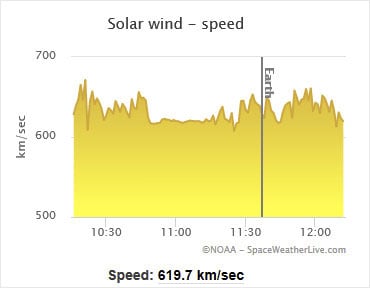
5. Solar Wind Speed
Faster speeds mean more interaction with the magnetic field: So stronger aurorae. Normally, that speed is around 375km/s. When the speed picks up to double that amount, it’s reason to dress warmly for the night. Especially if you’re located in the northern States, South Australia, Northern England, or anywhere along those lines. With speeds of around 500km/s, the aurora might photobomb you when pointed towards the poles if you’re anywhere in Scotland, Scandinavia, Canada or New Zealand.
Camera Settings
Milky Way photography is rather easy to get into, but quite difficult to master. That’s because the settings on your camera are almost always identical. That’s certainly not the case for the northern lights. The dynamic nature of the aurora has you constantly adjusting your settings in order to control the exposure. The steep learning curve of aurora photography starts at setting your camera’s ISO, aperture and shutter speed in the complete dark. Especially during a geomagnetic storm when the auroral display warps violently across the heavens, you don’t have time to turn on your headlamp, adjust settings and shoot again. And it’s too dark for the auto-exposure to have an effect anyway. So here’s a quick guide to help you prepare:
Tripod
It goes without saying that a tripod is mandatory. Due to the longer exposures, you don’t want the movement of the aurora to be influenced by the shake of your hands.
Focal length
Make it as wide as possible. Think about 14-20 mm or even a diagonal fisheye on a Full Frame camera. That way you can image the largest structures of the aurora, linking the sky together.
Aperture
Again, go as wide as possible. This is because we’re looking to capture detail in the shape of the aurora, so priority goes to shutter speed and lowering the ISO. f/4 at the minimum.
Focus
Because we’ve set the aperture to a wide setting, it’s imperative to set the focus to manual and focus right before the infinity mark. That way you can have some reasonably sharp outlines of distant objects in your frame, which add to your composition. Oh, and turn off any stabilization you might have on your lens or body while you’re at it. That is counterproductive when you photograph from a tripod.
ISO
Here’s where it gets interesting. On Sony and Fuji sensors, you’re best off with dialing in 400-800 and never look back, because of the ISO-invariant circuitry. But that means you’re not going to get a well-exposed preview when you take a look at your result on the camera’s LCD. Canon users: Go as low as possible, without you having to increase the exposure in post.
The best beginners advice I could give you on any camera is to start at ISO 3200 and adjust it from there. Some cameras can produce clean looking results at 12.800 or even higher, so it’s best to experiment a bit with this until you are happy with your result.
Shutter Speed
The single most important thing to control during an auroral display is the length of the exposure. Your goal is to find the equilibrium between structure (shorter exposures) and brightness (longer exposures). In as far south as the Netherlands, I’ve been happy with 10-second exposures, but in Iceland that would have completely blown out any highlights. The lowest I got there was at 1.6 seconds.
Personally, I always start short at 2 seconds. That way I only have to wait two seconds to shoot the next one. If you would have to wait 25 seconds to conclude your image is blown out, you might miss that one shot where the composition was just perfect.
Post-Processing
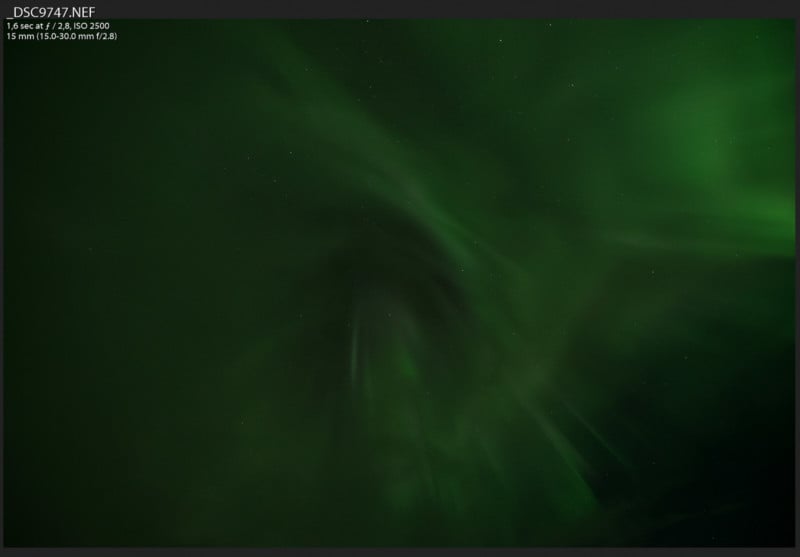
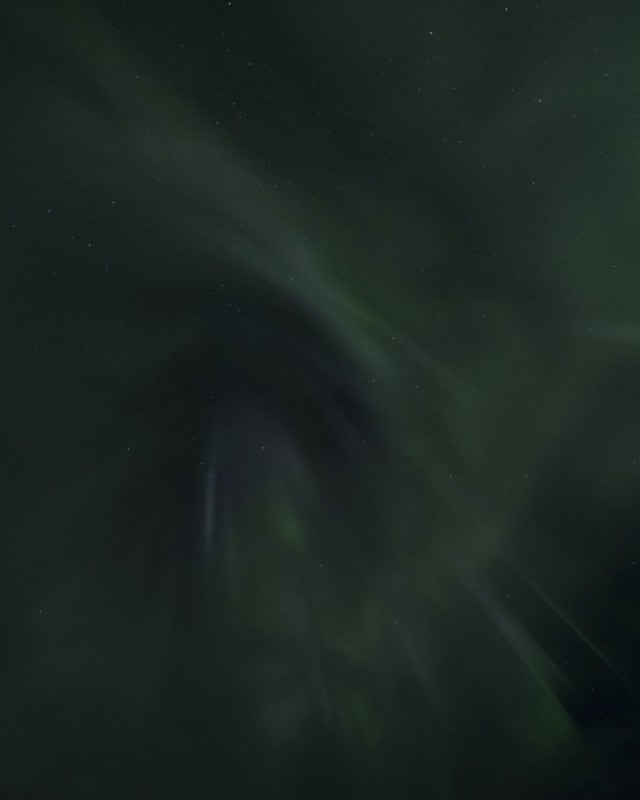
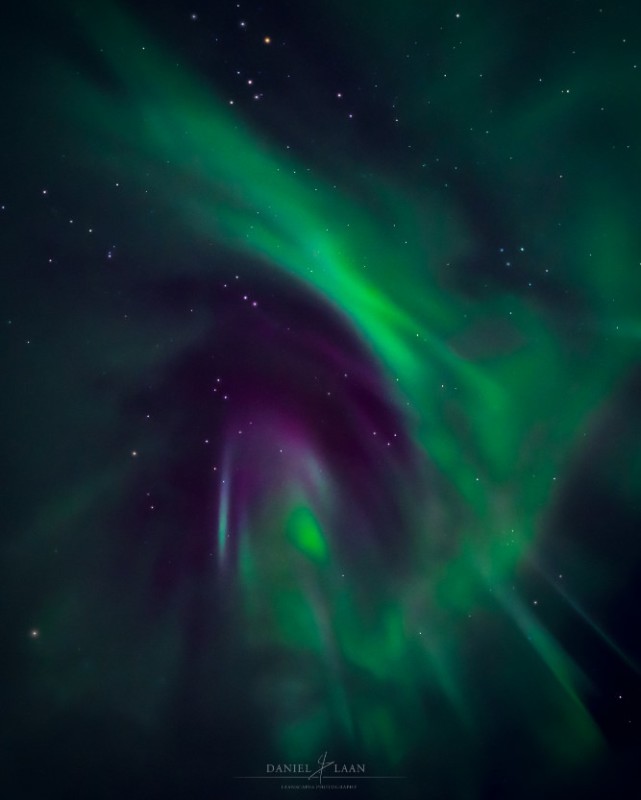
With a memory card full of memorable shots, it’s time to tweak those sliders to get the most out of our northern lights. Let’s see what we got here. This shot was fired straight up, with a nice green corona flaring around a more magenta center piece as clouds started to roll in and end the light show.
Personally, I want to create images that I enjoy looking at. So I’m embracing artistic freedom with this abstract photo of the northern lights. I have chosen to work on this image to teach you how to edit just the Aurora. That helps us to concentrate our efforts on something new to learn. Use these techniques to create stunning aurora landscape images or space weather selfies after this.
Now, I would like to emphasize that magenta offset color to obtain a good amount of color separation. So let’s take a look at the color wheel before we make any adjustments. This will help to guide our processing more than anything.
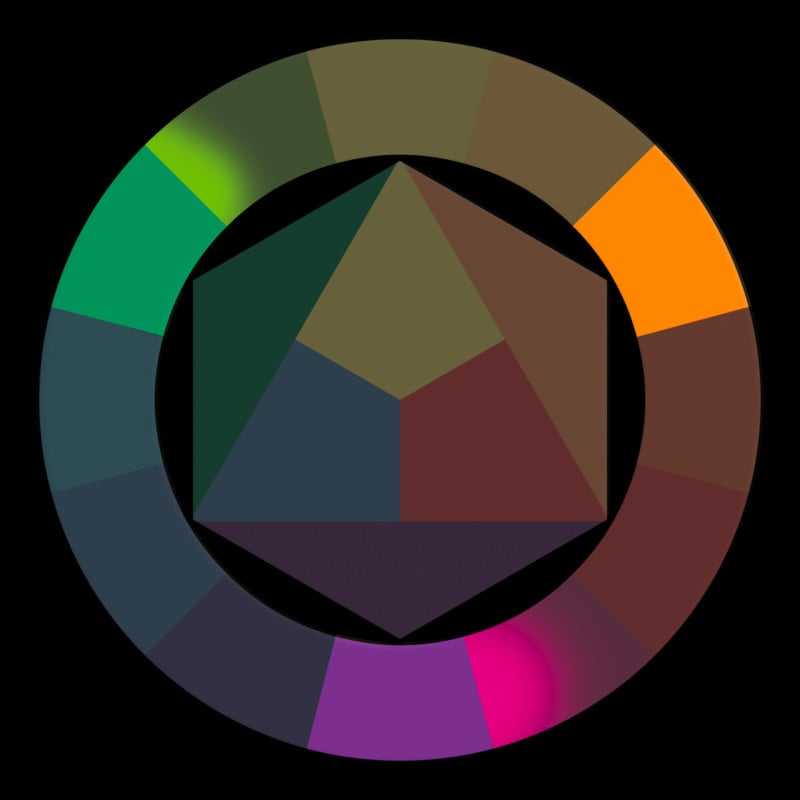
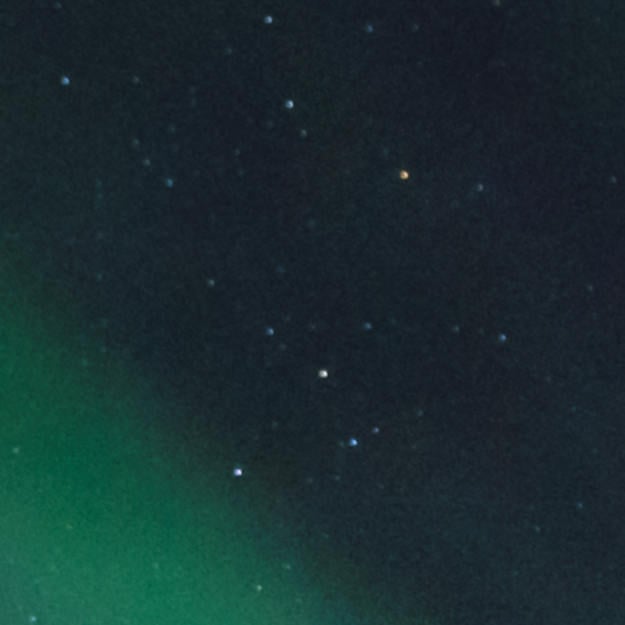
We’re going to pursue a triad color harmony for this image. The most important (or key) color is obviously going to be a shade of green. To offset the bright greens, I like to flood the shadows with a shade of magenta. And orange? Well, there’s a single star in this field of view that looks to be a red giant, but we’ll get to that later.
There isn’t much detail at all in this image. That’s because I shoot my aurora images at a faster shutter speed while keeping the ISO lower. That will underexpose your image, but for Nikon, Sony and Fujifilm, it’s good advice to do so in night photography. If you shoot Canon, you’re better off to raise the ISO and not increase the exposure too much in post.
Boost the Signal, Suppress the Noise
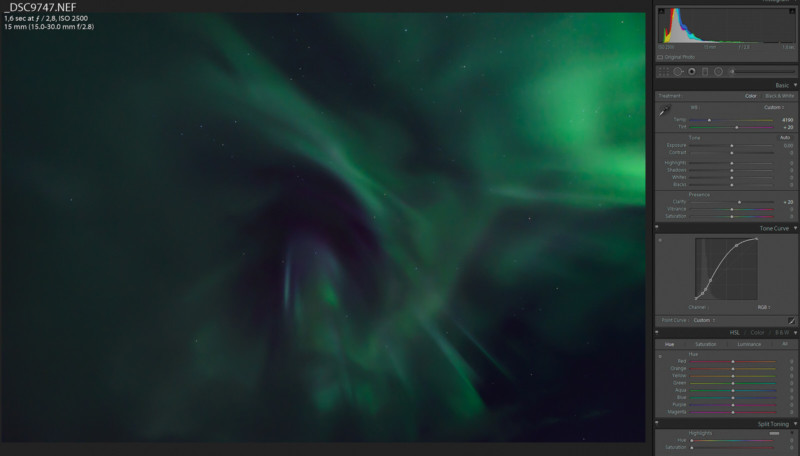
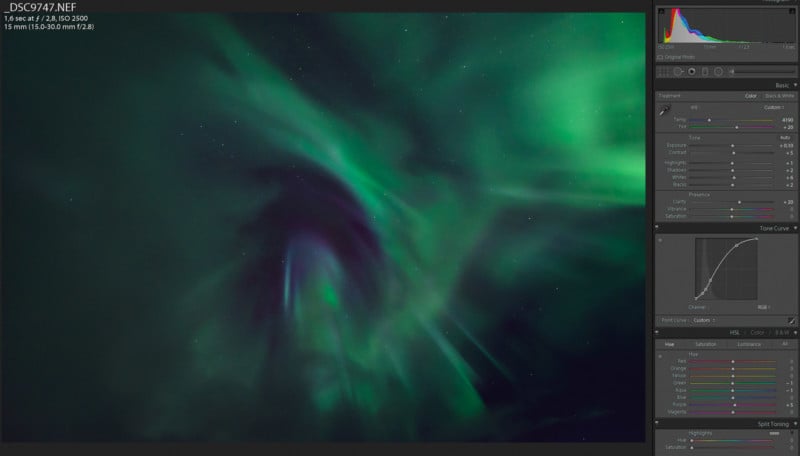
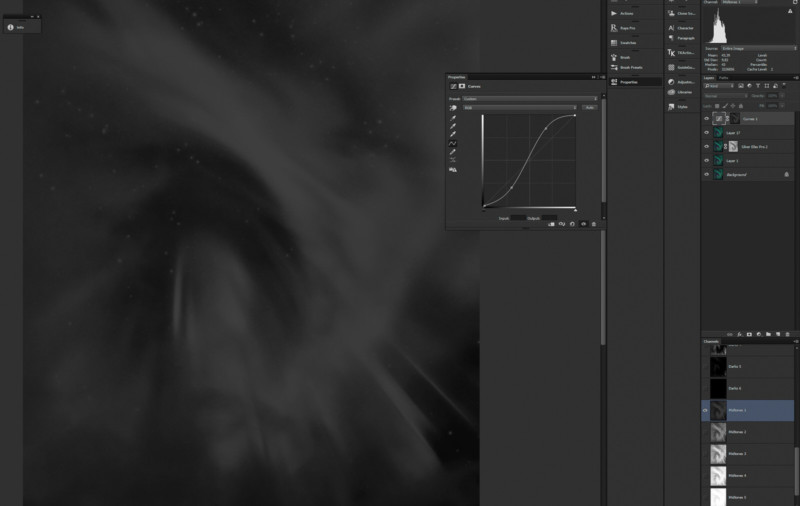
First, we’re going to increase the exposure. Curves are better to do this with than using the sliders because sliders target specific areas of brightness. Curves are more gradual, as they target all tonalities, but make sure you select “Custom” in “Point Curve”.
So I’ve raised the black point here, upped the midtones to create more contrast in the darker areas and lowered the highlights a bit to protect the greens there. The slightest amount of highlight clipping is needed to separate the stars from the noise before we get into noise reduction.
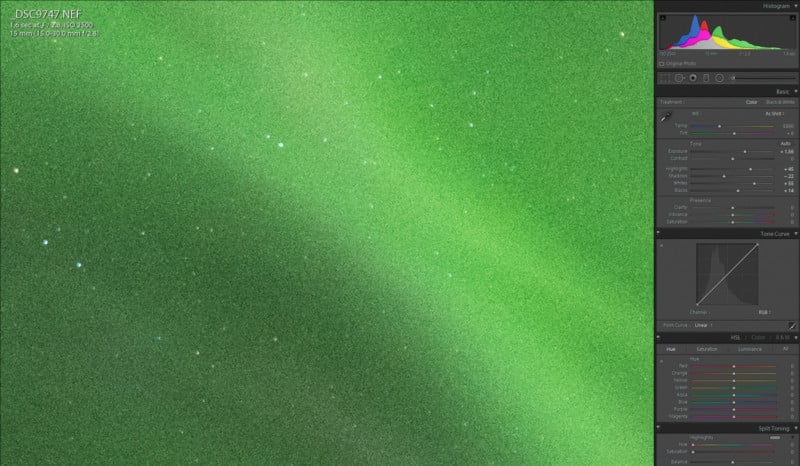
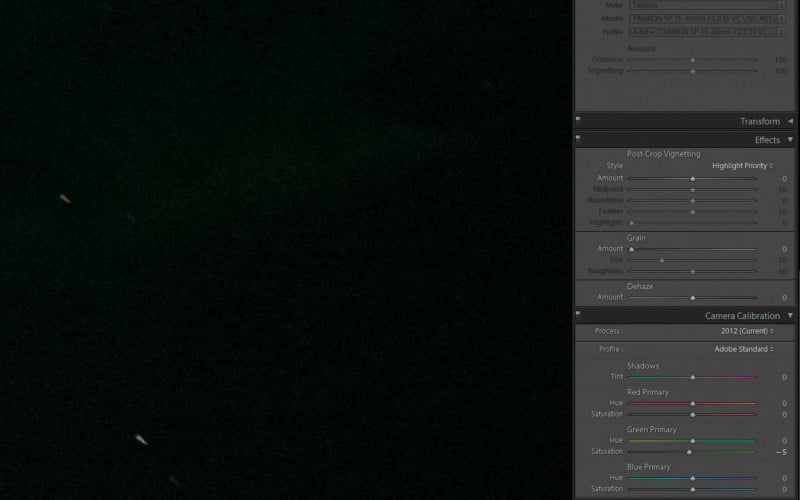
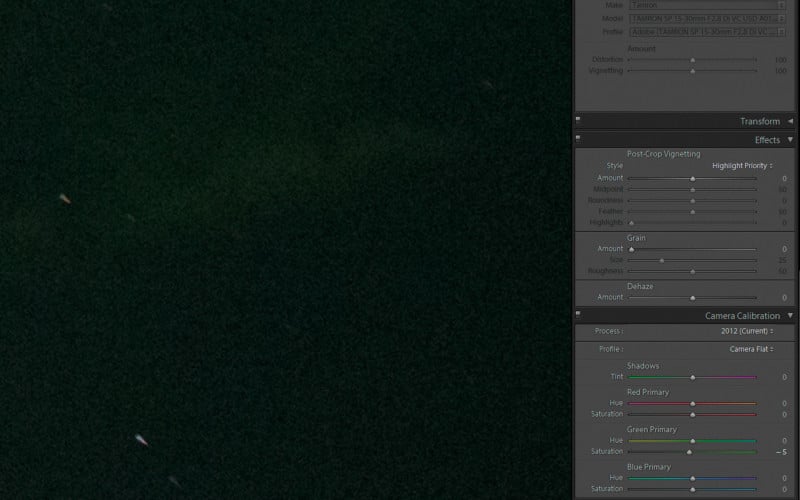
Now scroll all the way down and select “Camera Flat” instead of the “Adobe Standard” profile in the Camera Calibration tab. Faint signals will become more evident, but it also increases noise. So let’s handle that now.
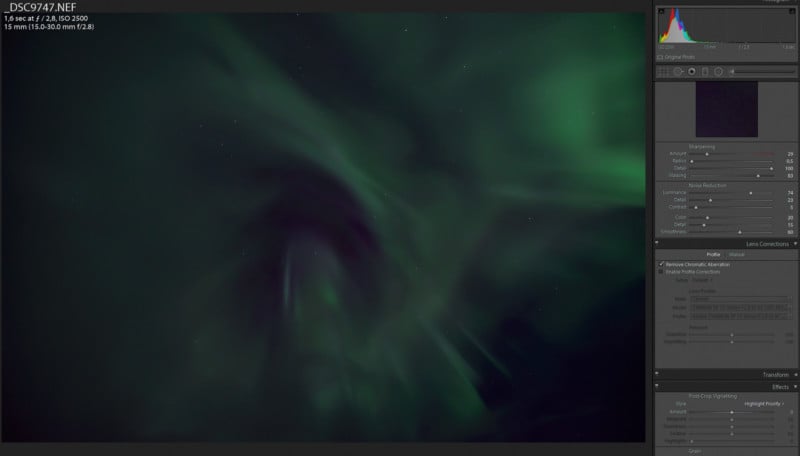
Unfortunately, we can’t stack multiple images to reduce noise here, because our subject isn’t a static one. Dial in the following settings at “Noise Reduction” to suppress that unsightly noise.
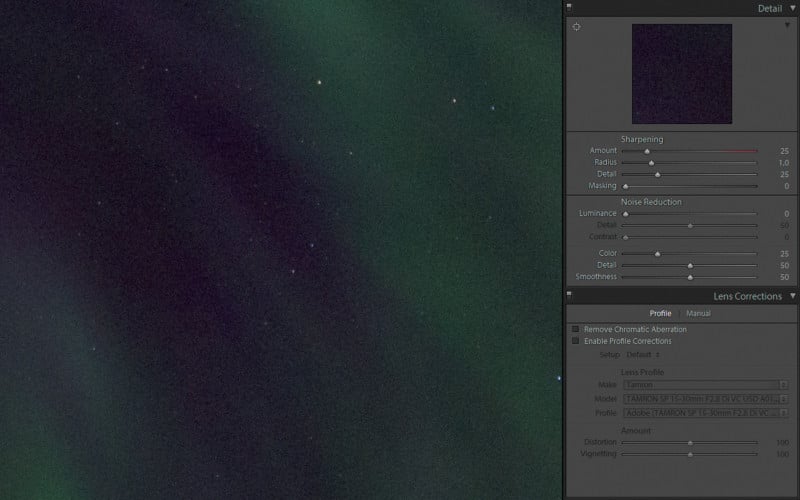
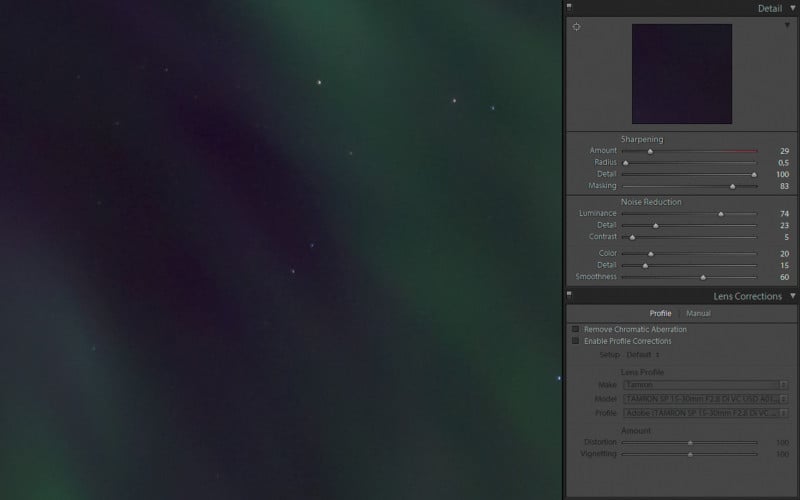
Without telling you what the screenshot already shows, there’s one trick I teach at every workshop: Capture sharpening. Because of the way DSLR sensors are constructed, we lose sharpness during raw conversion. Specifically at the demosaicing (or debayering) step. I remedy that by dragging “Radius” in the Detail tab all the way down while turning “Detail” all the way to one hundred.
The other sliders under Sharpening are different in every image, so be sure to tweak those until you’re happy with the result. Your goal here (as with any early step) is to take it slow. Be wary of wanting too much too soon. Gradually build up your image as you go along is key advice.
Finding the White Balance Sweet Spot
Now crank up both the “Vibrance” and “Saturation” sliders, save the image and don’t look back. We’re done!
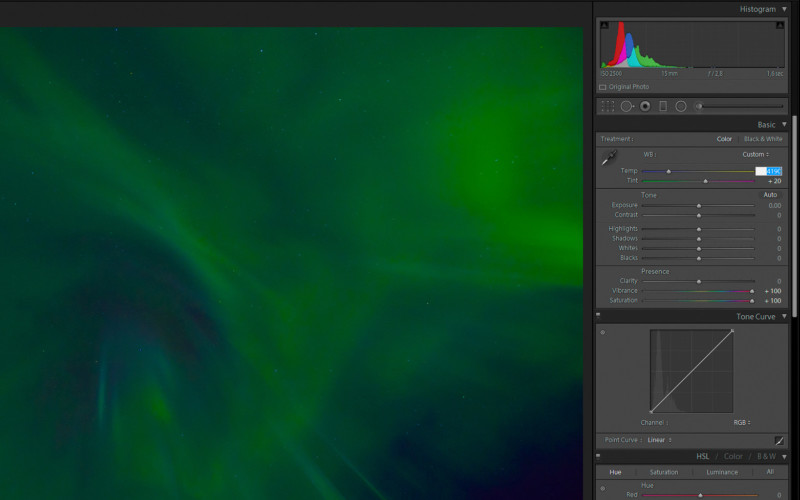
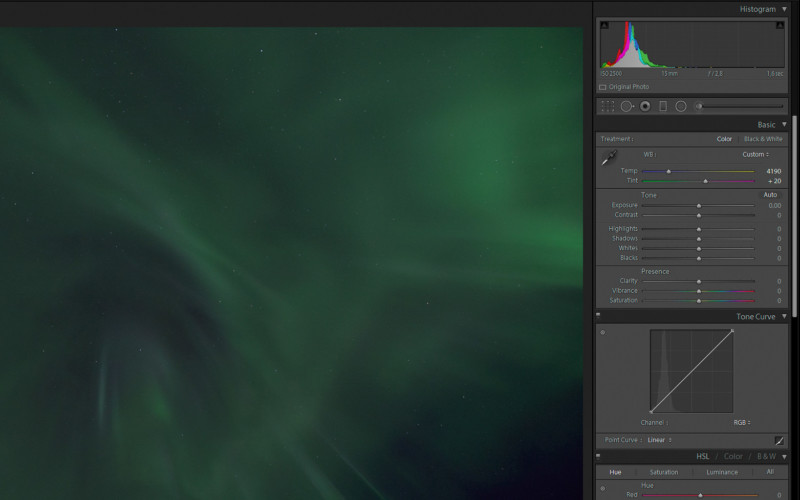
Kidding of course. This temporary increase will help to locate the point where there’s nearly as much green as magenta in the image. The aurora is almost never perfectly green, so I find it important and satisfying to extract as many shades from my shot as possible. Play around with “Temp” and “Tint” and zero “Vibrance” and “Saturation” again when you’ve found the sweet spot.
Mind the Corners before Applying Clarity
Let’s scroll down and turn on “Lens Correction” and select your lens’ profile. Oh, and put a check mark in “Remove Chromatic Aberration”. That will mostly take care of the colorful halos around stars.

Back up again to the Basic tab. Increase the overall structure of the aurora by dialing in a conservative amount of “Clarity”.
Artistic Local and Global Adjustments
Let’s get creative and emphasize the center a bit. Drag a radial filter around the part of the image that deserves the most attention and dial in the settings at Before:
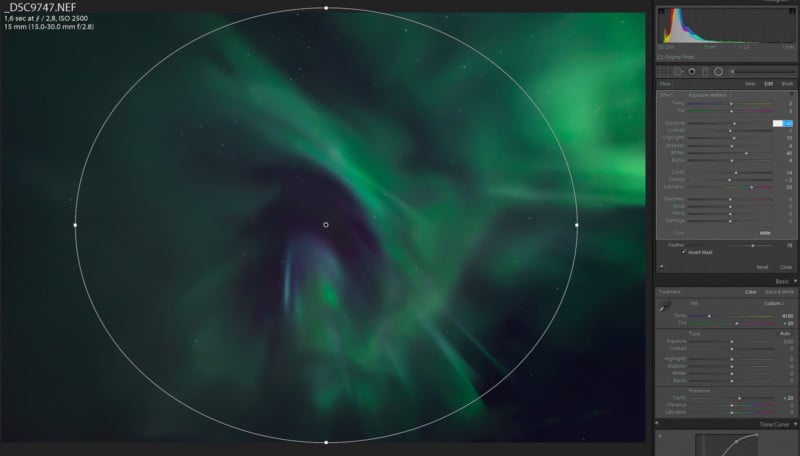
Your goal now is to separate the greens from the magentas, so close the radial filter and apply the settings at After to make the image pop. I’ve only slightly increased the hue of purple to make it more magenta while lowering aqua into the green. There are your first two of the triad color harmony. Now it’s time to pursue our third but minor color. In order to do that and a couple more enhancements, we’ll jump into Photoshop.
Making the Stars Bigger
Before I ever got into photography, I was a huge fan of so-called space art. You might know this by artist’s concepts that support a story about newly discovered exoplanets. Space art doesn’t have to be about anything though. It can as well be just a pretty picture — it’s art after all.
One of the things that I’ve picked up from that period is enlarging “hero stars”; the stars that play the lead in your image. The way we do this is by making a selection based on the brightness, or luminosity of the stars.
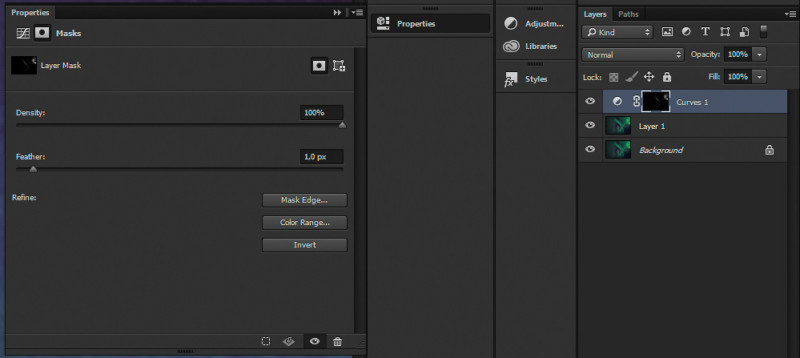
Now, I use Jimmy McIntyre’s Raya Pro to create luminosity masks, but Tony Kuyper’s TK action panel works just as well for this. I’m not going into creating luminosity masks here. Both Tony and Jimmy have excellent tutorials available for this. I’ll hit “Create All” here. And I’m looking for a luminosity mask with the best separation between the stars and the brightest parts of the aurora.
Brights 3 fits the bill well enough. With that selection load, create a new Curves adjustment layer and feather its mask 1px to make smooth transitions between the already pixelated stars. As for the curve shape, increase the midtones with a single point.
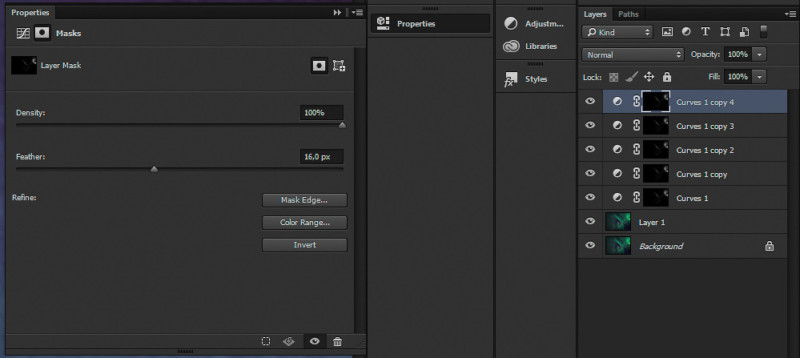
Here’s the kicker. Copy that adjustment layer 5 or 6 times, where you double the feather radius of the mask each time. The fifth layer should be feathered at 16px and a sixth at 32px.
It’s not a pretty sight. The adjustment also targets the highlights in the aurora, but to a lesser extent. Here’s how to correct this. Make those adjustment layers invisible and copy the base layer. Select the copied layer and go to Image > Adjustments > Threshold. We’re going to restrict our glow to the stars.
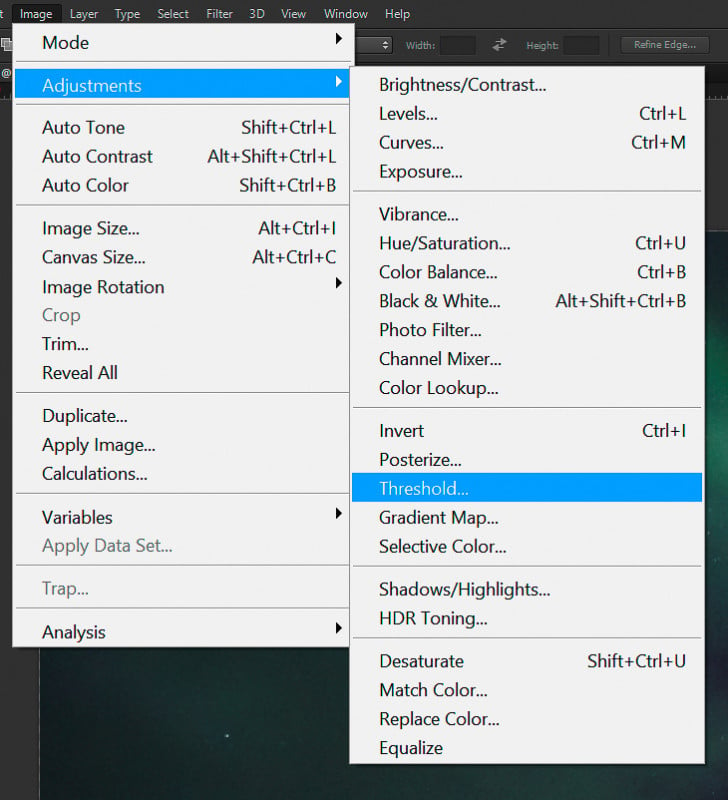
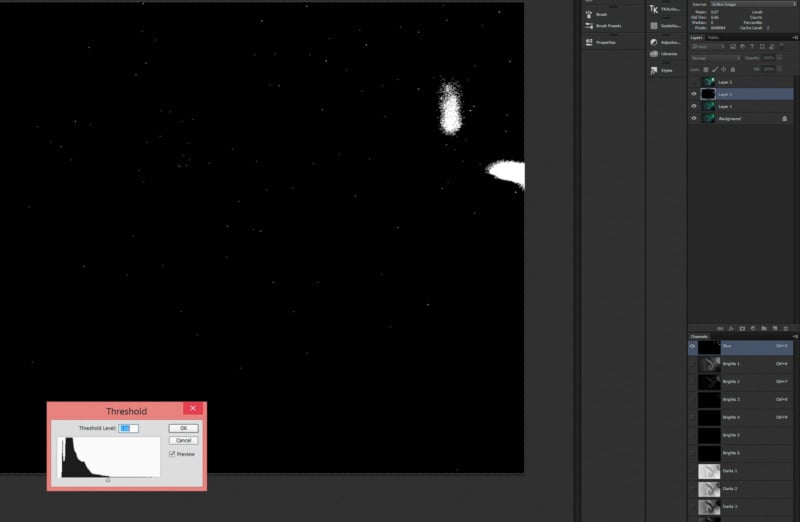
The threshold level should just about leave everything looking black. Except for a couple of white blotches. Hit ok and paint with black over the aurora highlights. We’ve created a star mask, but it has two values. Either black or white. This only targets the brightest stars of the image, so the effect we created earlier will be restricted to these “hero stars”.
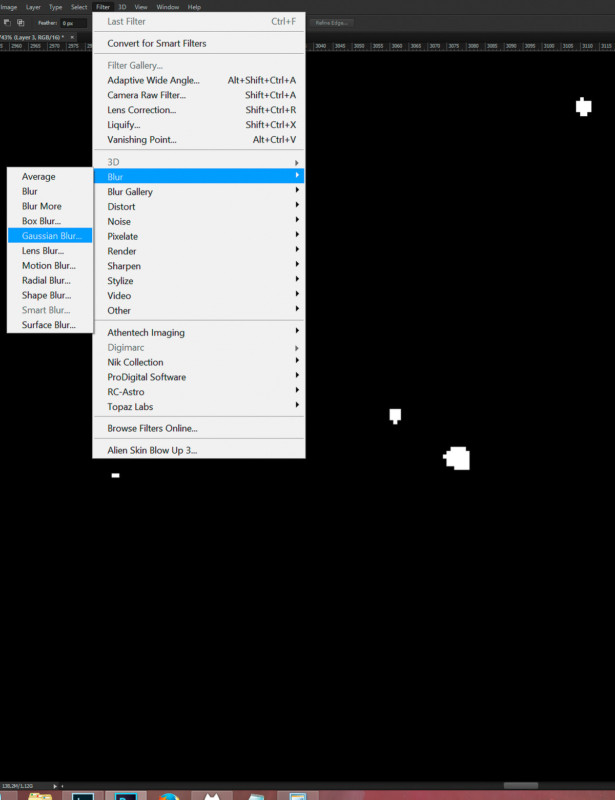
Apply a Gaussian Blur (Filter > Blur > Gaussian Blur) with a radius of around 0,6 pixels to make the stars retain their brightness falloff.

You will end up with something looking like a proper star field, but as a selection, it isn’t feathered enough. We’re going to stack 6 copies of this layer. Let me show you what I mean:
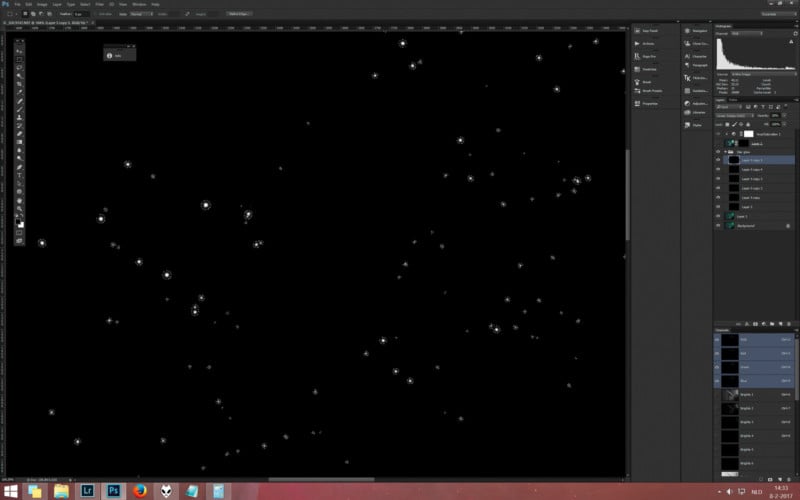
Copy the layer five times and set all the copies to the “Linear Dodge” blending mode. Average them out by setting each subsequent layer to an opacity that is one hundred divided by that layer’s position.
The original goes to 100% and the second to 50% opacity. The third and fourth go to 25 and 20%, respectively. We will leave the last layer at 20% though. Hold control (command on a Mac) and select the opacity of this stack by right-clicking the RGB thumbnail in the Channels palette. Now create a new mask on the star enhancement effect:

To enhance the color of these stars, you could apply a simple hue and saturation adjustment layer. And there’s our third color to subtly complete the triad color harmony.
Pareidolia Time
Like clouds, aurorae can be hosts of imaginary figures in the skies. From animals to ghosts, you can make anything come alive with these shots. I found there was some sort of angelic figure with forward-swept wings in my image, so I cropped in on the image to emphasize that.
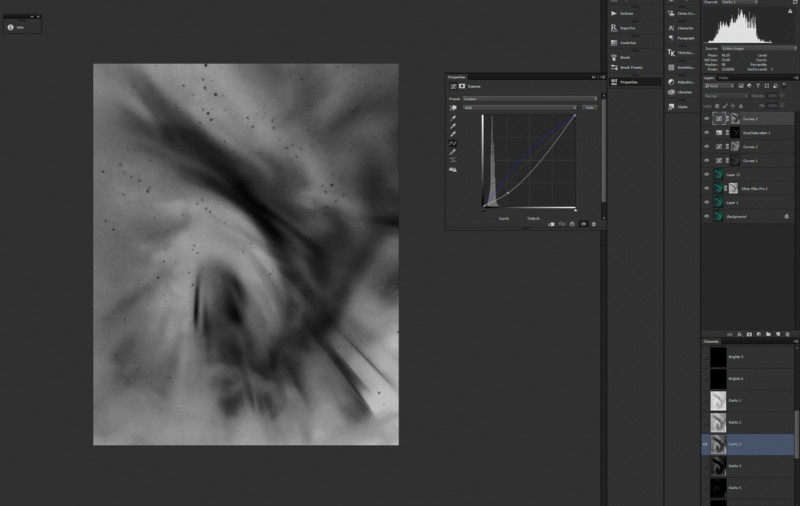
To finish it off in Photoshop, we’ll add contrast by applying an S-curve. Select the Midtones 1 luminosity mask and add a curves adjustment layer to it.
To give the image a silky smooth finish, we’ll then drop the midtones of Darks 3, while raising the blues:
Here’s the final before and after:
Before
After
Closing Words
You could go back into Lightroom and do some more adjustments before exporting it for the web, or leave it there. It’s a good amount of work, but in the end it will be worth your time. At least you will learn some new tricks from a field that’s related to astrophotography.
Personally, I love to combine the tricks of space art with a photograph as my canvas to maximize the fine-art potential of a single exposure. So this is how I go about post-processing my auroras. Hope you’ve picked up a trick or two because that will certainly help when we dive head first into editing landscape astrophotography in the near future.
About the author: Daniel Laan is a landscape photographer based in the Netherlands. In addition to being a full-time landscape shooter, Laan also teaches photography to students around the world. You can find more of his work on his website, Facebook, 500px, and Instagram.
Sources: NOAA Space Weather Prediction Centre; Dr. Vincent van Leijen; Spaceweatherlive.com
Continue reading...