RSSNewsFeeder
Member
Q. Why is it that sometimes in Lightroom, when I go to the White Balance presets menu, I get a list of a bunch of different white balance presets, and sometimes I only get two choices: Auto and Custom?
A. It’s because one time, you were looking at the White Balance presets for a RAW image, and the other was a JPEG or TIFF. You only see that longer list of preset choices when you’re working on a RAW image — if you click on the JPEG or TIFF image, you’ll only see Auto and Custom as your choices because the white balance you chose in in the camera is already assigned to JPEGs and TIFFs. That doesn’t mean you can’t use the white balance for JPEGs or TIFFs — you absolutely can — use the Tint and Temperature sliders as well as the White Balance Eyedropper tool (or choose Auto white balance from the pop-up menu). The difference is — you don’t get all those other choices like you would from a RAW image where the white balance preset isn’t already “baked in” (so to speak).
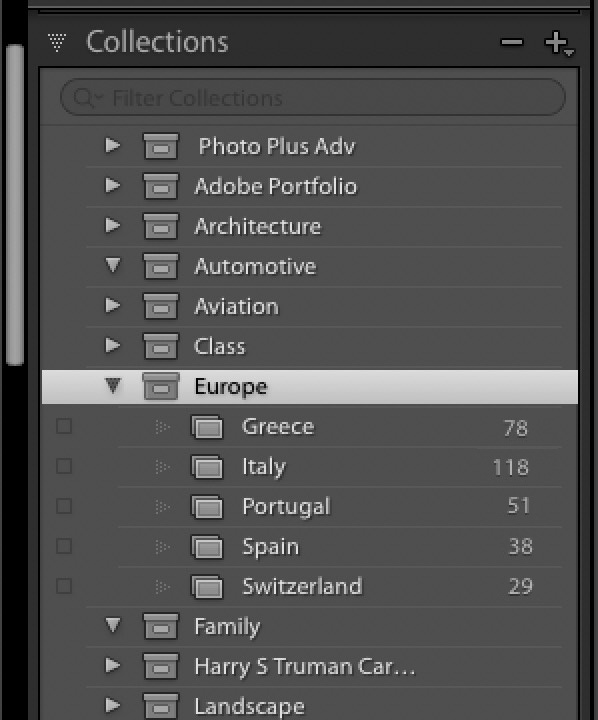
Q. I’ve been using Collections for a while now, but why would I need to use a Collection “Set?” What are they for?
A. Think of Collection sets simply as folders, just like the folders on your computer. You use folders on your computer to keep things organized, right? Same thing with Collection Sets. So, for example, if you took a vacation to Europe and wanted to keep your images from your trip organized by country, you could create a Collection Set named “Europe” and then make collections of images from all the counties you visited (for example, Spain, Portugal, Italy, Greece, and so on), and then you’d drag those into your “Europe Collection Set so they’d all be just one click away (you’d look inside your Europe Collection Set and inside you’d see Collections of all those countries). It’s just another tool for keeping your collections organized, and it’s a really handy one. Note: If you’re using Lightroom for the Cloud, these Collection Sets are called “Folders.”
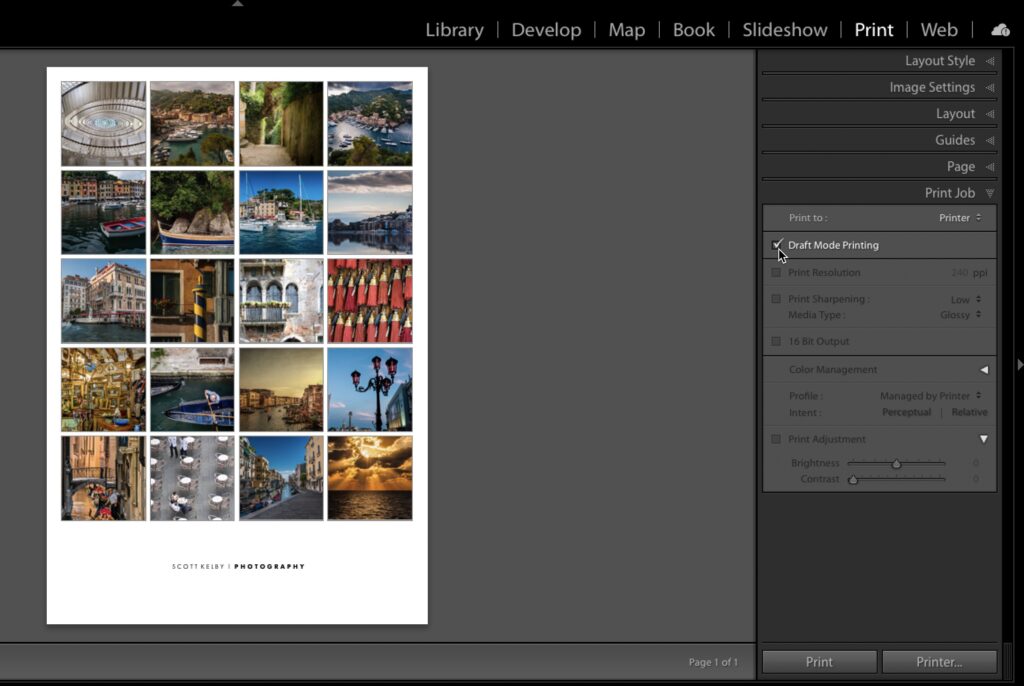
Q. Why would I ever want to turn on Draft Mode Printing?
A. For speed! Well, let me qualify that — it’s to speed up printing when you have a multi-photo layout, like a contact sheet. For example, let’s say you have a layout with five rows and six columns. Those images are going to be fairly small in size, but Lightroom will still send 30 high-resolution images to the printer to make that tiny thumbnail-size images. Turning on Draft Mode Printing sends the JPEG preview instead, and the image prints a LOT faster (and because the size of the images is so small, in most cases you can’t see any difference in quality). The only downside of using Draft Mode Printing is that it’s so fast people get hooked on it and want to use it all the time, even when they’re printing a single image, or two images, so that’s the only thing I could caution you about it — it’s easy to get hooked on, but when printing large single images you will almost certainly see a difference in quality. Just so ya know.
Q. Is there an easy way to get the images I’ve been organizing in Elements into Lightroom and keep all the albums I had intact and still have all the keywords I’ve added?
A. Absolutely, and Lightroom will pretty much do it all for you. Just go under the File menu and choose ‘Import a Photoshop Elements Catalog,” which will bring up the Import an Elements Catalog dialog box. It automatically chooses the catalog you used last in Elements (if you want it to import a different catalog, you can choose it there). Now just click the Import button, and Lightroom will take it from there. Any Albums you made in Elements appear in Lightroom’s Collections panel as Collections, and all your keywords will still be in place.

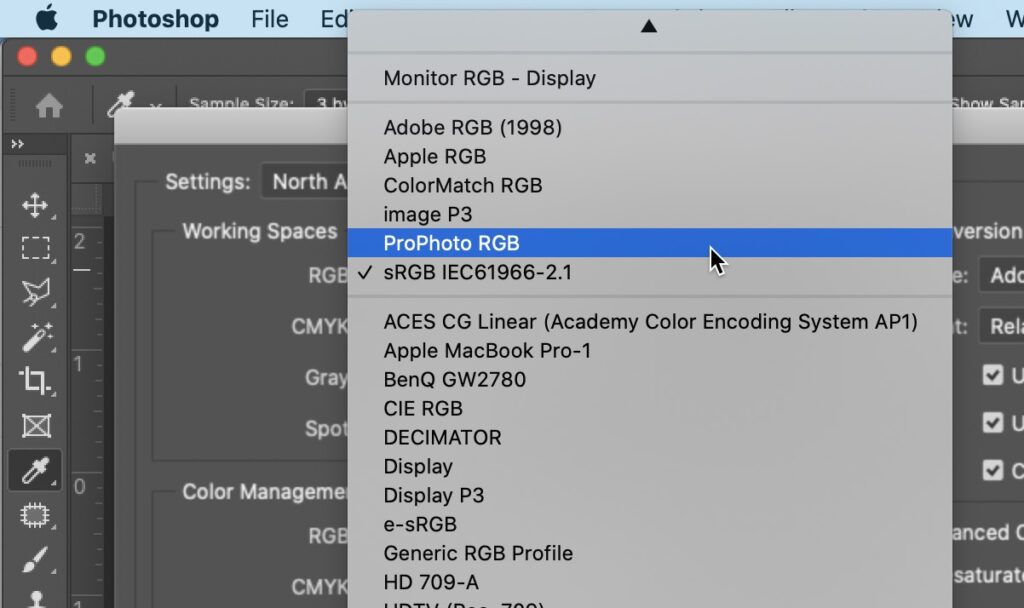
Q. Why does my image look different when I take it from Lightroom to Photoshop. The color is definitely different.
A. It’s probably because Photoshop isn’t set up to use the same color settings as Lightroom’s default color profile, which is ProPhoto RGB. To switch Photoshop to ProPhoto RGB, in Photoshop, go under the Edit menu and choose ‘Color Settings’ to bring up the Color Settings window (shown here), and then under Working Spaces, from the RGB pop-up menu, choose “ProPhoto RGB” as shown here, and then click OK. Now Lightroom and Photoshop share the same color settings, and your image color will look consistent as you move back and forth between the two programs.
Q. How come sometimes the Filter Bar appears across the top of my thumbnail grid in the Library, and sometimes it doesn’t?
A. It’s probably because you hit the “backslash” key on your keyboard at some point, and that’s how you toggle on/off that menu.
Hope you found those helpful.
I’m the guest on Steve Brazill’s awesome “Behind The Shot” Podcast
Steve had a great topic – “What to expect from a photo critique,” and we looked at the good, bad, and ugly of giving and getting photo critiques. Steve is the king of photography podcast interviews – he’s the best and it was a really fun, lively, and certainly sometimes controversial talk. Here’s where to check it out:
Behind the Shot Website: https://behindtheshot.tv/2023/07/13/what-to-expect-from-a-photo-critique/
YouTube:
Apple Podcasts – Video: https://itunesvideo.behindtheshot.tv
Apple Podcasts – Audio Only: https://itunesaudio.behindtheshot.tv
Google Podcasts: https://googlepodcasts.behindtheshot.tv
Spotify: https://spotify.behindtheshot.tv
Hope you get a chance to check it out (and thanks to Steve for having me on his show).
Have a great weekend, everybody.

-Scott
The post Lightroom Q&A Day appeared first on Lightroom Killer Tips.
Continue reading...
A. It’s because one time, you were looking at the White Balance presets for a RAW image, and the other was a JPEG or TIFF. You only see that longer list of preset choices when you’re working on a RAW image — if you click on the JPEG or TIFF image, you’ll only see Auto and Custom as your choices because the white balance you chose in in the camera is already assigned to JPEGs and TIFFs. That doesn’t mean you can’t use the white balance for JPEGs or TIFFs — you absolutely can — use the Tint and Temperature sliders as well as the White Balance Eyedropper tool (or choose Auto white balance from the pop-up menu). The difference is — you don’t get all those other choices like you would from a RAW image where the white balance preset isn’t already “baked in” (so to speak).
Q. I’ve been using Collections for a while now, but why would I need to use a Collection “Set?” What are they for?
A. Think of Collection sets simply as folders, just like the folders on your computer. You use folders on your computer to keep things organized, right? Same thing with Collection Sets. So, for example, if you took a vacation to Europe and wanted to keep your images from your trip organized by country, you could create a Collection Set named “Europe” and then make collections of images from all the counties you visited (for example, Spain, Portugal, Italy, Greece, and so on), and then you’d drag those into your “Europe Collection Set so they’d all be just one click away (you’d look inside your Europe Collection Set and inside you’d see Collections of all those countries). It’s just another tool for keeping your collections organized, and it’s a really handy one. Note: If you’re using Lightroom for the Cloud, these Collection Sets are called “Folders.”
Q. Why would I ever want to turn on Draft Mode Printing?
A. For speed! Well, let me qualify that — it’s to speed up printing when you have a multi-photo layout, like a contact sheet. For example, let’s say you have a layout with five rows and six columns. Those images are going to be fairly small in size, but Lightroom will still send 30 high-resolution images to the printer to make that tiny thumbnail-size images. Turning on Draft Mode Printing sends the JPEG preview instead, and the image prints a LOT faster (and because the size of the images is so small, in most cases you can’t see any difference in quality). The only downside of using Draft Mode Printing is that it’s so fast people get hooked on it and want to use it all the time, even when they’re printing a single image, or two images, so that’s the only thing I could caution you about it — it’s easy to get hooked on, but when printing large single images you will almost certainly see a difference in quality. Just so ya know.
Q. Is there an easy way to get the images I’ve been organizing in Elements into Lightroom and keep all the albums I had intact and still have all the keywords I’ve added?
A. Absolutely, and Lightroom will pretty much do it all for you. Just go under the File menu and choose ‘Import a Photoshop Elements Catalog,” which will bring up the Import an Elements Catalog dialog box. It automatically chooses the catalog you used last in Elements (if you want it to import a different catalog, you can choose it there). Now just click the Import button, and Lightroom will take it from there. Any Albums you made in Elements appear in Lightroom’s Collections panel as Collections, and all your keywords will still be in place.
Q. Why does my image look different when I take it from Lightroom to Photoshop. The color is definitely different.
A. It’s probably because Photoshop isn’t set up to use the same color settings as Lightroom’s default color profile, which is ProPhoto RGB. To switch Photoshop to ProPhoto RGB, in Photoshop, go under the Edit menu and choose ‘Color Settings’ to bring up the Color Settings window (shown here), and then under Working Spaces, from the RGB pop-up menu, choose “ProPhoto RGB” as shown here, and then click OK. Now Lightroom and Photoshop share the same color settings, and your image color will look consistent as you move back and forth between the two programs.
Q. How come sometimes the Filter Bar appears across the top of my thumbnail grid in the Library, and sometimes it doesn’t?
A. It’s probably because you hit the “backslash” key on your keyboard at some point, and that’s how you toggle on/off that menu.
Hope you found those helpful.
I’m the guest on Steve Brazill’s awesome “Behind The Shot” Podcast
Steve had a great topic – “What to expect from a photo critique,” and we looked at the good, bad, and ugly of giving and getting photo critiques. Steve is the king of photography podcast interviews – he’s the best and it was a really fun, lively, and certainly sometimes controversial talk. Here’s where to check it out:
Behind the Shot Website: https://behindtheshot.tv/2023/07/13/what-to-expect-from-a-photo-critique/
YouTube:
Apple Podcasts – Video: https://itunesvideo.behindtheshot.tv
Apple Podcasts – Audio Only: https://itunesaudio.behindtheshot.tv
Google Podcasts: https://googlepodcasts.behindtheshot.tv
Spotify: https://spotify.behindtheshot.tv
Hope you get a chance to check it out (and thanks to Steve for having me on his show).
Have a great weekend, everybody.
-Scott
The post Lightroom Q&A Day appeared first on Lightroom Killer Tips.
Continue reading...