Lightroom 6 / CC HDR and Panorama test


thoongeng

Senior Member
Jan 26, 2010
1,531
65
48
First time doing a review so apologies for any mistakes in advance hehe, just point out to me I'll fix it :)

I was quite interested in Lightroom CC's new merge to HDR and panorama features, because previously doing these mean I have use other programs to achieve them. So I downloaded the trial version to test them out.

Here is the final result, after some Basic panel adjustments and cropping, everything done within Lightroom:


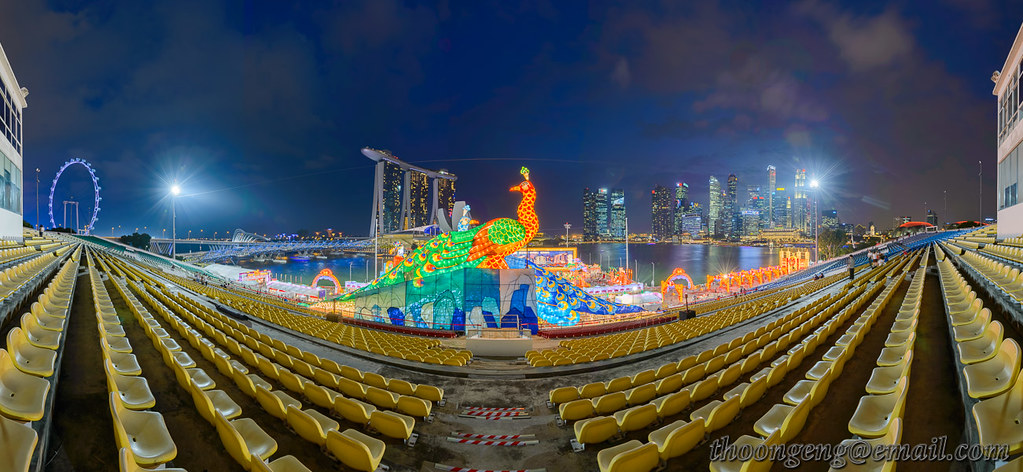
This was a panorama from 5 vertical frames, each frame of 3 exposures 3 stops apart, taken on tripod with a panoramic head. This was one of the frames with the 3 exposures (normal exposure, exposure -3 and exposure -6 stops):

20150225-03_Float_Marina_Bay_Seating_Gallery_with_River_Hongbao_panorama_D600_8779.jpg
20150225-03_Float_Marina_Bay_Seating_Gallery_with_River_Hongbao_panorama_D600_8777.jpg
20150225-03_Float_Marina_Bay_Seating_Gallery_with_River_Hongbao_panorama_D600_8778.jpg


I used the 'Photo Merge > HDR' on the 3 exposures for each frame first, which generates a 16bit floating point DNG file. After the 5 files were generated, I selected them and used the 'Photo Merge > Panorama' to do the stitching.

My source files were DNG RAW files generated from the original 24 megapixel RAW files (my usual workflow to save space), initial file sizes were around 8-15 megabytes. Each HDR DNG generated were around 88 megabytes. Interestingly the HDR Panorama DNG file generated was also around 88 megabytes, even though it was a 10514x6227 pixels image.
 

  • Like
Reactions: catchlights
Great review! I am looking forward to tge upgrade!
 

Thanks moderators for dropping by and approving my review :)

I wanted to include some more images, but hit the max limit in the first post. However seems like there is some problem displaying the images I uploaded so have to upload again in the evening ;p
 

Below are some 100% crops for closer inspection

Panorama
On closer inspection, there were only minor stitching errors in the foreground seats, quite similar results to Photoshop's merge to Panorama function. Photoshop's advantage is that you can toggle each layer on-off to easily check for stitching errors and make edits. For Lightroom CC you can't do any editing if there are stitching errors (as by design Lightroom does not work at the pixel level unlike Photoshop). That said, obvious lines in the foreground always give panorama stitching programs a headache, despite using a panoramic head (or maybe it's just me who can't configure my panoramic head properly)

20150225-03_Float_Marina_Bay_Seating_Gallery_with_River_Hongbao_panorama_D600_8780-HDR-Pano.jpg


HDR
The HDR feature produces more 'realistic' HDR results and there are not many options in the dialog, so if you are looking to generate those 'surrealistic' results you will need to look elsewhere. I feel the results are quite good, as you can see here it handled the difficult blown building highlights quite well, compared to the original normal exposure below it:
20150225-03_Float_Marina_Bay_Seating_Gallery_with_River_Hongbao_panorama_D600_8780-HDR-Pano-4.jpg


20150225-03_Float_Marina_Bay_Seating_Gallery_with_River_Hongbao_panorama_D600_8779_Copy.jpg


It is not flawless though, as you can see a bit of halo-ing around some really difficult outlines of the signs above, and around the peacock here:
20150225-03_Float_Marina_Bay_Seating_Gallery_with_River_Hongbao_panorama_D600_8780-HDR-Pano-3.jpg


It should work much better for normal landscapes and less demanding scenes. When the HDR DNG is generated the Exposure slider in the Basic Panel now expands to +10 and -10 stops.

Conclusion
The HDR and Panorama features are useful additions, especially if you want to only use Lightroom as the sole program to do your editing and post your images on the web. My opinion is that the HDR and Panorama functions are satisfactory, at web viewing sizes can hardly notice any stitching errors or digital artifacts that are commonly encountered in automatic HDR tone-mapping programs. For flawless results you still have to use pixel level editing programs like Photoshop or GIMP etc ;)
 

To me, the main pro seems to be that you're still able to make raw adjustments after stitching. For previous versions of LR, when sending the task to be done via photoshop, you end up with a tif, so your raw adjustments have to be done before stitching.
 

Hmm actually after stitching and saving in Photoshop, can still import back to Lightroom for the adjustments.

Previously I also tried using Photoshop's Merge to HDR function then save the file as 32 bit TIFF (or was it PSD?), then import back to Lightroom to do adjustments, and the Exposure slider was also +- 10 stops.

However the DNG files generated by Lightroom are much smaller sized than the TIFF/PSDs generated by Photoshop, I wonder why Photoshop can't save it's output to something as efficient hehe
 

Hmm actually after stitching and saving in Photoshop, can still import back to Lightroom for the adjustments.

Previously I also tried using Photoshop's Merge to HDR function then save the file as 32 bit TIFF (or was it PSD?), then import back to Lightroom to do adjustments, and the Exposure slider was also +- 10 stops

With LR 5, after PS has stitched the image, just save the file before closing and it is automatically imported into LR for adjustments. What I meant was that the kind of adjustments you can do with tiff is different from raw. Less latitude with WB change, or highlight recovery, etc.

Also, doesn't the exposure slider have the same scale/range regardless of file type? Wasn't aware that it changed for different file types.

Hmm when I normally stitch or manually blend an image in Photoshop and save it as a 16bit PSD file, I can still change the White Balance slider without obvious artifacts as compared to the original RAW file (usually don't do highlight recovery as I would have done it in PS). I feel there shouldn't be much difference in adjustment latitude, as RAW files from the camera are usually 14bit/channel files, when they are brought to Photoshop and converted to 16bit/channel files theoretically the resultant file should contain all the data from the RAW file. Unless it was converted to 8bit/channel in Photoshop.

One thing you can't do after stitching in PS is you can't apply the camera/lens correction profiles. If the stitch by Lightroom is without stitching errors, the file size savings are quite significant, for this image the DNG was 88 megabytes, my usual panoramas are 300-400 megabytes ;p

The Exposure slider in Lightroom is usually +-5 stops, however it will be +-10 stops for 32bit/channel TIFF/PSD files or the HDR DNG generated by Lightroom :)
 

Last edited:
Interesting, thanks for clarifying! Will try saving to PSDs and see if the auto import still works :)

No problem just sharing what I know :)

I went back to check, after generating the 32-bit HDR file in Photoshop, need to save in TIFF for Lightroom to recognize. Unfortunately if save as 32-bit PSD Lightroom can't recognize.