
You don’t often see photographers using gels outdoors in natural light, but why? I think one of the core reasons you don’t see too many natural light gel shots, is that you need a lot of power and control from your lights to make gels visible in daylight.
Whenever we’re outside during the daytime, sunlight has a tendency to creep in everywhere. Even when we’re standing in heavy shadow, there’s still a lot of light on us as the sun bounces around almost endlessly and sneaks into even the most shadowy areas. This is an issue for gels as bright, strong daylight will overpower and ruin a gel shot instantly, making the desired shot significantly harder to achieve over simply setting it up indoors.
Why is sunlight an issue with gels? If we really want to use gels outdoors, are there any elements we should be aware of? One of the key tenants I teach about gels is to always try and apply a gel to a shadow. The reason for this is to ensure rich, clean colors and you can only really achieve this if there’s not already light falling where you want to add them. If you’re going to use gels outdoors, try and only do so in the shadows.
What about the best time and place to use gels outdoors? The reason I’m making this point about gels, shadows, and daylight is so that I can prepare you for the best scenario to use gels in your shots outdoors. Yes, you can use gels outdoors in natural light, but for best results, try and use them in shadowy areas or better yet, after the sun has almost gone down.
The Setup
Now that I’ve primed you with a little knowledge about gels and daylight, let me now explain the lighting setup I used here. Hopefully, some of the decisions I made about when and where to do this shoot will now make a little more sense to you as I explain it.
Timing
On the day of the shoot, we’d actually already been shooting all day prior to this setup, but by the time it got to about 4 or 5 o’clock, I thought it would be a good time to try and get some shots with the gels outdoors. The sun had dropped low in the sky and there was no direct sunlight anywhere in the area where I wanted to shoot. On top of that, I also decided to shoot under some trees and this further reduced the amount of ambient light in the shot.
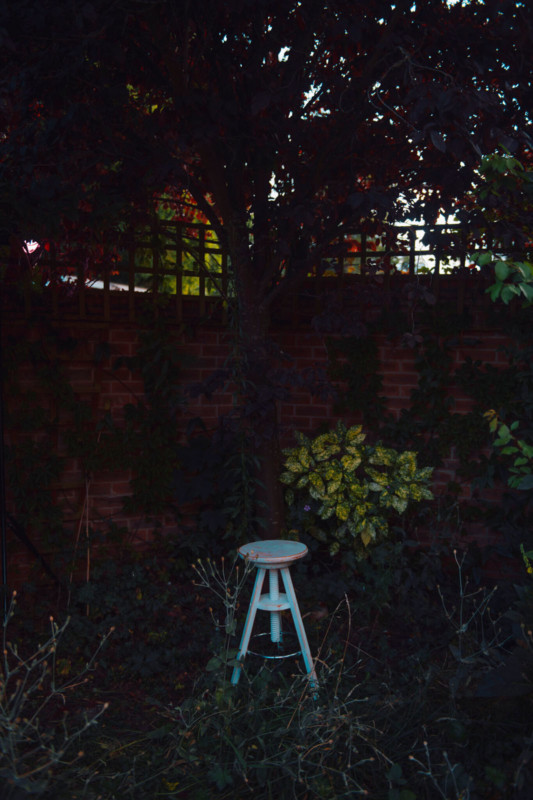
Here’s my ‘baseline’ shot as I adjust my camera around the daylight. I have limited the amount of light falling in the foreground so that my gel colours will be strong, but the daylight is still easily poking through the trees and leaves.
Getting Your Baseline
Whenever you start to set up a multi-light shot, what light do you set up first? For me, and I advise this on both indoor and outdoor shoots, I always recommend you start with the light you can’t control. In this setup, the one light I can’t control is the sun. Consequently, I need to adjust my camera around that.
If you were indoors and there was a tungsten bulb lighting a part of your scene, the same would apply here. You can’t (ordinarily) adjust the power of that bulb, whereas you can adjust the power of your strobes. If that’s the case, you set your camera up around the power of that tungsten light first.
For this scene, I wanted it as dark as possible where I was going to be shinning my gels, but I also wanted the glow of sunlight to come through at the top of the frame to silhouette the trees, leaves, and trellis.
Why Not Just Shoot it at Night?
One thing you may be thinking is, “Wouldn’t this just be easier to do at night?”. Yes, shooting this at night would mean you wouldn’t have to worry about daylight ruining your gels, but try to imagine the shots I’ve taken here with zero daylight. The top of the frame would be extremely dark and we’d lose all of the beautiful elements where daylight is still creeping through the leaves. This shot at night would be vastly different and I personally feel it would lose a lot of impact.
My baseline camera settings were: ISO 100, f/2.8, and 1/250th.
The fast shutter speed allowed me to limit a huge amount of daylight out of the areas I didn’t want it and this allows me to add gels to those shadows later on. I didn’t want to eliminate all of the daylight though, and I still had a little fill in the foreground as well as enough daylight poking through the trees to provide some nice silhouettes and interest in the top of the frame too.
A Note on HSS: I just want to quickly mention HSS (High-Speed Sync) as I know someone will ask. If you’re not aware, HSS allows you to shoot at very fast shutter speeds and still sync with your flash. This is a feature on many modern flash units and it’s great if you like shooting with strobe outside in the daylight. For this shot, I am not using HSS as the 1/250th shutter speed is still slow enough that I am able to sync to my camera without it. The reason I mention it is so that you don’t think a shot like this is only possible with HSS. Most strobes or even speedlights, new and old, will be able to achieve this setup.
Placing the Lights
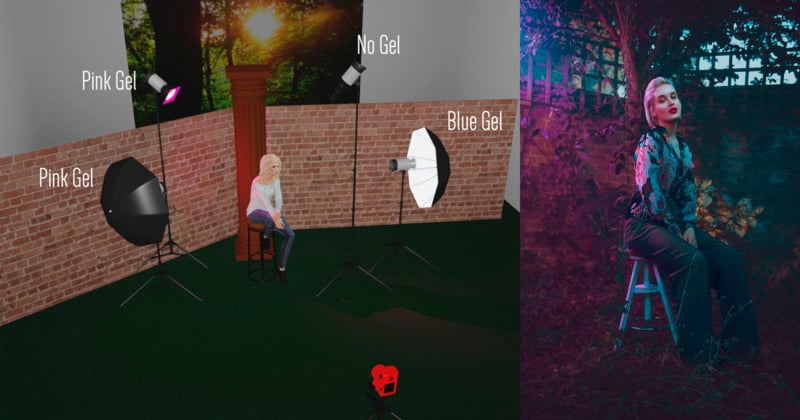
This may seem obvious, but for gels to really work and stand out in a shot like this, they need to be shone onto a surface (the bigger the better) for the color to show up. In this shot, I’m going to be using a brick wall behind my subject to shine my gels onto, this will then make the subject stand out against it. Next, I’ll shine an opposing color from the other side (camera-right) to shine onto my subject which will then further increase the separation between subject and background with color contrast. Next, I’ll add a hair light of the same gel color on camera-left and then I’ll finish it off by adding a white key-light to the subject’s face.
A Lighting Setup

Here’s the lighting setup (just imagine this is outside).
As I mentioned above, I’m casting that pink gel across the back of the shot so that the subject stands out against it. I’m then further enhancing that pink gel in shot by adding a gridded dish up high and to camera left as a hair light. This just helps to add more shape to the subject, whilst still keeping it in line with the colors on that side of the shot.
Here’s the setup prior to the model arriving:

Remember: there are two pink lights to camera-left and one blue light to camera-right.
Lastly, be sure to pay close attention to how much ambient light (daylight) we have in the foreground as fill.
Note: There is also supplemental atmosphere here and I will discuss that further in a bit.
Lighting Modifiers
This setup has a lot of flexibility in terms of what modifiers you can use. It’s a four-light setup and in basic terms, it’s essentially just two soft lights and two hard lights. Here are the modifiers I was using, but you can mix and match them with other hard and soft modifiers as you see fit.
Gelled Edge Lights (x2): Large Umbrella
I’m using a couple of large umbrellas here, but you could just as easily use two big softboxes if that’s what you have. The important thing to remember here is that you want modifiers that will throw the colored light over a wide area.
Hair Light: Gridded Dish
This is one of our ‘hard lights’ and I’m using this grid because I want to focus the light into a small area, namely the edge and top of the model’s head and hair. Again, you can use a variety of things here, I’m using a dish and grid, but you could also use a barn-doors or snoot to do the same thing.
White Key-Light: Optical Snoot
The only non-gelled light in the shot is our key light. For this setup, I’ve placed it up nice and high and angled it down so as to only shine light onto her and not the background. To make this work, you really need a directional hard-light again. I used one of my favorite modifiers, the ‘Optical Snoot’, but you could use another grid or snoot to similar effect. The main reason I used my optical snoot here though, is simply because it gives me so much control. This modifier not only gives me a very small pool of light, but it’s also a very clean pool of light with a consistent exposure from edge to edge. If this modifier is new to you, take a look at my review of it to learn why it’s one of my favorite modifiers I own.
Artificial Atmosphere
The final touch to this setup is going to be the addition of artificial atmosphere and to do so I’ll be using a haze machine. When adding elements like smoke or haze, subtly is key as you don’t want to overpower the subject, but you just want to add a little extra visual depth to the scene. Take a look below at the two side-by-side shots. The one on the left has no haze in shot and the one on the right has the haze present. Subtle, but you definitely notice it when it’s not there.
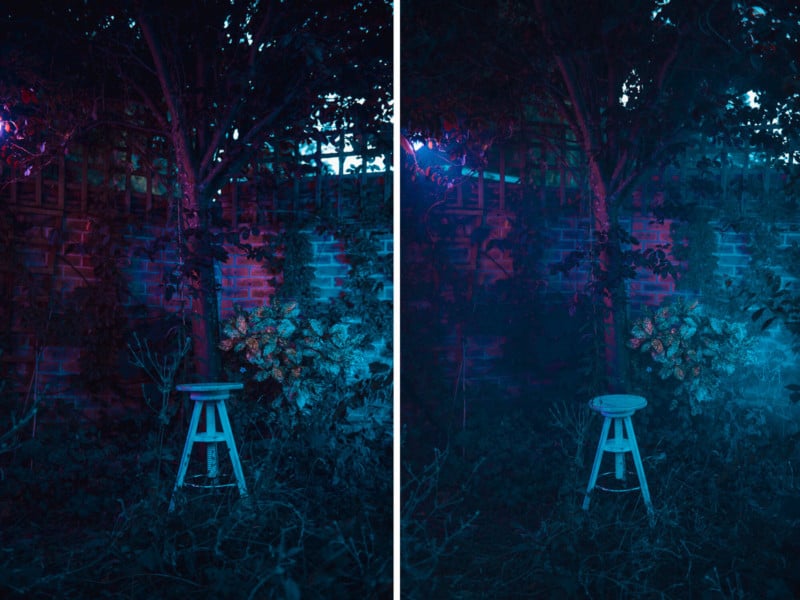
As you can see above, you don’t need a lot of haze to get the desired effect, but adding haze like this also has an additional benefit and that’s a little extra detail to the shadows. Look at how much data we have in our shadows now that the haze diffuses the light that passes through it. In contrasty scenes like this, that little bit of haze can make all the difference.
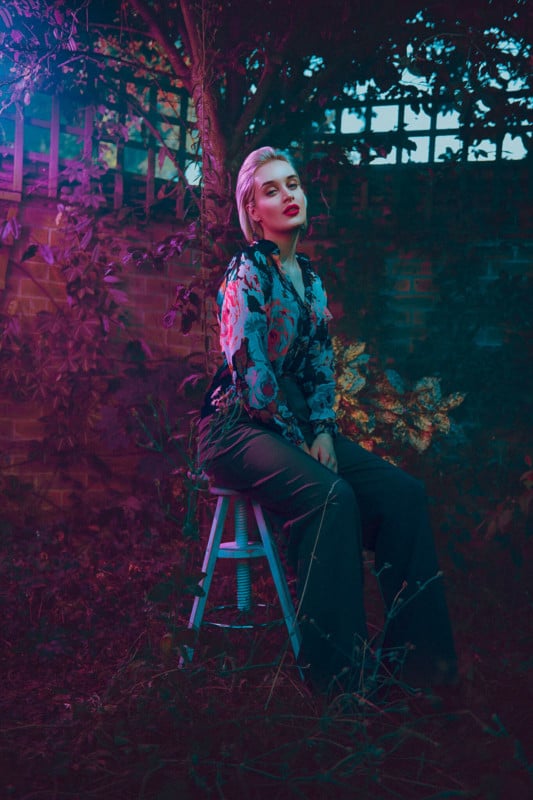
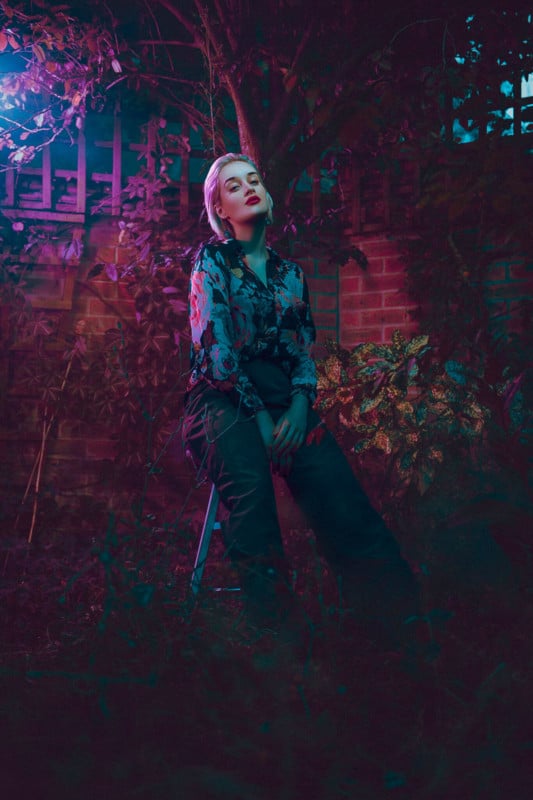
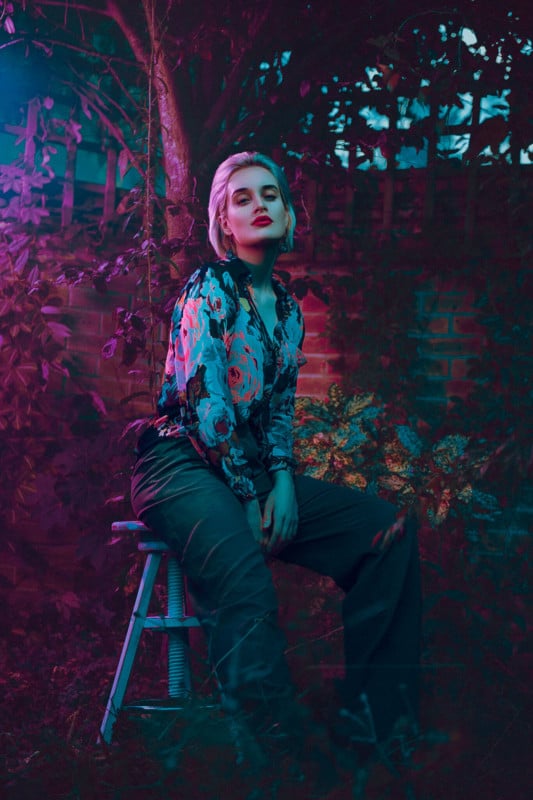
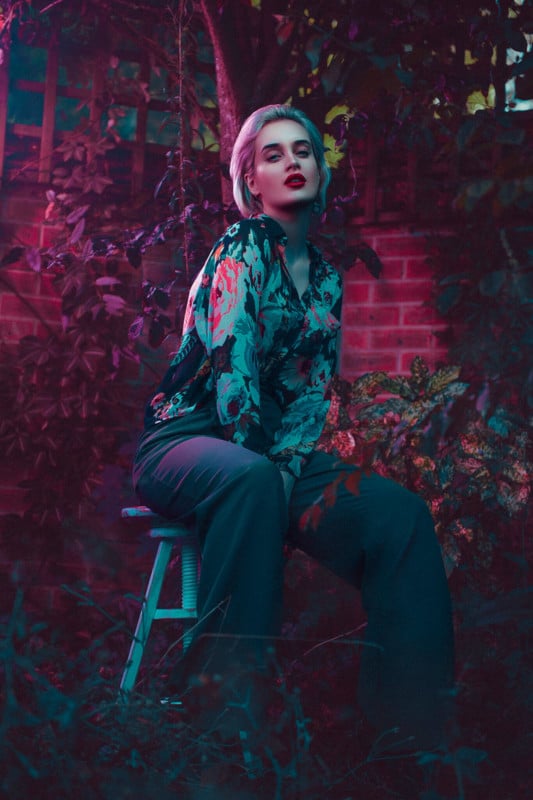
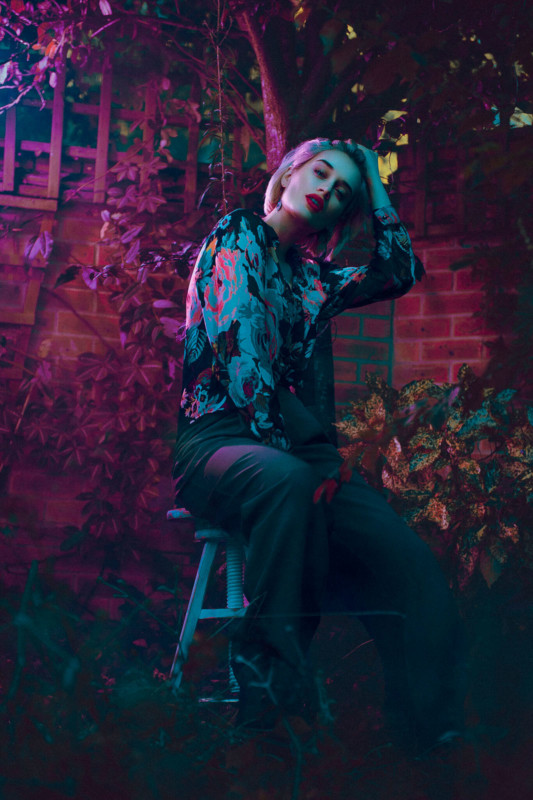
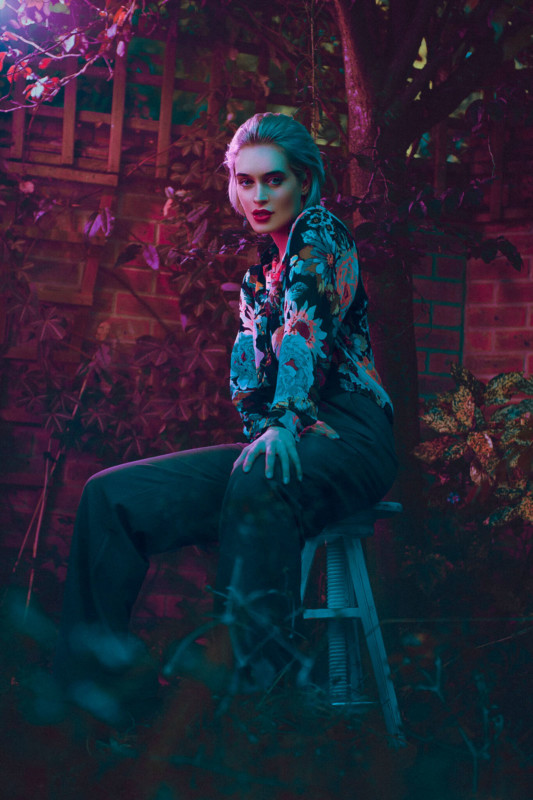
The Final Shots
Once everything is finally in place and roughly adjusted, it’s time to bring the model (Isabella Besque) in and fine-tune everything. Here’s how the final shots turned out.
Key Points to Remember
This is not a difficult setup to shoot, especially if you remember a few key points whilst you’re getting everything into position.
1. Get your baseline exposure first. Remember your baseline is the one light you can’t adjust and in this case, it’s the daylight. Make sure you limit the daylight where you’ll be shining the gels, but ensure you have enough to allow it to act as a global fill.
2. Have something to shine your gels onto. Again, I appreciate this may seem obvious, but having something behind the subject to shine the gels onto will allow you to easily create color separation between the subject and background.
3. Control your key-light. The key light here is that very directional white light on the face. To ensure the gels are not ruined by that, you must ensure you keep as much of that light on the model’s face and nowhere else. The very directional optical snoot is great for this purpose.
4. Think about depth. For many of us studio shooters, myself included, we can often forget about foreground depth as well as background depth. Consider getting low and allowing outside elements to interact with the foreground of your shot to draw the viewer in.
5. Maximize the atmosphere. We have a lot going on here in terms of depth and lighting. Adding some haze to the scene will further enhance that depth as light passes through it to not only add interest but to lighten those dark shadows too.
Thanks for checking out this article and spending a little bit of your day with me here. I hope you found it useful and if you left with a little more knowledge than when you arrived, it’s been worth it.
About the author: Jake Hicks is an editorial and fashion photographer based in Reading, UK. He specializes in keeping the skill in the camera and not just on the screen. If you’d like to learn more about his incredibly popular gelled lighting and post-pro techniques, visit this link for more info. You can find more of his work and writing on his website, Facebook, 500px, Instagram, Twitter, and Flickr. This article was also published here.
Continue reading...