
This process is super quick and easy, and you can do it in either Lightroom Classic or the ‘cloud’ version. Here’s how to do it.
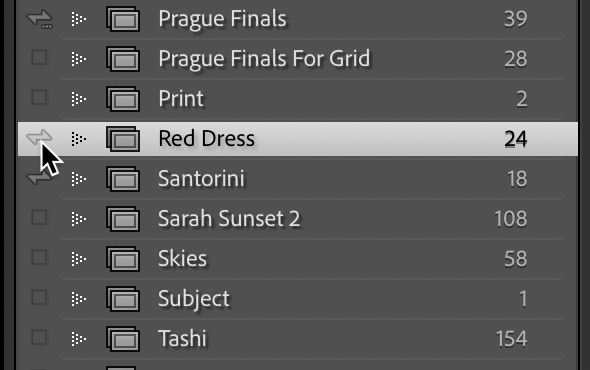
STEP ONE: This step is only for Classic users (cloud users skip this step). First, turn on Syncing if it’s not already turned on (click the cloud icon up in the top right corner of Lightroom Classic’s window), and then go to the Collections panel, to the collection you want your client to be able to choose images from and click the checkbox that appears to the left of it (as shown here). A “Sync” symbol (seen here) will appear, letting you know this album is being synced. By the way – you’ll only see this checkbox appear once syncing is turned on.
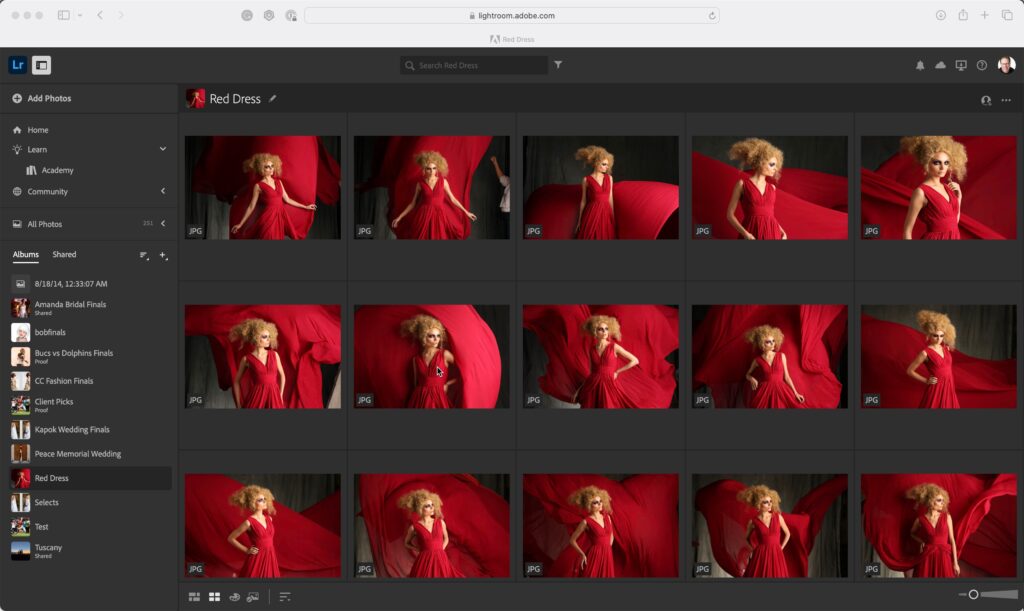
STEP TWO: Now, in your Web Browser (here, I’m using Safari), go to lightroom.adobe.com and log in with your Adobe user ID and password (the same user ID and password you use for your Lightroom photography bundle account). You’ll see the album you just chose to sync right in the collection of Albums on the left side. Click on it, and it will display the images inside (as seen here).

STEP THREE: Go to the bottom left corner of the window, right under your thumbnails, and click on the “Proofing” button (as shown here). It’s the fourth icon from the left.
NOTE: If you don’t see this proofing button, click on the little round icon for your Account up in the very top right corner of the screen, and from the pop-down menu that appears, click on “Technology Previews” and turn on the checkbox to “Enable Technology Previews.” Now that button will appear.
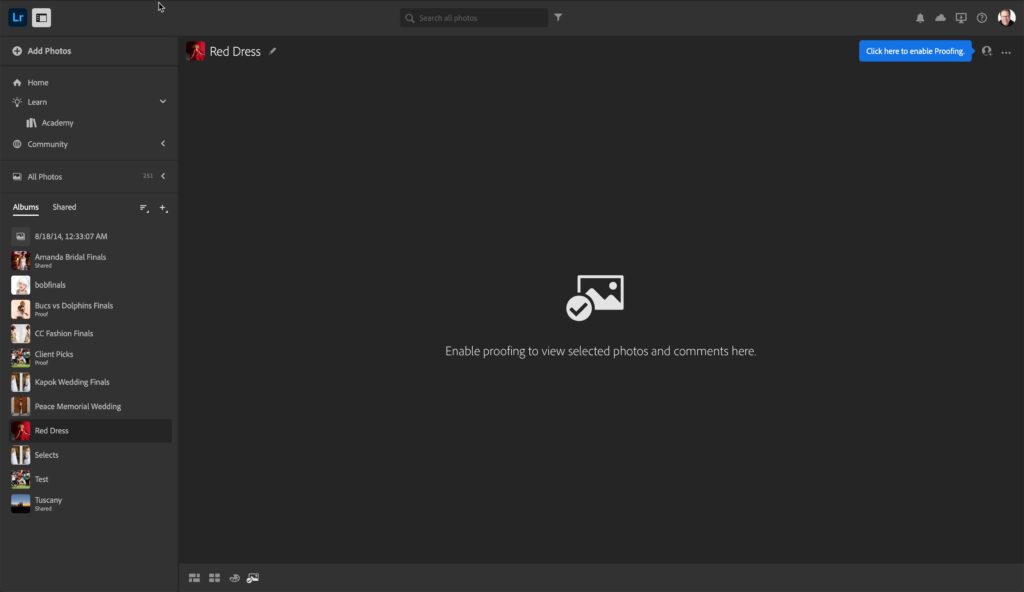
STEP FOUR: The first time you do this, it brings up an empty window, but up in the top right, it prompts you to turn on Proofing (as shown above in blue), so click where it shows you to.
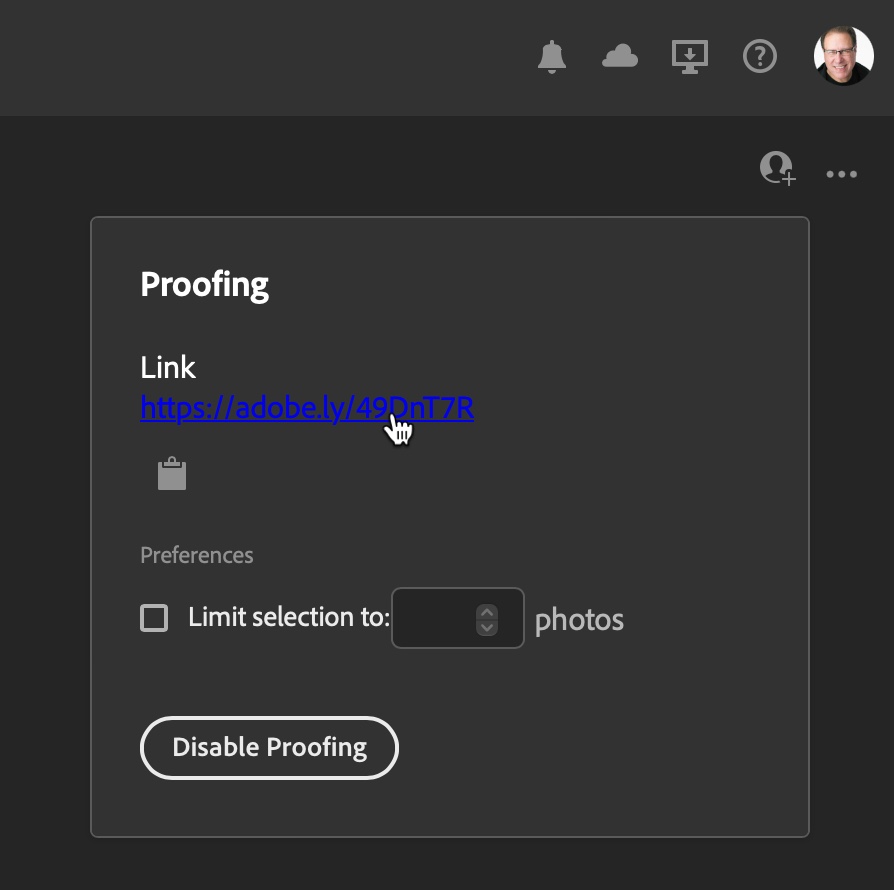
STEP FIVE: A little pop-down window will appear with a custom link that leads just to this gallery of proofing images. Click on the clipboard icon to copy this link into memory (this is the link you’re going to email to text message your client so they can see this gallery too).
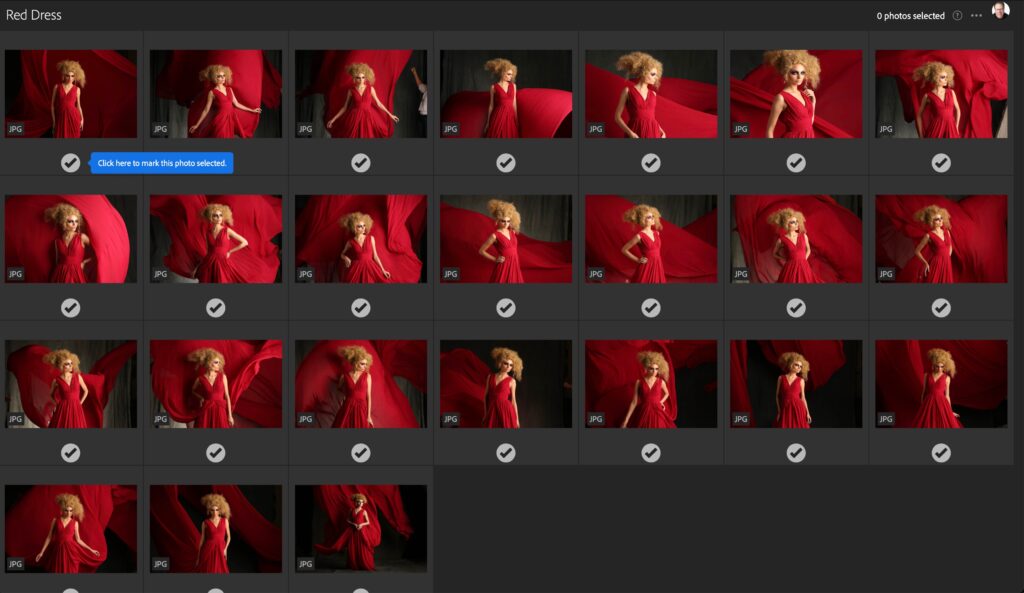
STEP SIX: When your client clicks this link it will take them a screen that looks the one above, with checkmarks below each image and the instruction (in blue) to click on the checkbox below any images they want to select.
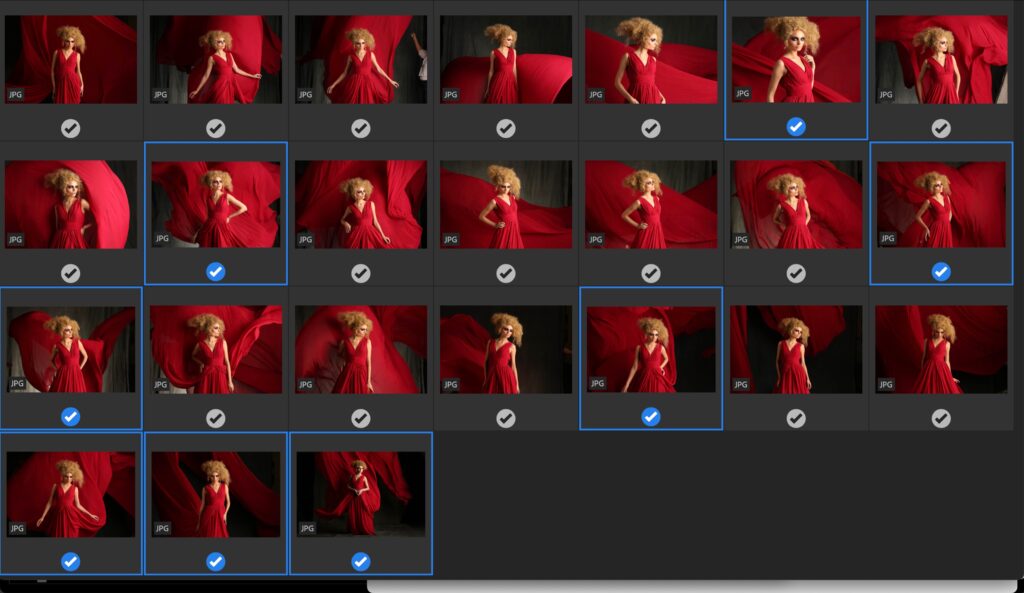
STEP SEVEN: When they click one of those checkboxes, it highlights the checkmark in blue and puts a blue outline around the thumbnail (as seen above).
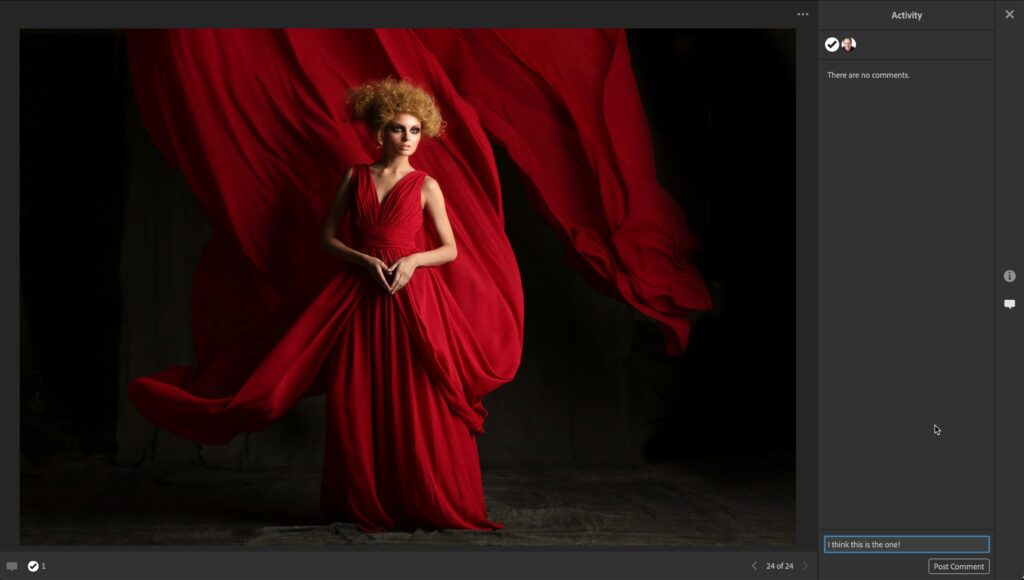
STEP EIGHT: If your client double-clicks on any image, they will see the image larger (as shown here), and they can leave you a comment in the comment field at the bottom (as shown here). When they hit the return key, it adds that comment to this photo, which you can see.
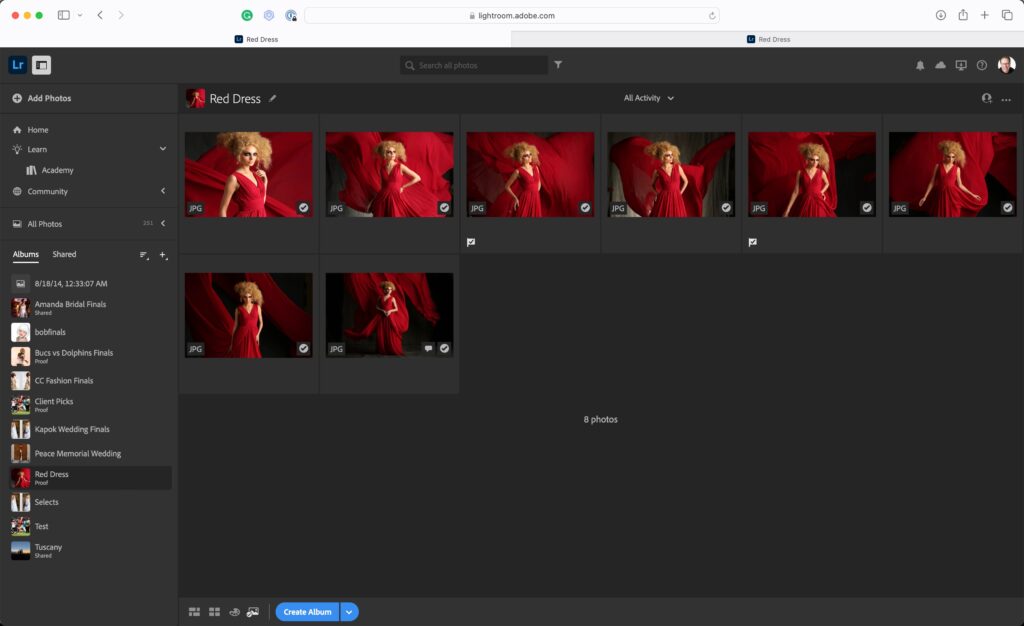
STEP NINE: OK, now back to you. To see which images your client chose, just refresh that Web page, and now only the images they selected will appear here. Any image they commented on will have a comment icon attached to the thumbnail – just double-click on it to see the comment and/or respond back to the client’s comments.
That is all there is to it (pretty slick, right?).
Have a great Monday, everybody.

-Scott
The post How To Let Your Client Proof Images in a Lightroom Collection appeared first on Lightroom Killer Tips.
Continue reading...
STEP ONE: This step is only for Classic users (cloud users skip this step). First, turn on Syncing if it’s not already turned on (click the cloud icon up in the top right corner of Lightroom Classic’s window), and then go to the Collections panel, to the collection you want your client to be able to choose images from and click the checkbox that appears to the left of it (as shown here). A “Sync” symbol (seen here) will appear, letting you know this album is being synced. By the way – you’ll only see this checkbox appear once syncing is turned on.
STEP TWO: Now, in your Web Browser (here, I’m using Safari), go to lightroom.adobe.com and log in with your Adobe user ID and password (the same user ID and password you use for your Lightroom photography bundle account). You’ll see the album you just chose to sync right in the collection of Albums on the left side. Click on it, and it will display the images inside (as seen here).
STEP THREE: Go to the bottom left corner of the window, right under your thumbnails, and click on the “Proofing” button (as shown here). It’s the fourth icon from the left.
NOTE: If you don’t see this proofing button, click on the little round icon for your Account up in the very top right corner of the screen, and from the pop-down menu that appears, click on “Technology Previews” and turn on the checkbox to “Enable Technology Previews.” Now that button will appear.
STEP FOUR: The first time you do this, it brings up an empty window, but up in the top right, it prompts you to turn on Proofing (as shown above in blue), so click where it shows you to.
STEP FIVE: A little pop-down window will appear with a custom link that leads just to this gallery of proofing images. Click on the clipboard icon to copy this link into memory (this is the link you’re going to email to text message your client so they can see this gallery too).
STEP SIX: When your client clicks this link it will take them a screen that looks the one above, with checkmarks below each image and the instruction (in blue) to click on the checkbox below any images they want to select.
STEP SEVEN: When they click one of those checkboxes, it highlights the checkmark in blue and puts a blue outline around the thumbnail (as seen above).
STEP EIGHT: If your client double-clicks on any image, they will see the image larger (as shown here), and they can leave you a comment in the comment field at the bottom (as shown here). When they hit the return key, it adds that comment to this photo, which you can see.
STEP NINE: OK, now back to you. To see which images your client chose, just refresh that Web page, and now only the images they selected will appear here. Any image they commented on will have a comment icon attached to the thumbnail – just double-click on it to see the comment and/or respond back to the client’s comments.
That is all there is to it (pretty slick, right?).
Have a great Monday, everybody.
-Scott
The post How To Let Your Client Proof Images in a Lightroom Collection appeared first on Lightroom Killer Tips.
Continue reading...