HDR Processing


Status
Not open for further replies.
Hi ykgen,

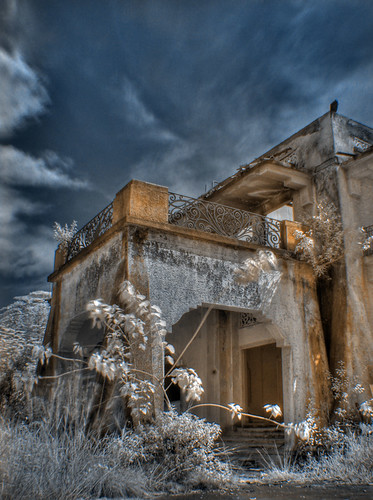
You don't need to use layers to generate HDR pic with CS2. Here are the steps:

  1. In PS CS2, click "File->Automate->Merge to HDR..."
  2. Choose your bracketted frames in the "Merge to HDR" dialog box.
  3. If the frames have EXIF data, skip to step 4. Otherwise, a "Manually Set EV" dialog box will open, and you need to manually set the EV of each frame.
  4. A preview window titled "Merge to HDR" pops up. Make sure the "Bit Depth" is "32 Bits/Channel" and click ok.
  5. A merged HDR pic is now available. Note that this pic might not look good on your screen due to the limitation of your monitor/display card, as it has 32 bits per color channel, while your display can only show 8 bits per channel.
  6. You can now save a copy of this HDR pic in PBM or other 32 bits/channel compatible formats, just in case you want to redo the tonal mapping later.
  7. Now you need to convert this pic to 8 bits/channel which is the common, more useful format. This step is call "tonal mapping. Click "Image->Mode->8 Bits/Channel".
  8. A "HDR Conversion" dialog box pops up. In "Method", select "Local Adaptation".
  9. Click the button to open up "Toning Curve and Histogram". Adjust the curve to have the pic to your liking. The trick to good HDR pic is to reveal as much details as possible while still making the pic looks natural. Click Ok when done.
  10. Save your completed 8 bits/channel HDR pic. That's all!
Here is an example done with the above steps:
http://forums.clubsnap.org/showthread.php?t=276587

Have fun and hope that helps. :)
 

Didn't expect so many steps to be involved. No wonder my attempts always turn out screwed. Thanks for sharing.
 

my try following ziploc's steps..

not sure whether i'm doing the right thing.. :bsmilie:

HDR
hdr2.jpg


original shot
soup3.jpg
 

thank ziploc for the short tutorial..
 

my try following ziploc's steps..

not sure whether i'm doing the right thing.. :bsmilie:

HDR
hdr2.jpg


original shot
soup3.jpg

Hi ykgen,

You are welcome.

This is probably not a good example for HDR, as you can achieve the same result by just adjusting the curve of the original. HDR normally comes into application when you have a lighting situation which exceeds the dynamic range of your sensor: e.g. sunset where the sky is tool bright and the foreground is too dark, or in a house/cave shooting out thought the door/window, where the interior of the house is too dark while outside is very bright. Using HDR in these situation will reveal the details in either the underexposed or overexposed part, or both. :)
 

Here, let me poison you;

This is CS2 -after- a lot of work, and even then it sucks:

443379873_2882aaa087.jpg


This is Photomatix (IR photograph, btw), only needed to do the channel swap:

457406042_7e0d1a068d.jpg


Was there any doubt? <3 <3 <3

This is HDR, done in photoshop, manually of course. I don't like to use programs like photomatrix etc. The algorithm is just too simplistic, and the end product is too fake. The haloing is still just as visible to me.


IMG_9982.jpg

the exposure of sky, the sun-lighted area, darkened face is different by quite a few stops.
Do alot of work doesn't mean anything. Doing a little of the correct stuff is better than doing alot of the wrong stuff. In PS, just do the right work and it'll be good. Simple layering does the trick.

Here's 2 of the starting from which I extracted the face and sky and stomach details, if you'd like to take a look at them:
IMG_9982b.jpg
IMG_9982a.jpg

Granted DR isn't is only at most 6 or 7 stops, but the theory is still the same. I've got quite a few better examples, but this is from one of my most recent shoots, and everything is still readily available for me to put up for you to see.
 

Status
Not open for further replies.