2. Unintentional blurring and dealing with it
2.4 Focusing: Anticipation and planning for dynamic frame
Much of the photographic opportunities is by chance, but very often surprise elements turn up some of the best photos. However, in much consistencies, you need to be at the right place at the right time, with the right angle and right preset, becos some of the events are fast moving and disappear by the time you are ready to act on it.
Failure to do so, means either you are not at the location at that time, or if you are there, you are hurried into a situation with a poor composition and blurred due to improper focusing, and lack of time to preset appropriate settings and control your composure to avoid handshake.
Therefore planning where you should stand, how you should position yourself, at what focal length should you frame your picture, at what settings are you going to set your camera at, is another art form by itself. For example, someone shooting a squirrel may have take much effort to camouflage himself at one hidden corner, a wedding photographer securing his position when the champage is to be popped, or an sports photographer anticipating the movement of the athlete. All this takes understanding of your subject, and even static subjects like buildings and scenaries changes with the time of the day, and with seasons. And with this understanding, you will preset your estimated ISO, aperture size and shutter duration, priority mode & metering mode & exposure compensation, as well as focusing mode.
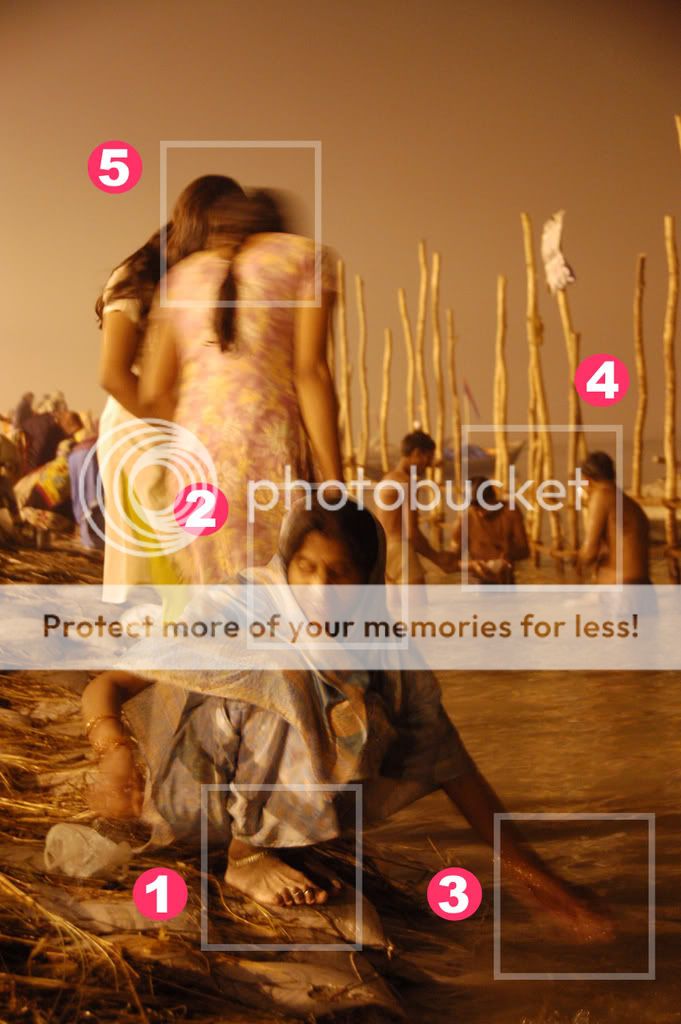
Of note, a key technical factor in shooting with anticipation is pre-setting your focus of a fast moving object. Anticipate where the object is going to be, set your focus and exposure, lock it or set focusing to manual mode, and wait for the subject to turn up at that location. This is important especially when the camera & body is not able to establish auto-focus fast enough to enable shutter release. And if you are doing panning and trust your continuous focusing mode (AF-C) or automatic focusing mode (AF-A), then the preset focus may not be required.
Timing can be based on anticipated moments of activity and subject position, and also by anticipated ambient lighting which can differ from places to places. In Singapore, generally the time between 645 to 745pm is where the colors can transit from bland white/pale blue to dark blue/reddish-brown, with variable colors in between. This varies widely especially at places at the extreme north and south at different seasons - your sunrise may be at 3am or 7am.
Remember one point, many factors make or break a picture. You need to get your subject relatively sharp, that is the first and foremost. Subsequently is the angle of perspective which if exaggerated, cannot be easily replicated by post processing. Next, many things will be affected by the lighting from colors to tones to contrast to exposure to details to zones to shutter duration and resultant duration related matters, hence get the timing right, you won half the battle. I cannot emphasize this part more.
Read this about
timing from Ken Rockwell.
2.5 Avoiding handshake: Increasing stability and handheld techniques
with regards to the body
1. broad base with centre of body weight kept low, e.g. one leg forward, one leg back, or kneeling instead of squatting
2. gain support for body by leaning to the body
with regards to the arms
1. keep the arms close at the side of the body, avoid excessive winging while keeping your posture comfortable.
2. gain support for the arms if the body is leaning on a inclination, e.g. bend forward. Do not lean forward without resting for your elbow.
with regards to the face & camera body
1. keep the camera body close to the eyes and the nose.
2. loop the neck strap on the camera body on the arm and pull taut to gain further support.
with regards to breathing
1. control the pace of the breathing, snap on expiration or between breaths
with regards to pressing the shutter release button
1. control pressure, do not jerk
2. use a timer, or cable, or remote, if not handheld
Nikonians have a good reading on it.
There are many ways of handling the tools based on the above concepts.
Joe McNally have also demonstrated a few methods best suited for right hander and left eye focus, which is to say the camera will be nearer to the left shoulder, thereby allowing the elbow to maintain a relatively neutral positions at the side without bending inwards. He took a sideway stance, gain support with the left shoulder, allow a downward directing left elbow and also suggest a double right handed grip. You got to see the
video to learn and practise on your own. I tried it out and feel that i got to modify his method for more comfort and stability for myself, but it really works. I find that with two hand handing on the side, i tend to wobble the camera, but instead of wrapping my left hand over my right hand, i put it partially across my right hand while still supporting the base of the lens.
2.6 Avoiding handshake & motion blur: Controlling of shutter duration
The common teaching is to ensure that the shutter duration does not exceed your handheld ability to avoid handshake. And this ability changes with the situation. You may be able to hold it steadily at 1/8 seconds, but not necessarily so when you have to hold it vertically. Or that you may do it well at standing, but when you squat or kneel and bend down, you may not be able to handle 1/30 seconds well. Or do it after jogging for a 100m, perhaps not so well too. It also depend on whether you are holding a light short lens or a heavy long lens. So afterall, the shutter duration depends as much as your varying handheld ability.
Assuming a consistent handheld ability of a common man, and assuming the similar conversion factor of 1.5 to 1.6 for most DSLR sensors, a general shutter duration guideline on shooting a static object, would be dependent on the focal length.
shutter duration < 1/focal length
If shooting at 200mm, aim to have 1/250 seconds or faster.
If shooting at 10mm, aim to have 1/15 seconds or faster.
The assumption made is of a common man, so some people will cope better than the above rule, whereas some will not. The conversion factor for some smaller sensors may also be larger, thereby amplifying the effect of handshake requiring a faster shutter duration. And of cos, if your subject is an animal or a human being, he may move, at various speed, hence the shutter duration may or may not be able to fixate into a static image. Hence the above rule should only be used as a general guideline and further adapted based on personal experience.
Fair handheld techniques is required to reproduce the above guideline. Good handheld techniques, good monopod techniques and the use of VR will help to push the limit a bit. Tripod will push the limit significantly. And tripod with good tripod techniques will push the limit by a lot, and equipped with cable release or remote control to reduce or eliminate the shake caused by shutter release button almost complete it. Perhaps the last part is mirror lockup.
As far as the shutter duration control, it can be done on PASM modes to various degree. Either you alter the aperture, ISO and EV on programmed or AP mode while observing the resultant shutter duration to be appropriate, or you switch to SP and manual to have active control of the shutter duration.
2.7 Camera: Vibration reduction mechanisms
Manufacturers have designed some physical mechanism within the camera body and the lens to allow the image to be focused more correctly onto the sensor with the effect of the handshake reduced. These various mechanisms only help to decrease the handshake effect to a certain magnitude, and if handshake is bad, the blurring will still be present and evident, but less.
They comes in different names.
VR:
Nikon Vibration Reduction
IS: Canon Image Stabilisation
SSS: Sony Super Steady Shot
OS: Sigma Optical Stabilizer
SR: Pentax Shake Reduction
Of all, my personal favorite term is VR, not because i uses nikon, but the term describe the mechanism most directly aptly. Of all, I find SSS most awkward and corny. But what i didn't like is each brand comes up with different terms that meant the same thing.
Not everyone will find the effect evident, especially when their handshake is severe or that the shutter duration they take is often too long for the vibration reduction mechanism to work effectively. When users find that their pictures are variably blurred still, that does not mean that the VR is not working, more often it is because handshake is a variable thing in some people, and sometimes they can handle may a 1/15 and sometimes they cannot, and different times, different focal length may be within or outside of their handheld ability with or without VR.
Moreover, the vibration reduction mechanism works only for a few stops and is only meant to complement good handheld technique and monopod use and definitely cannot replace the use of tripod.
By the way, some compact manufacturers have used higher ISO settings to pass off as "image stabilization" mechanism. Here's an article from
dpreview on this issue.
.