RSSNewsFeeder
Member
Today, we’re looking at something that I hope you’ll find helpful — it’s about the Auto button in the HDR Preview window, what it does, why it’s helpful, and a little about the advantages of creating HDR images in Lightroom.
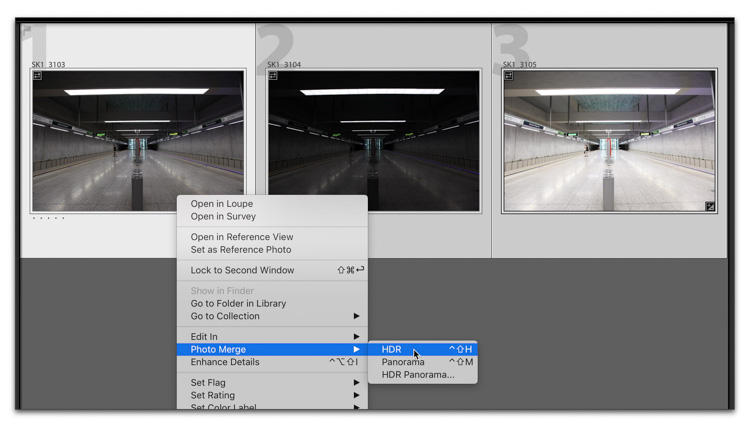
STEP ONE: Here are three images from a subway stop (I think I took these in Budapest a few years back). Let’s select all three images (according to Adobe, you actually only need the two-stops over-exposed image and the two-stops under image, but for this example, it’s important that I show all three, even though using three won’t make a better combined HDR image). I selected all three, right-clicked, and from the pop-up menu, I went under Photo Merge and chose HDR (as seen here).
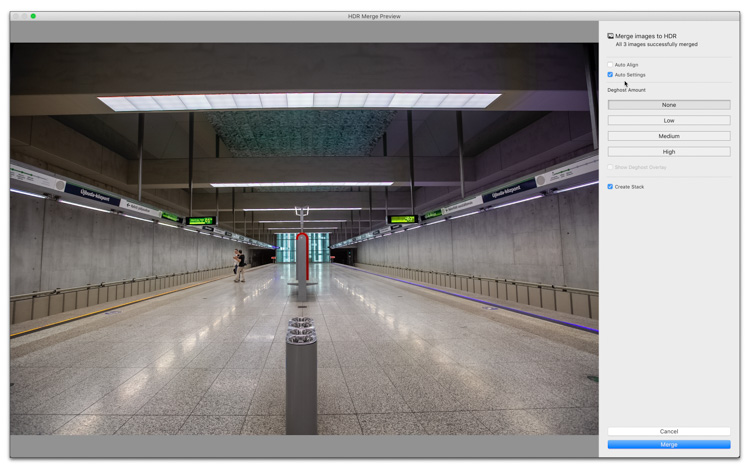
STEP TWO: When the Merge to HDR window appears (seen above), the Auto Settings checkbox is on by default, and you’ll notice that this image looks quite a bit different than any of the three original thumbnails I chose in the previous step. That’s because what you’re seeing here is not just the three images combined into a single image — you’re seeing that, but on top of it, you’re seeing the image toned the same way it would look if you took this image into the Develop Module’s Basic Panel and clicked the Auto button in the Basic Panel. So, if you’re not the kind of person to ever use that Auto Button in the Basic Panel, you probably shouldn’t turn it on here either, but I think it’s really important to know that is what’s happening with that Auto Button. It applies the same Auto settings as if you clicked the Auto button in the Basic panel.
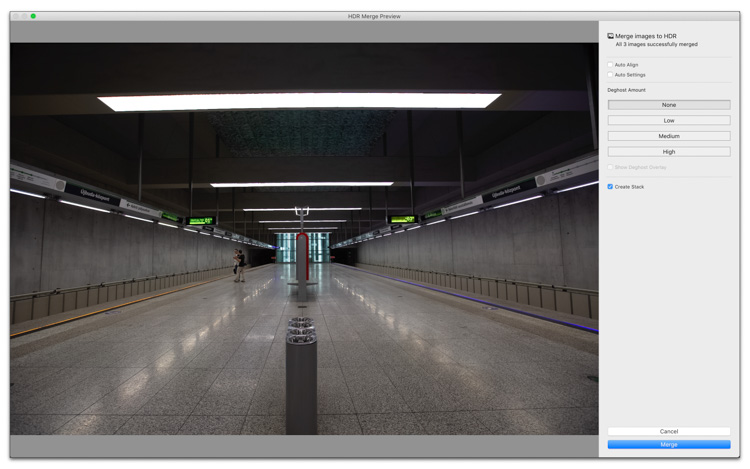
STEP THREE: If you turn off the Auto Settings checkbox in the Merge to HDR Preview window, you’ll see just the merged HDR image (the three images with different exposures combined into one) without any Auto toning added. It looks pretty much like the Normal exposure image (the first image on the left) from the three thumbnails you saw in Step One.
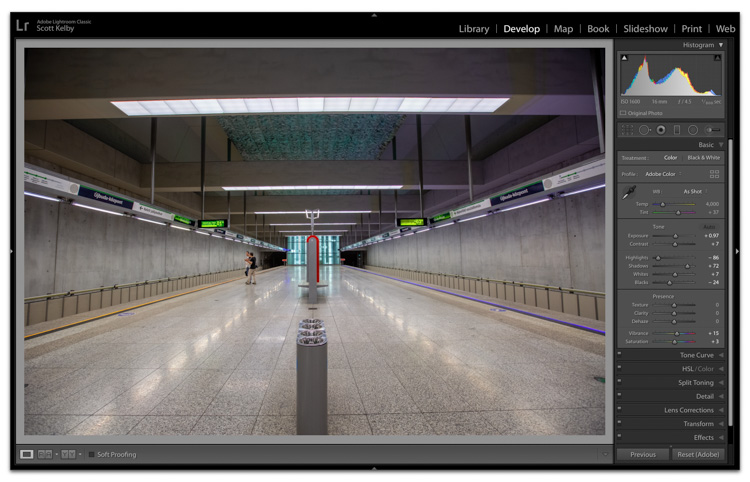
STEP FOUR: Just for example sake, I went ahead and opened that HDR image without the Auto Settings checkbox turned on, but then once the HDR image appeared in Lightroom, I went to the Develop Module and clicked the Auto Settings button. As you can see, it looks like the image in Step Two, which was the HDR image with the Auto button turned on. So, if without using the Auto button, the HDR image essentially looks the same as the normal exposure image, why would you want to take these extra steps to create HDR images at all? It’s because there’s a somewhat hidden advantage (and it’s a big one).

STEP FIVE: Here’s just the normal exposure image (not the HDR), and in the Basic Panel I dragged the Exposure slider all the way to the right — to +5.00, and you can see most of the image turned white. OK, so? Well, look at the next image.
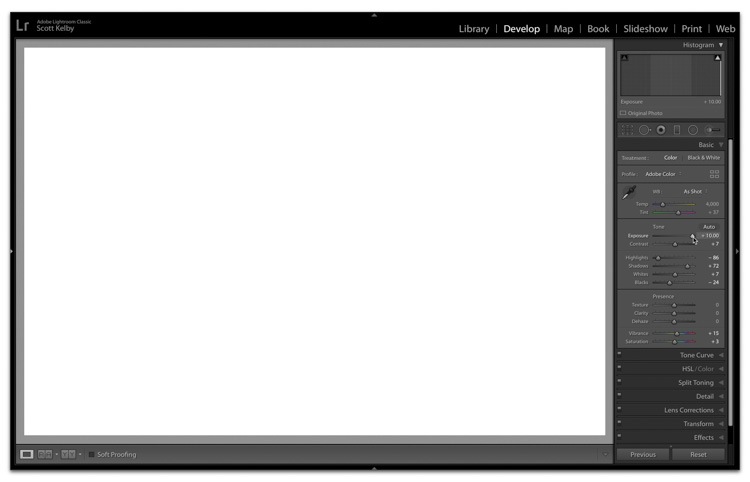
STEP SIX: Here’s the HDR image with the Exposure slider dragged all the way over to the right. It’s solid white because the tonal range of the HDR image is so much wider than the normal image. So much so in fact, that now the Exposure slider doesn’t just go to +5.00. It now goes to +10.00.
You might be thinking, “Scott, I’ve never wanted to turn an image solid white.” I know. Me, either. That’s just for example purposes, but this expanded tonal range allows us to open up the shadow areas in our image and reveal all kinds of detail, but with very little increase in noise in our image. You’ll be amazed at how much you can crank open the shadows, and it’s Lightroom’s HDR secret advantage (I’ve written about this before here on LRKT), but today’s post is really about the Auto button and what it does, but I couldn’t resist sharing this awesome advantage of HDR in Lightroom. You can push things farther with less noise or damage to your image.
I hope you found that helpful.Here’s wishing you a great Monday, a fantastic week!

-Scott
The post What The ‘Auto’ button does in the HDR Preview Window (sounds boring, but it’s not) appeared first on Lightroom Killer Tips.
Continue reading...
STEP ONE: Here are three images from a subway stop (I think I took these in Budapest a few years back). Let’s select all three images (according to Adobe, you actually only need the two-stops over-exposed image and the two-stops under image, but for this example, it’s important that I show all three, even though using three won’t make a better combined HDR image). I selected all three, right-clicked, and from the pop-up menu, I went under Photo Merge and chose HDR (as seen here).
STEP TWO: When the Merge to HDR window appears (seen above), the Auto Settings checkbox is on by default, and you’ll notice that this image looks quite a bit different than any of the three original thumbnails I chose in the previous step. That’s because what you’re seeing here is not just the three images combined into a single image — you’re seeing that, but on top of it, you’re seeing the image toned the same way it would look if you took this image into the Develop Module’s Basic Panel and clicked the Auto button in the Basic Panel. So, if you’re not the kind of person to ever use that Auto Button in the Basic Panel, you probably shouldn’t turn it on here either, but I think it’s really important to know that is what’s happening with that Auto Button. It applies the same Auto settings as if you clicked the Auto button in the Basic panel.
STEP THREE: If you turn off the Auto Settings checkbox in the Merge to HDR Preview window, you’ll see just the merged HDR image (the three images with different exposures combined into one) without any Auto toning added. It looks pretty much like the Normal exposure image (the first image on the left) from the three thumbnails you saw in Step One.
STEP FOUR: Just for example sake, I went ahead and opened that HDR image without the Auto Settings checkbox turned on, but then once the HDR image appeared in Lightroom, I went to the Develop Module and clicked the Auto Settings button. As you can see, it looks like the image in Step Two, which was the HDR image with the Auto button turned on. So, if without using the Auto button, the HDR image essentially looks the same as the normal exposure image, why would you want to take these extra steps to create HDR images at all? It’s because there’s a somewhat hidden advantage (and it’s a big one).
STEP FIVE: Here’s just the normal exposure image (not the HDR), and in the Basic Panel I dragged the Exposure slider all the way to the right — to +5.00, and you can see most of the image turned white. OK, so? Well, look at the next image.
STEP SIX: Here’s the HDR image with the Exposure slider dragged all the way over to the right. It’s solid white because the tonal range of the HDR image is so much wider than the normal image. So much so in fact, that now the Exposure slider doesn’t just go to +5.00. It now goes to +10.00.
So, what does that mean for us?
You might be thinking, “Scott, I’ve never wanted to turn an image solid white.” I know. Me, either. That’s just for example purposes, but this expanded tonal range allows us to open up the shadow areas in our image and reveal all kinds of detail, but with very little increase in noise in our image. You’ll be amazed at how much you can crank open the shadows, and it’s Lightroom’s HDR secret advantage (I’ve written about this before here on LRKT), but today’s post is really about the Auto button and what it does, but I couldn’t resist sharing this awesome advantage of HDR in Lightroom. You can push things farther with less noise or damage to your image.
I hope you found that helpful.Here’s wishing you a great Monday, a fantastic week!
-Scott
The post What The ‘Auto’ button does in the HDR Preview Window (sounds boring, but it’s not) appeared first on Lightroom Killer Tips.
Continue reading...