RSSNewsFeeder
Member
When I did that post last week asking, “What would Adobe need to add to Lr ‘Cloud’ for you to switch from Lr Classic?” (link) beside the folks who said something along the lines of “There is nothing they could ever do to make me change!” comments, there was quite a bit of confusion around the new local storage feature that just got added to the ‘cloud’ version.
In short, it allows you to look at images and edit them in Lightroom ‘cloud’ without ever having to import them or upload them to the cloud. That’s a totally new concept for ‘cloud’, which always made you import them before you could work on them. They synced to the cloud as soon as you connected to the internet. So, this local storage feature operates kind of like Adobe’s Bridge application (if you’re familiar with it. If not, just forget I mentioned it).
A lot of folks either (a) didn’t realize this feature was even available, (b) if they did hear something about it, they didn’t quite understand what it does, or (c) both. So, today, we’ll quickly look at why it’s a really handy new feature (one I’d like to see added to Lightroom Classic) and what it won’t do.
OK, you came back from a shoot; you copied your images onto your computer (or, if you’re like me, your external hard drive), and you want to find five or six images from this shoot. You don’t want to import all your images in Lightroom ‘cloud’; you don’t want to sync any images to the cloud; you just want to look through your images, find those five or six, and move on.
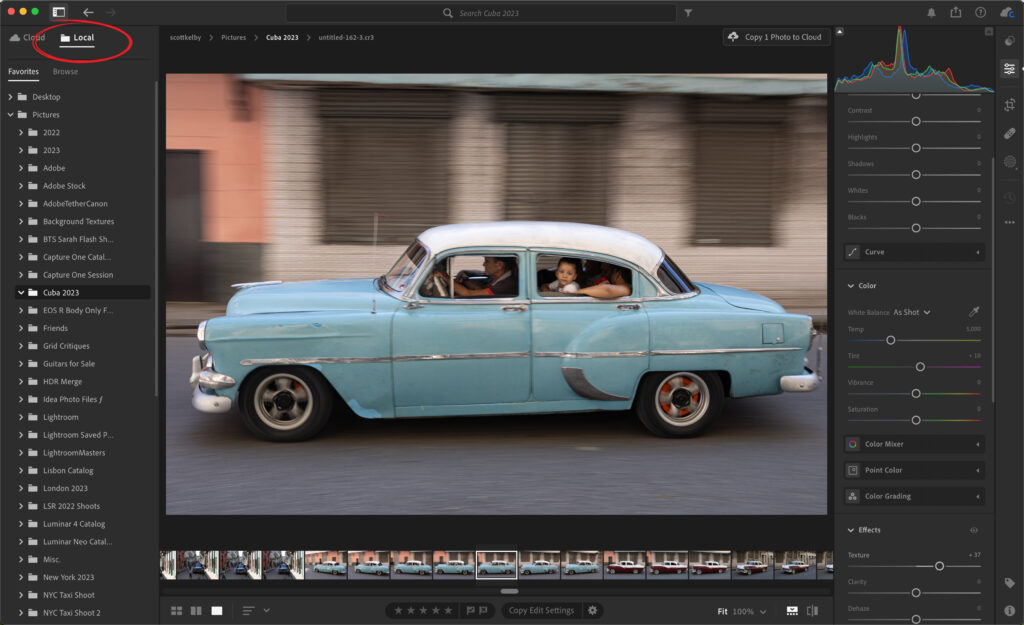
To do this, launch LR ‘cloud’ and click on the “Local” tab (shown circled here in red), and use the list below it in the left column to navigate to the images you want to look through. Again, these are NOT images you’ve already imported into Lightroom – these are the images you copied to your computer (or external hard drive), and when you click on the folder, you’ll see the images inside it (and the thumbnails appear super fast). Now, find the images you want to edit and just start editing them.
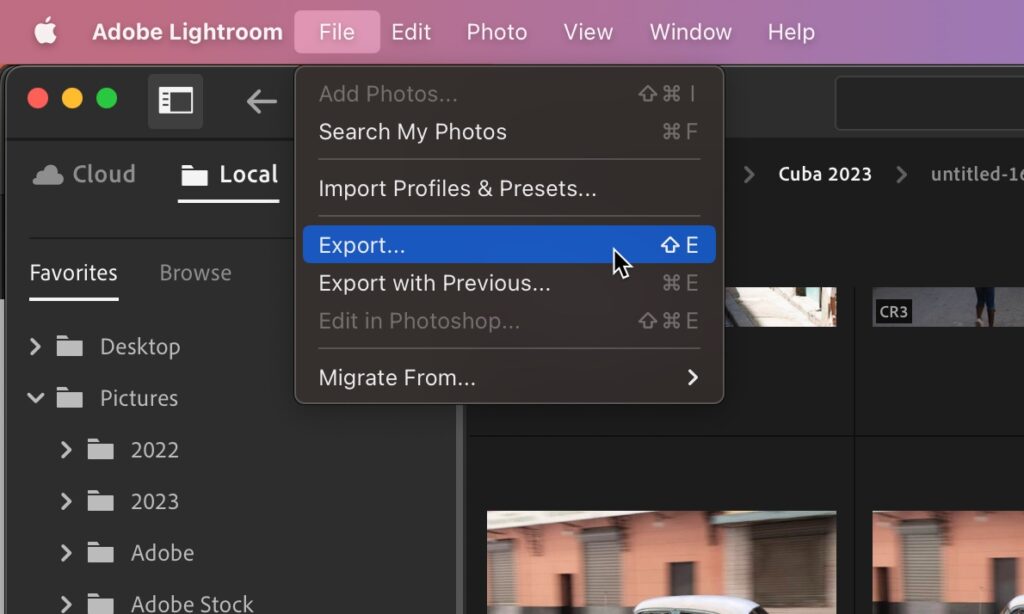
When you’re done editing, to save a copy of the file with your edits; go to Export (under the File menu) as shown here. Now, you can save it as a JPEG or whatever. If you export as a RAW image, your edits are saved in a .xmp sidecar file alongside your Raw file. If you save as a JPEG, your edits are embedded into the JPEG file itself.
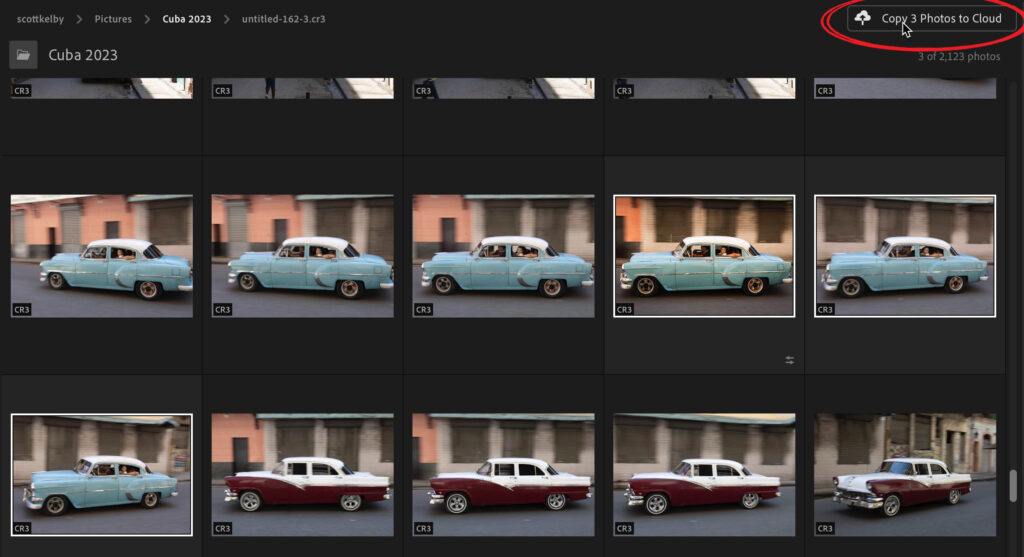
If, instead, after editing some images, you want to import them into Lightroom and sync them to the Cloud, then press “g” to return to the Grid view; select the photos you want to sync to the cloud, and then click the “Copy Photos to Cloud” (shown circled above in red).
Even if you choose to copy these 3 photos to the cloud (In this case, it’s 3 anyway), there will still be a copy on your computer (or external hard drive).
As I just mentioned, if you edit the local copy, you have the option to copy that edited version to the cloud. However, once imported and synced to the cloud, if you edit the cloud copy, you DON’T have the option to copy those edits to the local copy.
I hope that helps make this new Local feature more clear; what it does, and what it won’t do.
Now, how ’bout those Bama boys! #RollTide! And, how ’bout them Bucs? Ugh. Oh well, there’s always next season.
-Scott
The post What Does The New “Local” Storage Feature in Lightroom ‘Cloud’ Actually Do? appeared first on Lightroom Killer Tips.
Continue reading...
In short, it allows you to look at images and edit them in Lightroom ‘cloud’ without ever having to import them or upload them to the cloud. That’s a totally new concept for ‘cloud’, which always made you import them before you could work on them. They synced to the cloud as soon as you connected to the internet. So, this local storage feature operates kind of like Adobe’s Bridge application (if you’re familiar with it. If not, just forget I mentioned it).
A lot of folks either (a) didn’t realize this feature was even available, (b) if they did hear something about it, they didn’t quite understand what it does, or (c) both. So, today, we’ll quickly look at why it’s a really handy new feature (one I’d like to see added to Lightroom Classic) and what it won’t do.
Here’s a Typical Workflow Example
OK, you came back from a shoot; you copied your images onto your computer (or, if you’re like me, your external hard drive), and you want to find five or six images from this shoot. You don’t want to import all your images in Lightroom ‘cloud’; you don’t want to sync any images to the cloud; you just want to look through your images, find those five or six, and move on.
To do this, launch LR ‘cloud’ and click on the “Local” tab (shown circled here in red), and use the list below it in the left column to navigate to the images you want to look through. Again, these are NOT images you’ve already imported into Lightroom – these are the images you copied to your computer (or external hard drive), and when you click on the folder, you’ll see the images inside it (and the thumbnails appear super fast). Now, find the images you want to edit and just start editing them.
When you’re done editing, to save a copy of the file with your edits; go to Export (under the File menu) as shown here. Now, you can save it as a JPEG or whatever. If you export as a RAW image, your edits are saved in a .xmp sidecar file alongside your Raw file. If you save as a JPEG, your edits are embedded into the JPEG file itself.
If, instead, after editing some images, you want to import them into Lightroom and sync them to the Cloud, then press “g” to return to the Grid view; select the photos you want to sync to the cloud, and then click the “Copy Photos to Cloud” (shown circled above in red).
Even if you choose to copy these 3 photos to the cloud (In this case, it’s 3 anyway), there will still be a copy on your computer (or external hard drive).
What it won’t do:
As I just mentioned, if you edit the local copy, you have the option to copy that edited version to the cloud. However, once imported and synced to the cloud, if you edit the cloud copy, you DON’T have the option to copy those edits to the local copy.
I hope that helps make this new Local feature more clear; what it does, and what it won’t do.
Now, how ’bout those Bama boys! #RollTide! And, how ’bout them Bucs? Ugh. Oh well, there’s always next season.
-Scott
The post What Does The New “Local” Storage Feature in Lightroom ‘Cloud’ Actually Do? appeared first on Lightroom Killer Tips.
Continue reading...