
the shutter and aperture settings
- Thread starter bent
- Start date
You are using an out of date browser. It may not display this or other websites correctly.
You should upgrade or use an alternative browser.
You should upgrade or use an alternative browser.
- Status
- Not open for further replies.

erm, me very newbie here, so i just want the water to have that 'smooth' effect without it being too bright like the one in the example. If i made the shutter faster, it would not have that effect, but it wouldn't be overly bright. So i had to compromise somehow. Anyway to not compromise?
:what:
Yes, it is fine to want the silky water. But how did you determine the exposure? Which was the problem you appear to have? And the question you posted?
bent said:erm, me very newbie here, so i just want the water to have that 'smooth' effect without it being too bright like the one in the example. If i made the shutter faster, it would not have that effect, but it wouldn't be overly bright. So i had to compromise somehow. Anyway to not compromise?
Yes, it is fine to want the silky water. But how did you determine the exposure? Which was the problem you appear to have? And the question you posted?
To get a smooth effect in the water, you'll need to use a longer exposure. That is, a slower shutter speed.
To do this, it involves ensuring a few things:
-close down the aperture as much as possible. Use a small aperture (eg. f/22), NOT a large aperture (eg. f/2.8)
-use the lowest ISO setting that your camera allows. (eg. ISO 50 instead of ISO 100)
Looking at the photo, it already appears that you have some silky water. What camera are you using? What mode or settings did you choose?
Before even using ND filters, maybe try using the smallest aperture f16/22 (iso100) and meter the surroundings. Take the average shutter speed to use. If this is still faster than 1/8 secs, you'll probably need a ND filter.
The general idea is to use the longest time exposure as possible (on a tripod of course) so that the water is silky smooth and the surrounding is not over-exposed.
The general idea is to use the longest time exposure as possible (on a tripod of course) so that the water is silky smooth and the surrounding is not over-exposed.
Mind telling me more about how you "meter the surroundings" ? As in.. whats the steps involved to "take the average shutter speed to use"eng_keow said:Before even using ND filters, maybe try using the smallest aperture f16/22 (iso100) and meter the surroundings. Take the average shutter speed to use. If this is still faster than 1/8 secs, you'll probably need a ND filter.
The general idea is to use the longest time exposure as possible (on a tripod of course) so that the water is silky smooth and the surrounding is not over-exposed.
Raptor1 said:Mind telling me more about how you "meter the surroundings" ?
This is when zone system comes in handy. Set your shutter speed to 1/8 seconds (because you want "silky water" effect) and meter the highlights, shadows and midtones.
You'll need a spot meter or have your in-camera meter change to spot mode.
bent said:erm, me very newbie here, so i just want the water to have that 'smooth' effect without it being too bright like the one in the example. If i made the shutter faster, it would not have that effect, but it wouldn't be overly bright. So i had to compromise somehow. Anyway to not compromise?
I think I understand what you're asking because I faced the same exposure problem previously when trying to shoot waterfall using slow shutter speed in order to get the smooth effect. You clearly understand that the slow shutter speed (1/2 to 1/15) is necessary and don't want to compromise it because you want the smooth flowing waterfall effect.
Ways to reduce exposure :
1) use a lower ISO (this will make the camera sensor at its lowest sensitivity to light)
or
2) use a smaller aperture (reduce the amount of light per unit of time).
or a combination of the above.
If the picture still appears over-exposed despite having the lowest ISO and smallest aperture, there is nothing much you can do except to use neutral density filters. In my case, I couldn't lower to the appropriate exposure because my Coolpix 5700 couldn't go lower than ISO 100 and F/8. Without neutral density filters, the only chance then is to shoot when the sky is overcast or in the late evening when the sun doesn't shine directly and is not so bright.
Check the histogram of the picture once it's taken and see if most of them are on the far right side. If they still are, then the picture remains over-exposed and you need to stop down.
What camera are you using and what settings (ISO, aperture and shutter speed) have you used for the picture posted above?
Clockunder said:What camera are you using and what settings (ISO, aperture and shutter speed) have you used for the picture posted above?
From the look of the silkiness of the water, I guess he is using either 1/30 or 1/15 seconds. From its depth-of-field, the aperature is probably at f5.6 or f8. ISO most likely 100.
Looking at the picture, I guess you already know that a slow shutter speed will give you the silky water effect, how about using 'shutter priority' on your camera as a starting point, look at the aperture the camera selects that will give you the correct exposure. That was how I learn alsobent said:I tried to adjust the shutter and aperture using manual mode to take waterfall, but it is always so bright when i up the shutter timing. A lot of the pictures become overexposed. What should i do?
")
Here's a little excel spreadsheet I did for myself, and kept in my camera bag. At ISO100, reading the chart horizontally, shutter speeds at the given aperture will give me the same exposure,
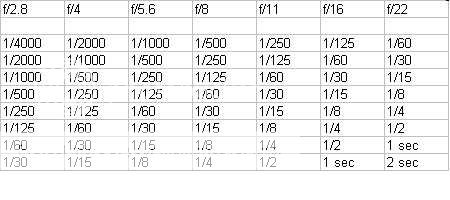
So depending on what I want to achieve, I adjust accordingly
Hey Hitman,Hitman said:Looking at the picture, I guess you already know that a slow shutter speed will give you the silky water effect, how about using 'shutter priority' on your camera as a starting point, look at the aperture the camera selects that will give you the correct exposure. That was how I learn also
Here's a little excel spreadsheet I did for myself, and kept in my camera bag. At ISO100, reading the chart horizontally, shutter speeds at the given aperture will give me the same exposure,
So depending on what I want to achieve, I adjust accordingly
Mind guiding me how to do a similar chart for my camera (E-500) ? I guess the process would be very similar.
It's an exposure value chart, so it's the same for all cameras at a given ISO.Raptor1 said:Hey Hitman,
Mind guiding me how to do a similar chart for my camera (E-500) ? I guess the process would be very similar.
Try the following website for more information:
http://www.fredparker.com/ultexp1.htm
http://www.mir.com.my/rb/photography/fototech/apershutter/exposure.htm
http://www.chem.helsinki.fi/~toomas/photo/ev.html
Have fun with your E-500
if i remember correctly, it was 1/8 seconds or slower and F8.0photobum said:From the look of the silkiness of the water, I guess he is using either 1/30 or 1/15 seconds. From its depth-of-field, the aperature is probably at f5.6 or f8. ISO most likely 100.
Hitman said:Looking at the picture, I guess you already know that a slow shutter speed will give you the silky water effect, how about using 'shutter priority' on your camera as a starting point, look at the aperture the camera selects that will give you the correct exposure. That was how I learn also
i tried using shutter priority and when i set to 1/8 seconds or slower it still is equally bright..
thanks for that!photobum said:I converted your image to black-and-white. Cropped off the distracting bright area and walah!


I hope you'll like it.
I think before going into details of taking picture of waterfalls etc, you guys might want to first learn the very basics of photography, ie. exposure (there are many books that teach that and - if you still don't get it - courses run by most photography clubs in sg)
First and foremost, you have to understand how correctly exposed pictures are produced. To do this, you have to understand, what I would call the exposure triangle. This is similar to the fire triangle we learnt in school. Each side corresponds to an element to successfully form fire, namely, fuel;air;spark. Combining these in the correct proportion will produce fire.
In the case of the exposure triangle, the sides correspond to Aperture; shutterspeed and ISO.
To maintain a constant exposure, you have to combine the 3 in varying degrees. So for a given camera setting (your camera's built in exposure meter will tell you if your pic is correctly exposed when the exposure meter settles at zero). If you decide to reduce the shutter speed (allowing more light into the camera) by 1 stop for eg. You have to either close the aperture by one stop or reduce the iso by one stop. Either of these actions will reduce the amount of light entering the camera thereby bringing the formula into balance.
Next, you need to know how the sensor in the camera measures exposure. Basically, the sensors cannot differentiate between colours and sees everything as shades of grey (much like the black and white photos you see). So for standisation, sensors are made to measure the brightness of subjects based on a standard 18% grey (roughly the colour of the palm of our hands). this important to know because things like charcoal and snow or white sea side sand can fool the sensor into thinking there is either too much or too little light than there actually is, so you will unerstand what fellow photographers are talking about when they say to do a spot metering on a neutral subject to get a correct reading.
If by now you are thoroughly confused, then my advise is to go read up more on these 2 items or attend a basic course. Because once you have mastered them, you will not need to refer to exposure charts or rely on those program night scenes or party modes on the camera (which incidently just play around with the 3 elements mentioned earlier). Then you can start concentrating on the aspects of photography like framing, depth of field etc to tell your story.
- Status
- Not open for further replies.
Similar threads
- Replies
- 0
- Views
- 96
- Replies
- 0
- Views
- 97
- Replies
- 0
- Views
- 114
- Replies
- 0
- Views
- 128
- Replies
- 0
- Views
- 160