RSSNewsFeeder
Member

Photoshop and Lightroom are mainstays in most photographers’ workflows for a reason. While other options abound, no other set of programs matches the popularity and widespread adoption of Adobe’s signature photography software. But while Photoshop’s manipulation capabilities and Lightroom’s processing and editing power are certainly robust, both offer even more power beyond the software itself in the form of plugins.
Plugins are add-ons that allow you to add or tweak the tools, functionality, and features of the base program. While most open-source software welcomes community-generated content, many larger companies prevent such modifications to their software. Adobe, thankfully, understands the value of third-party add-ons and welcomes them.
What We’re Looking For:
The possibility afforded by plugins is endless. Want a single, easy-to-use slider to tweak the intensity of a Lightroom preset? Want one for free? How about a simple, intuitive way to back up your Lightroom preferences and settings? There’s a plugin for that.
For the purposes of this article, we are focusing on your images themselves and the plugins that can make achieving them a breeze. The fact is, many plugins come with a cost, and often not a small one. Fumbling around online yourself can unfortunately waste your dollars as easily as your time. Below are seven options that we can personally confirm deliver on their promises and will leave you a happy customer.
- Best Overall Plugin for Photoshop and Lightroom: Nik Collection 4
- Best Plugin for Photoshop and Lightroom for Upscaling: Topaz Gigapixel AI
- Best Plugin for Photoshop and Lightroom for Noise Reduction: DxO PureRAW
- Best Plugin for Photoshop and Lightroom for Portraiture: Imagenomic Portraiture 3
- Best Plugin for Photoshop and Lightroom AI Plugin: Skylum Luminar AI
- Best Plugin for Photoshop and Lightroom for HDR: Skylum Aurora HDR
- Best Plugin for Photoshop and Lightroom for One-Click Presets: Exposure X7
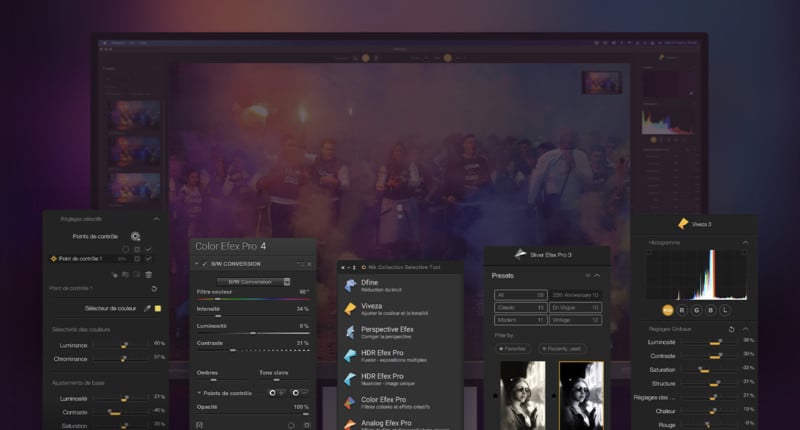
While most of the creative tools on this list are meant to aid you with specific tasks in your image editing process, many also exist as components within larger collections. These packs are worth investigating in full, but among them, Nik Collection 4 stands above the crowd. Honestly, it could almost function as an entire list of the best plugins all on its own.
We had originally sought to include Nik’s Silver Efex Pro on the list as the best plugin for black and white photography, but with the recent update to 3, it is no longer available as a standalone. No problem, because the price of the entire collection here is still less than if you bought two individual plugins on the list.
For many photographers, the Nik name has a history behind it they know they can trust. Through multiple changes in ownership, Nik’s products have remained consistent in their excellence and reliability. Nik now belongs to DxO, who has thrown its solid reputation behind it along with some real development. Nik Collection 4 is a dynamic, streamlined update that works cleaner and faster with your Adobe programs.
For only $100 (through the end of December before returning to its usual price of $149), you get eight fantastic plugins. For stunning film emulation, there’s Analog Efex Pro 2. Need presets for color? Color Efex Pro 4 has you covered. Noise reduction can be found with Dfine 2, while creating high dynamic range images is a breeze with HDR Efex Pro 2. Sharpener Pro 3, predictably, pre-sharpens your RAW data, while applying secondary sharpening after the debayering process. Adjusting color, light, and tonality is no problem in Viveza 3.
Perhaps it is a cheat to include an entire collection on a list of individual plugins, but the fact of the matter is, we wanted to list more than one of these before the recent bundling. After that, it is only a matter of price, and for what you get here we find it not only reasonable but a serious value. And that was before the current discount and impressive update Petapixel covered in-depth recently. This one is a no-brainer.
Best Plugin for Photoshop and Lightroom for Upscaling: Topaz Gigapixel AI

Artificial intelligence is now being employed across virtually every available technology, and photo editing is no different. One of the most useful advancements AI has made in the field is in the upscaling of images for maximum clarity. Topaz Gigapixel AI can upscale your photos by up to 600% without sacrificing quality, and in many cases can use the additional pixels to enhance your final image beyond what you might believe possible.
Upscaling can be valuable to a photographer for several reasons, some more obvious than others. Clearly if one needs to crop an image, the increased detail is welcome, as it would be for a photographer producing larger-sized prints. Those restoring older photographs may find upscaling necessary to bring resolutions into modern times.
There are many add-ons and programs that offer such upscaling these days, and we have tried many. The hard truth of it is, most are not worth the money and vastly underdeliver on their claims. For those considering free options, the results are even direr.
For Adobe’s part, it actually does offer a similar feature with its absolutely phenomenal Super Resolution (or “Enhance”) in Adobe Camera RAW. It performs beautifully and is lightyears faster than Gigapixel — not only because it requires a simple right-click, but because it can upscale in a matter of seconds. What makes Topaz Gigapixel AI worth its premium for many, however, is its superior noise reduction on upscaled images as well as significantly greater flexibility and options that allow you to tweak the results to taste and optimum quality. All in all, if upscaling is a crucial part of your workflow or something you often take advantage of, then Topaz Gigapixel is your best bet. For the user who simply upscales their photos every once in a while, Adobe’s Super Resolution is more than adequate.
Best Plugin for Photoshop and Lightroom for Noise Reduction: DxO PureRAW
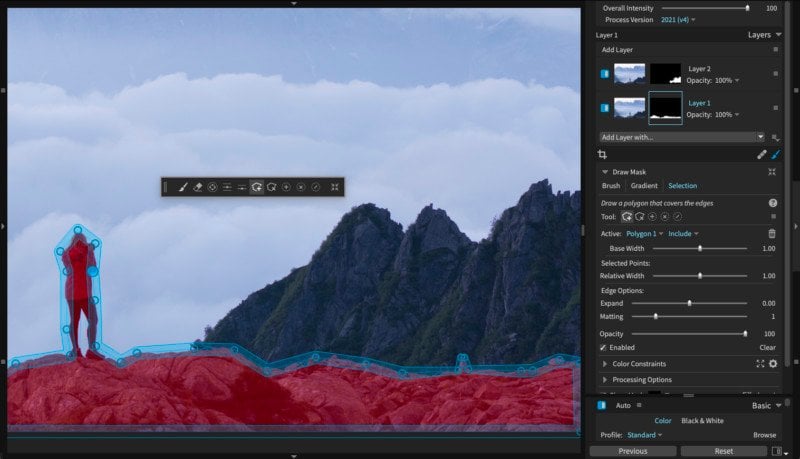
DxO PhotoLab is a comprehensive application that is worth investigating in total, but its PureRAW feature, available as a separate add-on for Photoshop and Lightroom, is a must-have. PureRAW is an AI-driven pre-processing application that draws from nearly 60,000 lens and camera combinations and millions of photographs in order to correct noise, chromatic aberration, vignetting, and other anomalies as a RAW photo is demosaiced (also known as debayering). This is a key difference between PureRAW and other RAW processing utilities (including Adobe Camera RAW), which only apply such adjustments after demosaicing is complete. The results are inarguable.
Often with denoising, sacrifices are made in sharpness, detail, and even color — not the case with DxO PureRaw. Testing image after image, each time the results are surprisingly crisp, providing a vastly better RAW file straight out of the camera. If there is a downside to PureRAW, it comes in file size. The DNG files PureRAW creates can be up to three times larger than the original file, and for those, like me, who hang onto all the original files, you are quickly filling up a hefty amount of storage.
It should also be noted that denoising is a particularly sensitive issue for many photographers — one in which maximum control, so as not to sacrifice fidelity, is a key concern. These users may balk at PureRAW’s automatic sharpening, which admittedly comes with little to no ability to modulate, and this is entirely fair. Still, the end results are astonishing, and for photographers seeking the cleanest possible RAW images with as little time behind the computer screen as possible, PureRAW cannot be beaten.
Best Plugin for Photoshop and Lightroom for Portraiture: Imagenomic Portraiture 3
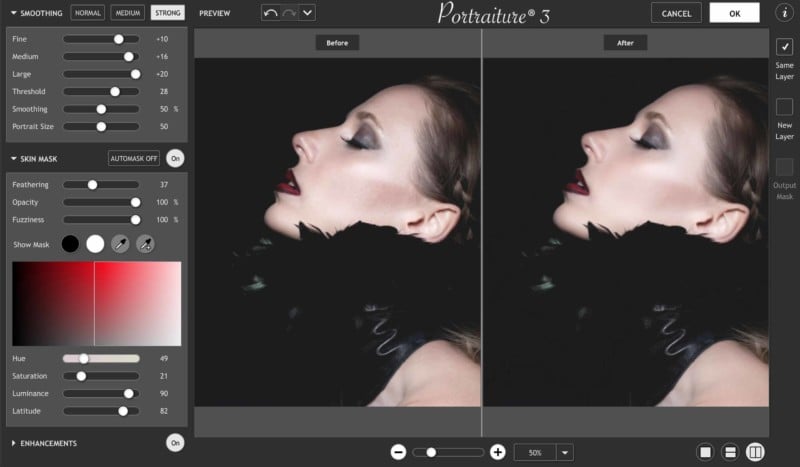
If you have searched for plugins at any point over the past few years, you have likely already heard of Portraiture 3 from Imagenomic. While certainly one of the oldest plugins on the list, time has done nothing to diminish its value. For users seeking a nondestructive way to retouch their portraits and smooth skin without sacrificing fine, high-frequency detail, this plugin is a lifesaver.
You cannot scan social media these days without seeing the worst examples of portrait beautification. Everyone you know has access to, with a flick of their thumbs, unsightly face-tuning that transforms their faces into waxy, glowing alien-esque versions of themselves. In truth, even experienced photographers working in sophisticated programs like Photoshop often yield unnatural and frankly horrific results. With Portraiture 3 users are able to diminish the blemishes that some clients may want to be removed, all without destroying the textures that make the subject human rather than an AI-generated robot.
One of the most pleasant things about Portraiture 3, other than the final image it produces, it just how adaptable it is to the user’s skill level. For those seeking something nearing a one-click solution, Portraiture 3 offers a set of base enhancements that fit the bill. For users seeking more control, Portraiture 3 offers a reasonable depth of fine-tuning options. Auto-masking works well in more natural lighting, the plugin supports layering, and the controls are intuitive.
It is true that, with enough skill, you could achieve Portraiture 3’s results on your own within Photoshop, but this is the case with most plugins, and frankly, most people just aren’t as capable with beautification as they think — or they simply don’t have or don’t want to spend the time. Portraiture 3 offers gorgeous, natural smoothing and retouching in a matter of a few simple clicks.
Best Plugin for Photoshop and Lightroom for AI Enhancements: Skylum Luminar AI

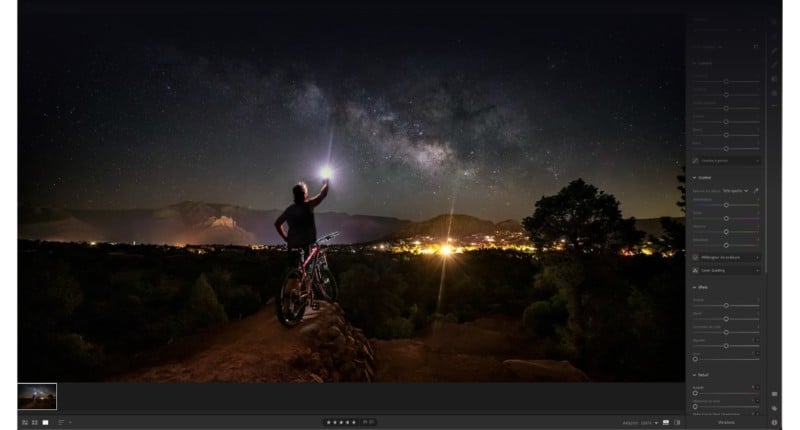
It is unlikely if you are reading this that you are unfamiliar with Luminar AI, as its popularity has skyrocketed along with its adoption. Luminar AI brands itself as the world’s first image editor fully powered by artificial intelligence, and, despite the influx of AI into the market, it remains the best. While it is available and frequently used as a standalone editor, it can also function as a plugin for Photoshop and Lightroom, bringing its impressive computational power into a workflow you are already comfortable with.
Luminar AI is perfectly suited to the casual photographer who needs a little help getting the reality of their final output to match the shot they imagined when snapping the photo. Across every possible type of edit, Luminar’s artificial intelligence lays out a clear pathway toward stunning imagery. It does this by offering “Templates”, automatically analyzing the content of each photo and suggesting the best edits possible. In terms of one-click solutions and presets, it is hard to argue with a program capable of “thinking” about your specific image when applying a look.
This is not to say that seasoned photographers cannot benefit from what Luminar AI offers. A plugin that works this intelligently to make rapid tweaks will always be useful. I know photographers who make ample use of a few key AI features to perfect aspects of their image before moving into Lightroom for more detailed work. Of particular note is Luminar’s magnificent ability to replace the sky, add layered fog, and beautify skin intelligently. These are just a portion of the tools available to “correct” an image before taking it into Lightroom.
One negative that inevitably comes up when discussing Luminar is the rapid rollout of new versions. The lack of legacy support offered by the company can make even the most committed Luminar fans like they are involved in a repetitive shakedown — I know because I am one of them. Even as I type this glowing commentary on Luminar AI, Luminar NEO, the next advancement, is in pre-order. The counterargument here is that when you are investing in a rapidly accelerating market like artificial intelligence, one should probably expect a rapid acceleration of features. After all, the software is learning how to be better all the time. That’s not an excuse for completely abandoning a program that came out one year ago and forcing users to upgrade (for a “discounted” price), but it is something at least.
One example of this growth came in Luminar AI’s sky replacement, which has recently been able to successfully and accurately handle reflections of the edited sky on water and reflective surfaces within the image. These are small but powerful signs of growth from one version to the next. Certainly, Luminar Neo will continue this trend. For now, however, we can firmly state that the power of Luminar AI overcomes any quibbles some may have with the company. The future of AI in photography is wide open, and we have no reason to doubt the “world’s first AI image editor” will continue to be the best.
Best Plugin for Photoshop and Lightroom for HDR: Skylum Aurora HDR

I frequently work with a visual effects artist who requires HDR captures of locations for film work in order to render models of the scene for pre-visualization and special effects work. I am perfectly capable of producing these images within Photoshop — I do not find it difficult or time-consuming to do so, and in most cases, the result is entirely suitable for their needs. Those needs, however, are far different than those of a professional photographer as are the circumstances of capture. So, while both Photoshop and Lightroom offer the ability to combine exposures, doing so consistently and with the most control possible is best accomplished via a plugin or outside program, and Aurora HDR is the king of the category.
Aurora HDR is software designed specifically for high dynamic range images, offering the ability to merge and tone map individual RAW files. Like many other HDR plugins, Aurora makes ample use of AI. Compared with its peers, however, Aurora runs miles ahead in terms of usability and quality. Much of its success can be attributed to prominent HDR photographer Trey Ratcliff, whose workflow forms the underlying basis for the program. That sort of creative and practical insight offers Aurora a real leg up.
It is also a dream to use as a Lightroom plugin since so much of the interface is designed like an extension of Adobe’s editing tool anyhow. Unlike Lightroom, however, Aurora allows you to implement layers, masks, and other manipulation tools. Even better, your changes are non-destructive, as Aurora keeps a backup of all edits and adjustments. And for those who have been persuaded into seeking out earlier entries in the list, Aurora allows the use of other plugins inside itself.
Simply put, if you are doing any consistent work with HDRs, you are doing yourself a disservice by not at least trying out Aurora HDR and seeing what it can do for you.
Best Plugin for Photoshop and Lightroom for One-Click Presets: Exposure X7
In our recent guide on Lightroom presets, we were committed to only sharing those you could find for free. Had we opened the door to paid options, there is no question Exposure X7 would have appeared high on the list. Exposure X7 is a powerful standalone photo editor with a uniquely enjoyable interface but, like many of the above choices, can be and is perhaps more effectively utilized as a plugin. There are many reasons to recommend this software, but its over 500 gorgeous presets warrant special attention.
Each of Exposure X7’s presets is professional in appearance and fully customizable. The most impressive of the bunch, however, is its film presets. In this category, you can find, organized by film type and camera, a wide assortment of emulations. Each of these is remarkably accurate. While many emulation presets underperform my expectations, to put it nicely, I have found Exposure X7’s to be among the best and retain some of the highest fidelity.
The presets on offer are not merely relegated to complete looks, however, as Exposure X7 also offers a number of high-quality one-click color tweaks that can be stacked to accomplish any look you seek.
The program is worth deeper investigation by all, no matter your experience level, though a word of caution: those working on slower computers, especially laptops that aren’t fully decked out, may experience an at-times frustrating lag in rendering certain effects. When using Exposure X7 as a one-click preset option, perhaps this sometimes-slow performance is unimportant compared to the time saved in more detailed editing. For those who wish to dig in and make use of all the software has to offer, though, you should prepare for some stuttering. All in all, however, Exposure X7’s extensive library of looks makes it a valuable addition to anyone’s workflow.
Continue reading...