RSSNewsFeeder
Member
Before we get to the Q&A (from Adobe’s own Terry White), just a heads-up on a new online course from me (we release a new online course every week) on creating timeless travel images. It’s shot on location in Portugal, and it’s about what to do in-camera and what to do in Lightroom and Photoshop. Here’s the official trailer (below):
Here’s a link to watch the course right now. You can own it for $29, or you can watch it (and nearly 1,000 other full-length courses) as part of a KelbyOne Pro membership. People are super-digging this one – I hope you’ll give it a watch.

Okay, onto Terry’s Lightroom Q&A:
Q. How do I switch from Lightroom to Lightroom Classic?
A. That’s a big question, but not uncommon. Sometimes photographers who are just starting out begin with Lightroom. Usually, it’s because they didn’t know there was more than one version, so they get the first one they see on adobe.com, which is usually Lightroom (Lr).
Switching to Lightroom Classic (LrC) is actually not hard. Because your images are already in the cloud in their full resolution, Lightroom Classic can sync all of your images to a folder on your hard drive. Your albums will come down as collections.
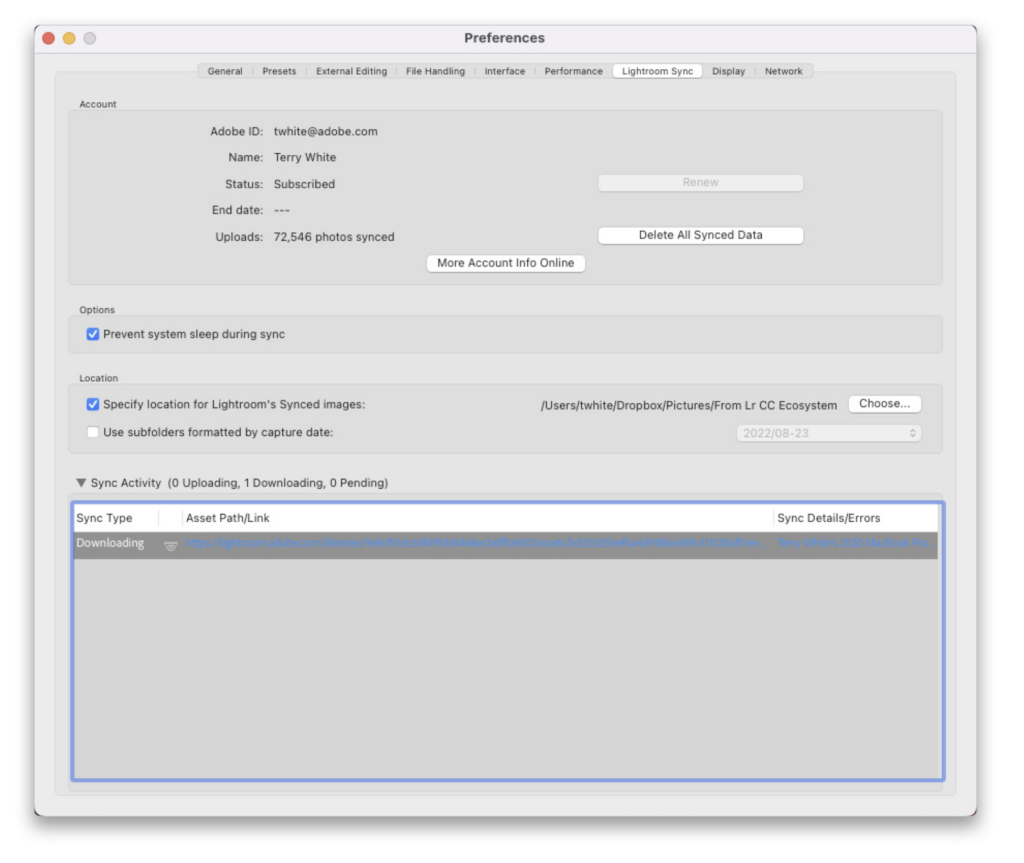
Start by installing Lightroom Classic, then turn on Start Syncing in the upper-right corner in the cloud menu. That’s it! Your images will start to sync into Lightroom Classic. One thing you should consider before enabling sync is to choose a folder where all of these images will download; perhaps a folder on an external drive that has more space on it.
Go to Lightroom Classic (PC: Edit)>Preferences and click on the Lightroom Sync tab. Enable the checkbox that says Specify a Location for Light- room’s Synced Images, and then click the Choose button. Navigate to the folder you wish to use, and click Choose. Once the images are downloaded and in LrC, you can use LrC to move them at any time to different folders in the Folders panel or on different drives. Note: Be sure only to move images inside LrC; if you move them outside LrC, it will lose track of the images and tell you that they’re missing.
Q. I love using collections, but I’m frustrated by not being able to add an exported JPEG to a collection at the time of export. Am I missing something? Many thanks!
A. Hi! I love collections too, but maybe I don’t under- stand the question. Are you saying that you want the JPEG you export to somehow be reimported into the catalog and added to a collection? Or are you saying that when you export an image from, say, a folder, you wish it to be added to a collection too? Neither of those are ideal workflows.
It’s best to put images into the collections where you want them. Do your edits, and then do your exports. The images will then be in the collections you want them in at all times throughout the entire process.
Q. My phone seems to be running out of space. When I checked, it looks like Lightroom is using more space than it should be. Is there a way to fix this?
A. I’ve run into this problem myself. All of a sudden, the space on my iPhone drops by 20–30 GB. Lightroom caches recent images to your device as well as images you’ve been editing. Normally, the cache clears over time; however, sometimes, it can get stuck and not clear properly. This doesn’t happen often anymore, but if it has happened to you, you can manually clear it anytime to reclaim the space it uses. Here’s how:
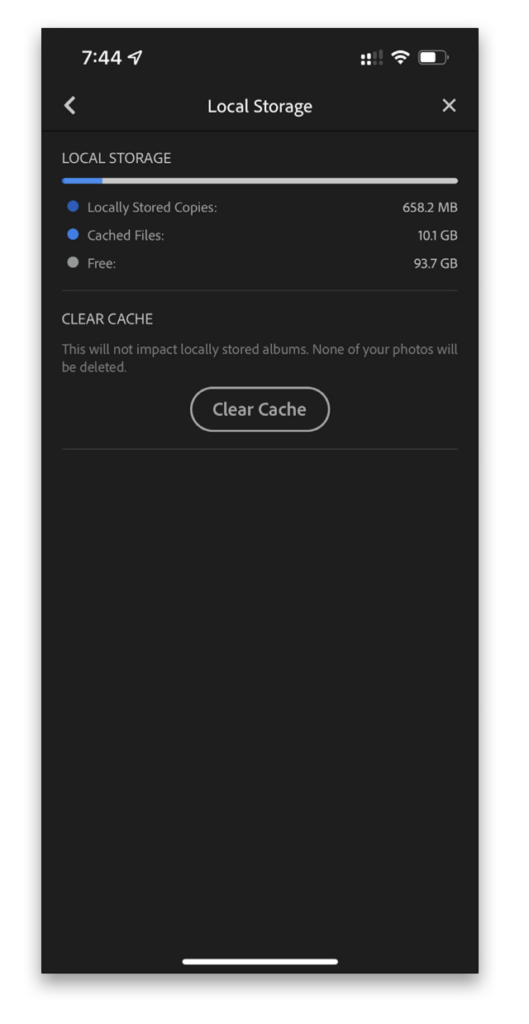
Launch Lightroom on your mobile device and tap the settings icon (gear). Then tap on Local Storage. Once you’re there, it will take a moment to calculate your local storage usage. Once it does, you can tap the Clear Cache button. This will remove the cached files from your device. Don’t worry; your images are still in the cloud along with the edits you’ve done (Lightroom will even tell you this with a pop-up message where you can click Clear or Cancel).
Q. Editing in Lightroom is great because it’s non-destructive. I’m afraid to edit in Photoshop because I could make a mistake that screws up my image. Is there a way to keep the photo nondestructive even if I take it into Photoshop?
A. Photoshop, by its nature, can permanently alter pixels in your image, but this isn’t a bad thing, and there are several techniques you can use to protect your original from being altered. When you choose to edit an image from Lightroom Classic in Photoshop, you can protect your original by editing a “copy” in Photoshop. This happens automatically if you choose to edit a RAW file.
If you’re editing a JPEG or other format, you will get a pop-up dialog asking if you want to Edit a Copy with Lightroom Adjustments. Always choose this option because when you do, it will send a copy of your image over to Photoshop. Anything you do to this image will be done to the copy, not the original. This also happens automatically when you use Lightroom.
Another Lightroom Classic option is to send the image over to Photoshop as a Smart Object by Right-clicking on the image and choosing Edit In>Open as Smart Object in Photoshop.
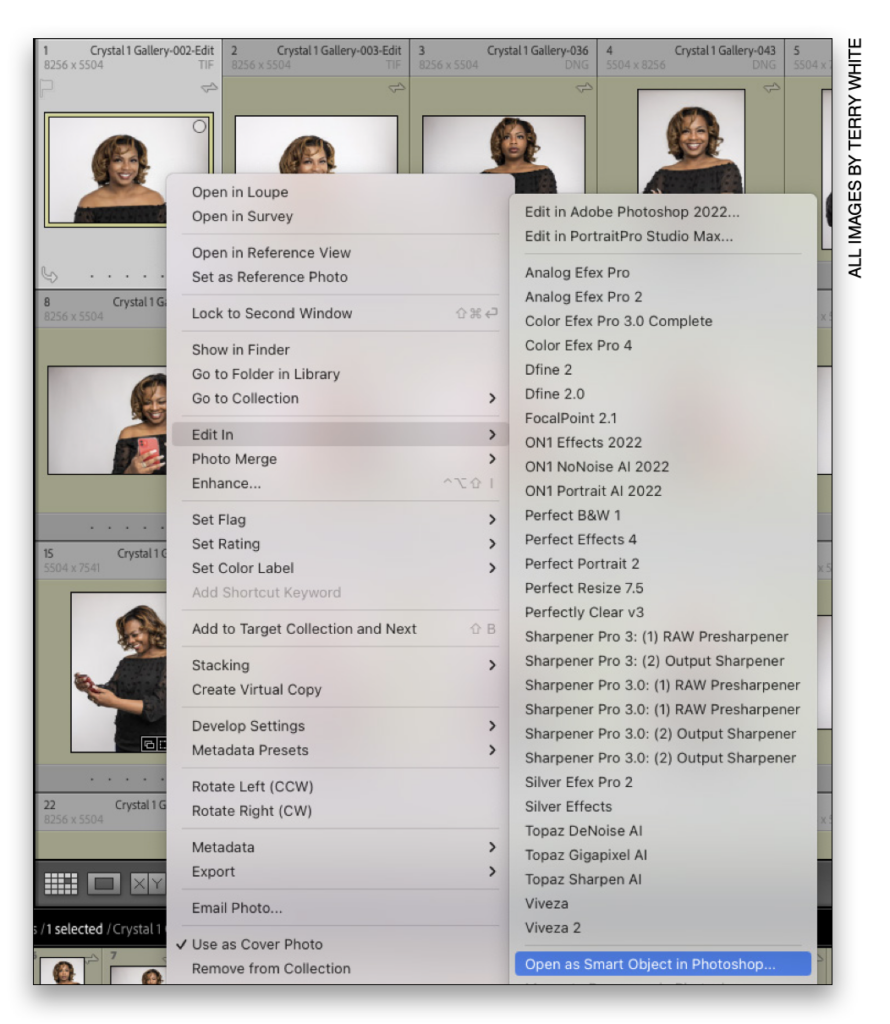
This will still send a copy, but even the copy will be protected as a smart object once it’s in Photoshop. This way, any filters you run on it will be non-destructive.
Q. I noticed when I’m in the Develop module that there are triangles in the upper-left and -right corners of the Histogram panel. Some- times they’re different colors. What do these triangles mean, and why are they sometimes different colors?
A. These triangles are warnings and are even useful for fixing the issues that they warn you about. The triangle in the upper-left corner of the Histogram is your shadow-clipping warning. The triangle in the upper-right corner is the highlight-clipping warning.
Ideally, you want both triangles to be grayed out. The different colors represent the severity of the warning. If either triangle is solid white, then that means the clipping is severe. A white shadow-clipping warning means that there are large areas of your photo that are completely black with no detail. If the highlights triangle is solid white, that means large portions of your image are completely blown out.
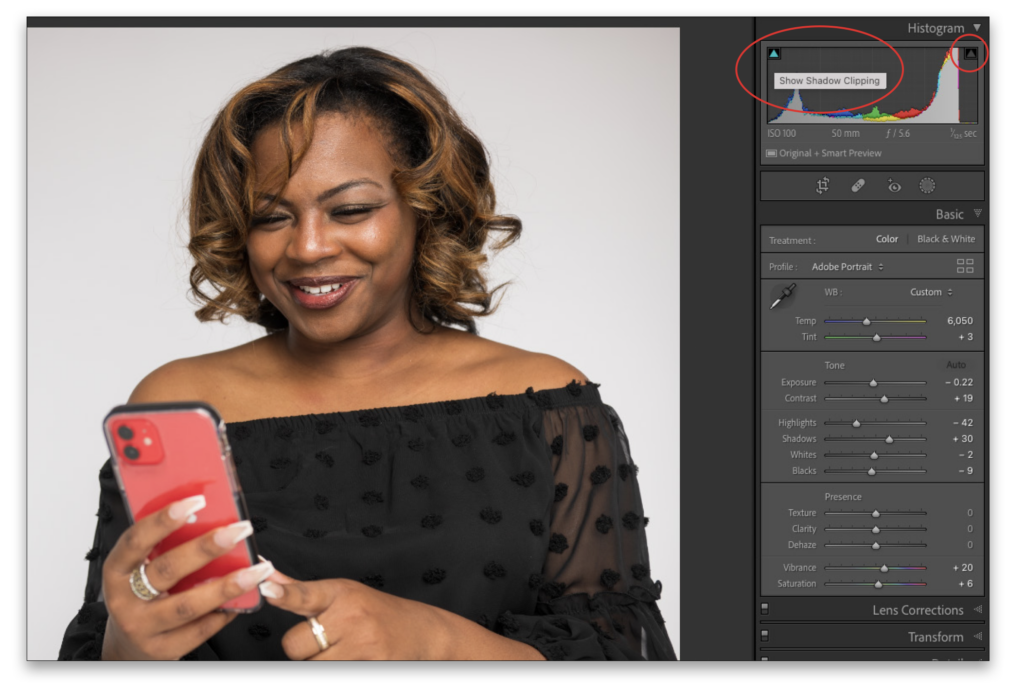
The other colors mean that there’s less clipping. If you hover your mouse cursor over either triangle, you’ll see the areas being clipped in your image, highlighted in blue for clipped shadows and red for clipped highlights. You can remove or reduce the clipping by dragging directly on the far left or far right side of the histogram below the triangles to adjust the Blacks and Whites, respectively, of your image and hopefully get the triangles to gray.
Thanks, Terry. Here’s wishing you all a great weekend!
-Scott
P.S. Thanks to everybody who came out to my keynote presentation at the ClickCon conference in Chicago this week. Met so many great folks, and had a wonderful time. Thanks to Adobe for having me here, and to Sherry and the crew from ClickCon for the hospitality.
The post Lightroom Q&A Day appeared first on Lightroom Killer Tips.
Continue reading...
Here’s a link to watch the course right now. You can own it for $29, or you can watch it (and nearly 1,000 other full-length courses) as part of a KelbyOne Pro membership. People are super-digging this one – I hope you’ll give it a watch.
Okay, onto Terry’s Lightroom Q&A:
Q. How do I switch from Lightroom to Lightroom Classic?
A. That’s a big question, but not uncommon. Sometimes photographers who are just starting out begin with Lightroom. Usually, it’s because they didn’t know there was more than one version, so they get the first one they see on adobe.com, which is usually Lightroom (Lr).
Switching to Lightroom Classic (LrC) is actually not hard. Because your images are already in the cloud in their full resolution, Lightroom Classic can sync all of your images to a folder on your hard drive. Your albums will come down as collections.
Start by installing Lightroom Classic, then turn on Start Syncing in the upper-right corner in the cloud menu. That’s it! Your images will start to sync into Lightroom Classic. One thing you should consider before enabling sync is to choose a folder where all of these images will download; perhaps a folder on an external drive that has more space on it.
Go to Lightroom Classic (PC: Edit)>Preferences and click on the Lightroom Sync tab. Enable the checkbox that says Specify a Location for Light- room’s Synced Images, and then click the Choose button. Navigate to the folder you wish to use, and click Choose. Once the images are downloaded and in LrC, you can use LrC to move them at any time to different folders in the Folders panel or on different drives. Note: Be sure only to move images inside LrC; if you move them outside LrC, it will lose track of the images and tell you that they’re missing.
Q. I love using collections, but I’m frustrated by not being able to add an exported JPEG to a collection at the time of export. Am I missing something? Many thanks!
A. Hi! I love collections too, but maybe I don’t under- stand the question. Are you saying that you want the JPEG you export to somehow be reimported into the catalog and added to a collection? Or are you saying that when you export an image from, say, a folder, you wish it to be added to a collection too? Neither of those are ideal workflows.
It’s best to put images into the collections where you want them. Do your edits, and then do your exports. The images will then be in the collections you want them in at all times throughout the entire process.
Q. My phone seems to be running out of space. When I checked, it looks like Lightroom is using more space than it should be. Is there a way to fix this?
A. I’ve run into this problem myself. All of a sudden, the space on my iPhone drops by 20–30 GB. Lightroom caches recent images to your device as well as images you’ve been editing. Normally, the cache clears over time; however, sometimes, it can get stuck and not clear properly. This doesn’t happen often anymore, but if it has happened to you, you can manually clear it anytime to reclaim the space it uses. Here’s how:
Launch Lightroom on your mobile device and tap the settings icon (gear). Then tap on Local Storage. Once you’re there, it will take a moment to calculate your local storage usage. Once it does, you can tap the Clear Cache button. This will remove the cached files from your device. Don’t worry; your images are still in the cloud along with the edits you’ve done (Lightroom will even tell you this with a pop-up message where you can click Clear or Cancel).
Q. Editing in Lightroom is great because it’s non-destructive. I’m afraid to edit in Photoshop because I could make a mistake that screws up my image. Is there a way to keep the photo nondestructive even if I take it into Photoshop?
A. Photoshop, by its nature, can permanently alter pixels in your image, but this isn’t a bad thing, and there are several techniques you can use to protect your original from being altered. When you choose to edit an image from Lightroom Classic in Photoshop, you can protect your original by editing a “copy” in Photoshop. This happens automatically if you choose to edit a RAW file.
If you’re editing a JPEG or other format, you will get a pop-up dialog asking if you want to Edit a Copy with Lightroom Adjustments. Always choose this option because when you do, it will send a copy of your image over to Photoshop. Anything you do to this image will be done to the copy, not the original. This also happens automatically when you use Lightroom.
Another Lightroom Classic option is to send the image over to Photoshop as a Smart Object by Right-clicking on the image and choosing Edit In>Open as Smart Object in Photoshop.
This will still send a copy, but even the copy will be protected as a smart object once it’s in Photoshop. This way, any filters you run on it will be non-destructive.
Q. I noticed when I’m in the Develop module that there are triangles in the upper-left and -right corners of the Histogram panel. Some- times they’re different colors. What do these triangles mean, and why are they sometimes different colors?
A. These triangles are warnings and are even useful for fixing the issues that they warn you about. The triangle in the upper-left corner of the Histogram is your shadow-clipping warning. The triangle in the upper-right corner is the highlight-clipping warning.
Ideally, you want both triangles to be grayed out. The different colors represent the severity of the warning. If either triangle is solid white, then that means the clipping is severe. A white shadow-clipping warning means that there are large areas of your photo that are completely black with no detail. If the highlights triangle is solid white, that means large portions of your image are completely blown out.
The other colors mean that there’s less clipping. If you hover your mouse cursor over either triangle, you’ll see the areas being clipped in your image, highlighted in blue for clipped shadows and red for clipped highlights. You can remove or reduce the clipping by dragging directly on the far left or far right side of the histogram below the triangles to adjust the Blacks and Whites, respectively, of your image and hopefully get the triangles to gray.
Thanks, Terry. Here’s wishing you all a great weekend!
-Scott
P.S. Thanks to everybody who came out to my keynote presentation at the ClickCon conference in Chicago this week. Met so many great folks, and had a wonderful time. Thanks to Adobe for having me here, and to Sherry and the crew from ClickCon for the hospitality.
The post Lightroom Q&A Day appeared first on Lightroom Killer Tips.
Continue reading...