Labrador Sunset, please comment


Status
Not open for further replies.

philip827

Member
Aug 17, 2004
486
0
16
41
upp east coast road
Dear fellow photographers,

I have a photo here that i hope can be commented on.

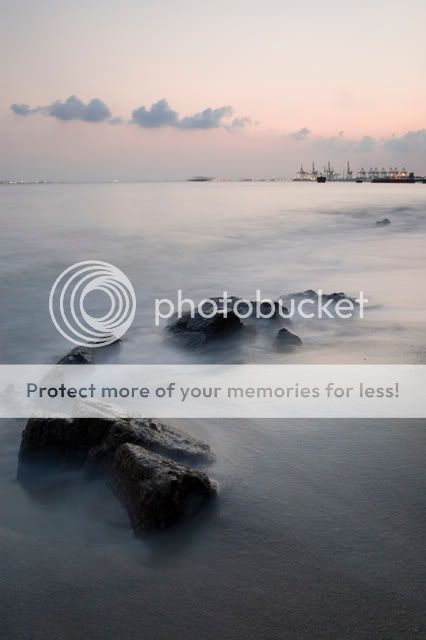
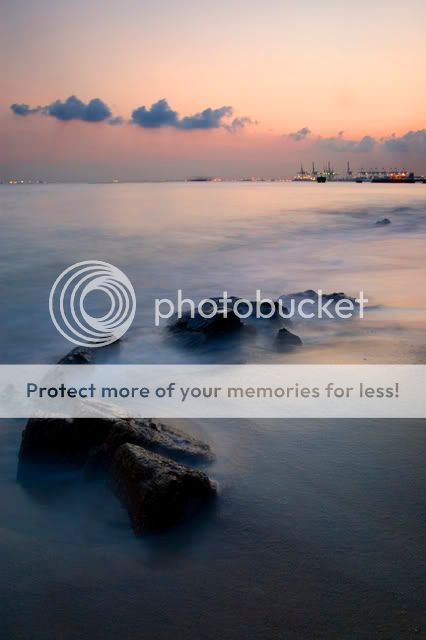
Personally, i find that the colors in this image lack that 'punch', when compared to many great photos posted here. I am not sure whether it is because of my photoshop skills, or the lack of filters or the photo just cannot make it to begin with. Pic 1 is the edited version. Feel free to edit my original photo. I hope i can learn from your comments. Thank you.

In photoshop, i increased contrast and saturation. Sharpened.

Time taken : 1910
taken in raw
D70
17mm
iso 200
6 sec exposure
f13
Additional items : polariser + cokin 2 stop grad ND filter soft.

pic 1
labradorparkedited.jpg


pic 2
labrador.jpg
 

Pic 1 is nice. Think it can be made more dramatic with contrast and saturation, and also nicer clouds and bigger creamy waves. Good effort. :thumbsup:

Just my thoughts. I'm a noob. :angel:
 

crop it to landscape, show the stone only.

or crop the biggest stone atthe bottom away, so it looks like the clouds.

.
 

Hi Philip, did you try to take one with a -0.3EV to -1.0EV to try to get the colours out of the sky? Then try changing your WB? For editing wise, I am not great in PS so I can drop my opinion bah... I try and see how... Kee kee kee :p

labrador_copy_2.jpg


I think i really sux at PS... LOL~~~ Philip, hope that you like tis... Critique oso... ;)
 

the pic seems not balance & the sun is missing ;)
 

Higher contrast will be more "dramatic".
 

Try a squre crop on the rocks in the foreground and convert to B&W.

As for the sunset, as others have already mentioned, saturation and contrast need to be increased.
 

An interesting photo issue here.

I think a large part of the sea has turned white and has no details (not dark and no flickering reflection of the sun light) because of the photo taking technique employed : cutting down the light exosure & reflection with a polariser + GND filter and then compensate light back with very long exposure (just like taking photos of waterfall with a slow shutter speed to have a white smooth water effect). I think, within a certain shutter speed range, the longer shutter speed you employ, the more white the sea will turn out even if the aperture is stopped down to offset the longer exposure.

The original picture seems to be very bright for a dusk shot. This coupled with the largely white sea caused it to appear very "whitish" and as a result, simple increase of saturation in photoshop won't be able to add much colour to it.

I think we need to understand why the picture is as such before we can successfully make the right adjustments in photoshop. At this moment, I'm still trying to figure it out.

Anyway, below is what I've got after trying to understand the cause and then photoshop it.

1)

labrador8bn8.jpg
 

I wonder what's the original dynamic range of the scene.

Sometimes, when you use polariser + GND filter and then compensate back with long exposure, the captured dynamic range may be compressed/altered and the contrast (i.e. relative brightness) of the various subjects in the original scene is changed even though the histogram of the picture captured shows a nice wide dynamic range captured within the camera's sensor range.

In this case, the sea in the picture doesn't contrast with the sky as much as the original scene because the sea is captured with lots of whites. In addition, the foreground is very much at the lower end of the wide dynamic range captured and as such, any significant decrease of brightness (to make the sky and white sea not so bright) or a desired increase of contrast in the picture will cause the foreground to become so dark (i.e. black) that all details there will be lost. So what I had done in photoshop was to brighten the shadows in the foreground and middle ground first so that the details in the foreground remains visible when I subsequently decrease of brightness and increase the contrast of the picture.

In order to add an orange saturation to the sky and white sea later, I added an orange filter effect. If not, a white/bright sky or sea would still largely remains whitish when I increase saturation (because more saturation to white is still white).
 

yllew said:
Hi Philip, did you try to take one with a -0.3EV to -1.0EV to try to get the colours out of the sky? Then try changing your WB? For editing wise, I am not great in PS so I can drop my opinion bah... I try and see how... Kee kee kee :p

labrador_copy_2.jpg


I think i really sux at PS... LOL~~~ Philip, hope that you like tis... Critique oso... ;)

Hi, i tried to take different exposures of the same scene. But for this shot, i only have time to capture 1, both me and my camera were drenched.
 

Clockunder said:
An interesting photo issue here.

I think a large part of the sea has turned white and has no details (not dark and no flickering reflection of the sun light) because of the photo taking technique employed : cutting down the light exosure & reflection with a polariser + GND filter and then compensate light back with very long exposure (just like taking photos of waterfall with a slow shutter speed to have a white smooth water effect). I think, within a certain shutter speed range, the longer shutter speed you employ, the more white the sea will turn out even if the aperture is stopped down to offset the longer exposure.

Hello Clockunder,
i have experimented shooting in the direction of the sun with and without the polarising effect. Sometimes (very seldom) the polariser helps, but most of the time it just makes the photo worse, the sea area will be dark and the sky will be overexposed.

For this photo, although i used a polariser, i turned its effect off so that it is acting like a ND filter instead.(correct me if i am wrong)
 

I tried to dodge&burn selected areas of the photo instead of just adjusting the contrast and saturation settings. And slightly cropped the photo. First time experimenting with dodge&burn, so result is not smooth. What do you all think?

labradorsunset1.jpg
 

philip827 said:
I tried to dodge&burn selected areas of the photo instead of just adjusting the contrast and saturation settings. And slightly cropped the photo. First time experimenting with dodge&burn, so result is not smooth. What do you all think?

labradorsunset1.jpg

Looks much better than the one in your first post.

Burning and dodging involve very tedious work but the advantage is that you can carefully select the areas you want to dampen or highlight.
 

philip827 said:
Dear fellow photographers,

I have a photo here that i hope can be commented on.

Personally, i find that the colors in this image lack that 'punch', when compared to many great photos posted here. I am not sure whether it is because of my photoshop skills, or the lack of filters or the photo just cannot make it to begin with. Pic 1 is the edited version. Feel free to edit my original photo. I hope i can learn from your comments. Thank you.

In photoshop, i increased contrast and saturation. Sharpened.

Time taken : 1910
taken in raw
D70
17mm
iso 200
6 sec exposure
f13
Additional items : polariser + cokin 2 stop grad ND filter soft.

pic 1
labradorparkedited.jpg


pic 2
labrador.jpg

despite what others say,
i lovee no.2!!..just sharpen the back ground or sth..:thumbsup: :thumbsup:
 

philip827 said:
Dear fellow photographers,

I have a photo here that i hope can be commented on.

Personally, i find that the colors in this image lack that 'punch', when compared to many great photos posted here. I am not sure whether it is because of my photoshop skills, or the lack of filters or the photo just cannot make it to begin with. Pic 1 is the edited version. Feel free to edit my original photo. I hope i can learn from your comments. Thank you.

In photoshop, i increased contrast and saturation. Sharpened.

Time taken : 1910
taken in raw
D70
17mm
iso 200
6 sec exposure
f13
Additional items : polariser + cokin 2 stop grad ND filter soft.

pic 1
labradorparkedited.jpg


pic 2
labrador.jpg


I tried to dodge&burn selected areas of the photo instead of just adjusting the contrast and saturation settings. And slightly cropped the photo. First time experimenting with dodge&burn, so result is not smooth. What do you all think?

labradorsunset1.jpg

1. the frame is slightly tilted to the left side

2. you might want to ask yourself whether this frame is suitable for the high saturation, rich colour treatment. from where i see the original (pic 2) is much better than the processed. the processed pictures messed up the composition with unnnecessary details that challenge the rocks' textures. ask yourself where the point of interest is in this landscape and then consider how the post processing can strengthen that. the effects should not be your main concern.
 

Hi,

Looking at this picture, it reminds me of the cover of this book..
"Creative Nature & Outdoor Photography" by Brenda Tharp.

Anyway, that got me intrigued and I was playing with the image
and did some post processing.. hope you dun mind

labradorparkedited_01.jpg
 

From the responses of a few forumers in this thread, it's apparent that the rocks are the most eye-catching subjects in the original picture. In fact, this even led to one forumer suggesting that you crop the rock into a square picture (i.e. cutting out the sky) and then convert to Black & White and increase the contrast. In this context, the texture and the appearance of the rocks becomes the focal point of the picture. In the original picture, the sky and clouds appear insignificant and hardly get noticed, especially when they only constitute less than 1/3 of the picture, are near the edges on the top 1/3, quite colourless and lack sharp contrast.

The above actually means that a more appropriate title of the picture would be something like "Rock by the sea side" instead of a "Sunset". It may be better to just take out the sky and clouds in the picture so that almost total attention is focused on the rocks, about their sizes, shapes, textures, edges, colour etc..

If the message is about a beautiful/interesting sunset scene, then eye-catching rocks with their sharp contrast with the white sea, rich texture and odd shapes are in fact distraction from the sunset, drawing most of the attention to them from the whole scene. For a nice sunset, the sky, clouds and overall colour and contrast become important and the impact of the rocks needs to be dampened in order to have a overall balance in the whole picture which is trying to tell a sunset story.

At the end of the day, which story to tell depends entirely on the picture taker.
 

this is my edited version. sorry for some noise as it is edited off the picture which is small and after correction of the horizon, i chop off too much on the left leading to an imbalanced edge. i dun go for too strong a saturation, and dun always push the contrast as it takes away details. i prefer the softer approach which i think is quite reverse of what most of yours prefer, so dun :kok: me too much, ok? :sweat:

tryout_2.jpg
 

zoossh said:
this is my edited version. sorry for some noise as it is edited off the picture which is small and after correction of the horizon, i chop off too much on the left leading to an imbalanced edge. i dun go for too strong a saturation, and dun always push the contrast as it takes away details. i prefer the softer approach which i think is quite reverse of what most of yours prefer, so dun :kok: me too much, ok? :sweat:

tryout_copy_000.jpg

Don't know why I can't see your picture.

In any case, the forum is for interesting discussion like this thread. From it, we hopefully learn something out of it.

As for contrast and details, it all depends on what kind of tonal range makes the scene more dramatic and nicer looking and whether details are important in telling the desired story. Sometimes too much details draw away too much attraction unncessarily.
 

Status
Not open for further replies.