
There are occasions where knowing the EXIF of an image can help you learn how a photo is taken. Not everyone posts their shooting information together with their image, however. In some cases, the shooting information is available from the EXIF header within the JPEG. I'll describe how you can easily access this information from within your Firefox browser with just two clicks.
Note that EXIF information is not always available. Some users choose to strip EXIF from their image for privacy reasons. Some photo sharing sites do not show the EXIF for resized images (SmugMug is one of them).
I'm writing this only for Firefox 3, because that is what I use. Earlier versions of Firefox should be fairly similar. If anyone would like to add an Internet Explorer, Opera or Safari section, please go ahead.
First, a brief introduction. One of the wonderful things about digital photography is that with most modern cameras (some camera phones are the exception), when you shoot an image, the date, time, camera model, shooting data such as exposure information and shooting mode, and depending on camera, lens, focus point and even custom function settings, are all stored in the JPEG or RAW file. This is called the EXIF header (exchangable image file format). There is also another metadata header, usually added by 3rd party software instead of the camera - IPTC. IPTC is useful for adding caption, keywords and author copyright information to the image.
To view the EXIF, if it is present, you can save the image to your local disk, then open it up with an image viewer, or (in XP) right click on it and select Properties. This gets tedious after a few images. Wouldn't it be better to be able to view it directly from the browser?
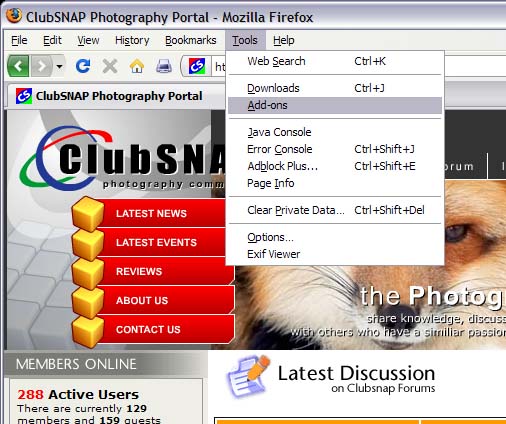
In order to do that, you will need to install Add-Ons to Firefox. Click on "Tools" and select "Add-Ons"
You will be presented with the Add-Ons dialog box. Click on the "Get Add-ons" icon on the upper left. Type in "exif" in the search filter just below the icon. You should see at least 2 results : Exif Viewer and FxIF.
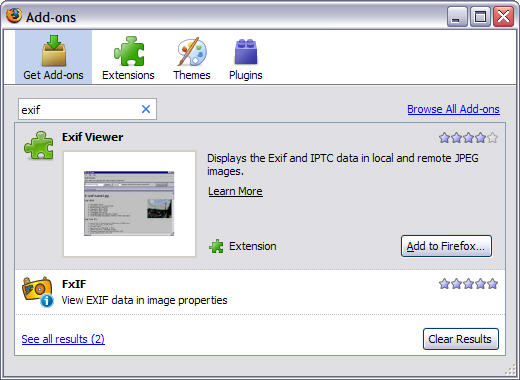
Personally I like FxIF better because it is nice and light. You can install either or both. They do not conflict with each other. Select the add-on you want to install, and click on the "Add to Firefox..." button. Follow the prompts on the screen. You will be asked to restart Firefox when installation is complete. If you're installing both, you can do that before restarting.
When Firefox has restarted, you're good to go.
Find an image that has embedded EXIF. Right click on the image, and select "Properties"
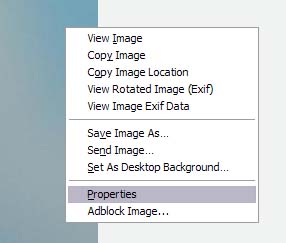
This should usually be the last item on the list. Mine has "Adblock Image..." because I'm running Adblock Plus. I don't mind banner ads, BTW, and even click on them occasionally, but I positively despise link rollover ads.
If EXIF is present in that image, you will see it in the dialog box.
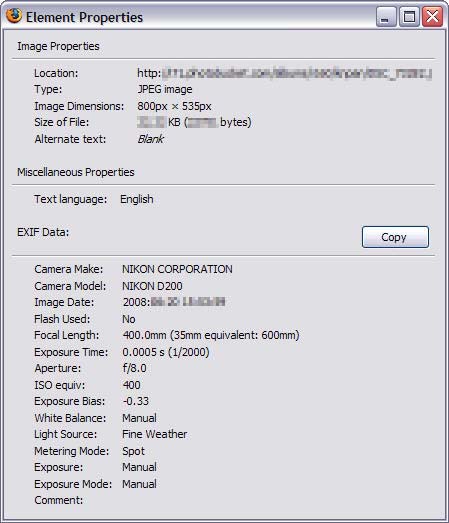
I've obscured some information in this dialog box, but you should have a pretty good idea of what information is available. You're good to go. If, for any reason, you want to copy the EXIF information into your clipboard as text, there is a "Copy" button right there.
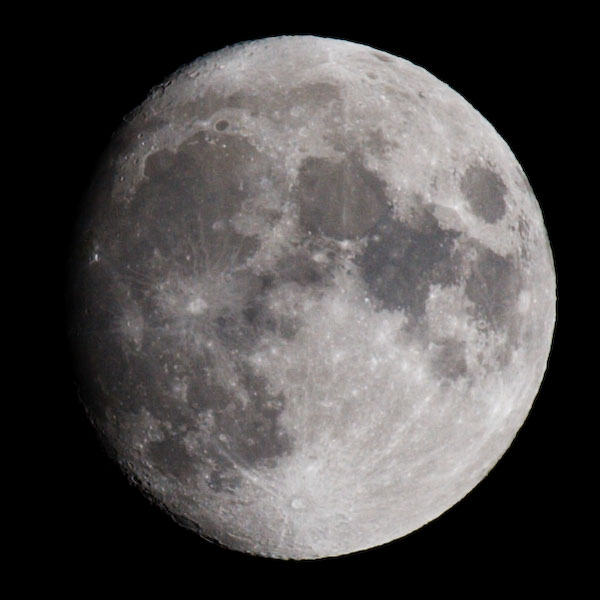
You can test with the moon photo at the next post.
I won't cover Exif Viewer. It shows a lot more information, however, and sometimes it works when FxIF does not (rare). I won't show a screen shot of the Exif Viewer window, but to access it, you right click and select "View Image Exif Data".

One final note. Sometimes, when Firefox is updated, it breaks the add-on. If that happens, try using the Add-On dialog to update the add-on. If all else fails, remove the add-on and re-install.
This concludes this mini tutorial. Hope you find it useful. Feel free to suggest changes or add to it.
Note that EXIF information is not always available. Some users choose to strip EXIF from their image for privacy reasons. Some photo sharing sites do not show the EXIF for resized images (SmugMug is one of them).
I'm writing this only for Firefox 3, because that is what I use. Earlier versions of Firefox should be fairly similar. If anyone would like to add an Internet Explorer, Opera or Safari section, please go ahead.
First, a brief introduction. One of the wonderful things about digital photography is that with most modern cameras (some camera phones are the exception), when you shoot an image, the date, time, camera model, shooting data such as exposure information and shooting mode, and depending on camera, lens, focus point and even custom function settings, are all stored in the JPEG or RAW file. This is called the EXIF header (exchangable image file format). There is also another metadata header, usually added by 3rd party software instead of the camera - IPTC. IPTC is useful for adding caption, keywords and author copyright information to the image.
To view the EXIF, if it is present, you can save the image to your local disk, then open it up with an image viewer, or (in XP) right click on it and select Properties. This gets tedious after a few images. Wouldn't it be better to be able to view it directly from the browser?
In order to do that, you will need to install Add-Ons to Firefox. Click on "Tools" and select "Add-Ons"
You will be presented with the Add-Ons dialog box. Click on the "Get Add-ons" icon on the upper left. Type in "exif" in the search filter just below the icon. You should see at least 2 results : Exif Viewer and FxIF.
Personally I like FxIF better because it is nice and light. You can install either or both. They do not conflict with each other. Select the add-on you want to install, and click on the "Add to Firefox..." button. Follow the prompts on the screen. You will be asked to restart Firefox when installation is complete. If you're installing both, you can do that before restarting.
When Firefox has restarted, you're good to go.
Find an image that has embedded EXIF. Right click on the image, and select "Properties"
This should usually be the last item on the list. Mine has "Adblock Image..." because I'm running Adblock Plus. I don't mind banner ads, BTW, and even click on them occasionally, but I positively despise link rollover ads.
If EXIF is present in that image, you will see it in the dialog box.
I've obscured some information in this dialog box, but you should have a pretty good idea of what information is available. You're good to go. If, for any reason, you want to copy the EXIF information into your clipboard as text, there is a "Copy" button right there.
You can test with the moon photo at the next post.
I won't cover Exif Viewer. It shows a lot more information, however, and sometimes it works when FxIF does not (rare). I won't show a screen shot of the Exif Viewer window, but to access it, you right click and select "View Image Exif Data".
One final note. Sometimes, when Firefox is updated, it breaks the add-on. If that happens, try using the Add-On dialog to update the add-on. If all else fails, remove the add-on and re-install.
This concludes this mini tutorial. Hope you find it useful. Feel free to suggest changes or add to it.
")