Help:) Sunlight Technique


Status
Not open for further replies.

lrrp77

New Member
Mar 10, 2004
133
0
0
Hi guys,

Let's say that you are taking a shot of a person but he is backlit by the bright sun, i.e. the sunlight is shining directly into your lens.

example:

You ==> Person (subject) <=== Position of Sun (shining into lens)

What settings, filters, flash should I use to avoid silouetting the person & to see his face clearly.

Also,

If there is a mirror behind your subject in an indoor environment. How should I avoid a flash reflection.


Thanks!
 

use omnibounce and flash direct to the subject. see who stronger... hehe... can also use sunlight to max effects by using reflectors to reflect lights to the subject. not sure if u can use ND filters anot... but u can use higher shutter speed... but most importantly is to have your side's light stronger than the back light.

mirror must take on an angle, either from top or down, left or right, and the flash need to bounce.
 

lrrp77 said:
Let's say that you are taking a shot of a person but he is backlit by the bright sun, i.e. the sunlight is shining directly into your lens. [...] What settings, filters, flash should I use to avoid silouetting the person & to see his face clearly.

This is slightly tricky, but read what I say closely and hopefully you will understand.

The first thing you do is compose your picture properly. When the sun is shining directly into your lens, you will have problems with flare (little octagons in your frame) and halation (overall decrease in contrast). You can see this in your viewfinder. Make sure you use a lens hood, or change your composition so that the flare/halation disappears (unless of course you WANT this effect).

The next thing you do is to decide how to expose the picture properly. This is the trickiest bit. You can either do it the manual way, or the automatic way. If you want to do it the automatic way, you have to understand how your camera's TTL metering works and dial in the appropriate amount of flash exposure compensation. However, you need to understand the principle behind fill flash, so I will describe how you do it the manual way:

First is a bit of background knowledge. Suppose your film (or sensor) has a 6 stop latitude:

(Blk)---(-2)---(-1)---(Mid)---(+1)---(+2)---(Wht)

Therefore, anything more than 3 stops either side of (mid) will cause blowout or blackout. You need to look at your picture closely and ask yourself what you will allow to blow out or black out. So the first step in exposure is to choose your midtone and this is how you do it:

1. Meter your subject. Either use the spot meter on your camera, or use an incident meter (place on his face, pointing back towards the camera). Let's say this is F/8, 1/125s at ISO 100.

2. Meter your background. Point your incident meter back towards the background and take a reading. Or, set your camera to matrix metering and point it at the background. Let's say this is F/16, 1/125s, at ISO 100.

3. Set your camera in manual mode, and enter F/16, 1/125s if you are shooting ISO 100 film. Your midtone has now been entered into the camera.


The next thing you need to do is decide how you are going to compensate:

4. You realize there is a 2 stop difference between the subject and the background (F/8, F/11, F/16). If you take a picture without fill flash, your subject's face will be two stops darker than the background, so therefore you need to throw two stops of light on his face to bring it back up.

5. Option 1: use fill flash. Use an incident meter set to "flash" mode. Fire your flash. Adjust your flash power output until your meter gives you F/16, 1/125s at ISO 100. Note: you CAN use TTL to automate this but I personally find the results too unpredictable. You need to understand how your TTL works before you start getting reliable results. You could go to the photonotes website and read their article on EOS flash to get a better understanding. If you shoot Nikon, then ask a Nikon expert.

6. Option 2: use a reflector. Get an assistant to point a reflector at the subject, and take an meter reading until you get F/16.

7. Take the picture!


lrrp77 said:
If there is a mirror behind your subject in an indoor environment. How should I avoid a flash reflection.

By composing your picture properly! If you can see yourself in the mirror then you will get a flash reflection.
 

Amfibius, you have a very detailed lecture here. :thumbsup:
 

call me lazy, i just use AFD lens, set A on cam, TTL BL on sb800 and shoot ;p
 

Er, thanks guys - but exposure is one of the most basic things in photography. Everyone who wants to take photography seriously needs to understand exposure.

I must say I quite like the effect of backlit subjects. It looks romantic and natural. However it is challenging to photograph because you REALLY have to think about exposure, composition and lighting. The sun provides a natural hairlight and helps to seperate the subject from the background.

Here are a few other tricks you could try:

1. Underexpose the background, but correctly expose the subject. In this example I will assume your shutter speed is set at 1/125s at ISO 100. You meter the background and get F/16. You then deliberately dial F/11 into your camera - so your background will be underexposed by one stop. But then you still throw enough flash on your subject to bring it to F/16. Result: correctly exposed subject, underexposed background. Done properly, it will make the background seem to recede and the subject stand out and make the picture seem more three dimensional.

2. Use a very large aperture. The intention is to decrease the DOF and render the background blurry to make it seem more three dimensional. The problem with this is that your shutter speed might be so high that your flash cannot sync with it. In this example, 1/125s F/16 is the same as 1/4000 F/2.8! Solution: better hope you own a Canon (and shoot FP flash) or a Nikon D2h. The other solution is to stick a neutral density filter on to cut down 4 stops of light so that your shutter speed will be slow enough to sync. Most ND filters at most only cut down 2 stops of light, so you may have to stack two filters on.

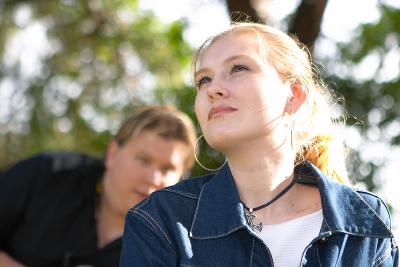
This picture (of a fellow CS'er) was taken with a polarizer to cut down light and full blast flash to try to overpower the sun:


Click for original
.

It's not the best picture in the world but you can see what I am trying to do. The background has been underexposed by 1 stop, the sun is in the frame (see the flare?), and there is an unnatural looking second shadow from the flash which was firing at full power. If the flash did not fire, you would be looking at a picture of a silhouette.
 

Oh, and while we're on the topic, here is another picture of a backlit subject with the shadow areas opened up by fill flash:


Click for original


1/200, F/2.8, ISO 100, polarizing filter, flash used. This time I got the exposure wrong and blew out her hair and part of her cheek.

(That guy sneaking around the back is another CS'er).
 

Amfibius said:
Er, thanks guys - but exposure is one of the most basic things in photography. Everyone who wants to take photography seriously needs to understand exposure.

I must say I quite like the effect of backlit subjects. It looks romantic and natural. However it is challenging to photograph because you REALLY have to think about exposure, composition and lighting. The sun provides a natural hairlight and helps to seperate the subject from the background.

Here are a few other tricks you could try:

1. Underexpose the background, but correctly expose the subject. In this example I will assume your shutter speed is set at 1/125s at ISO 100. You meter the background and get F/16. You then deliberately dial F/11 into your camera - so your background will be underexposed by one stop. But then you still throw enough flash on your subject to bring it to F/16. Result: correctly exposed subject, underexposed background. Done properly, it will make the background seem to recede and the subject stand out and make the picture seem more three dimensional.


It's not the best picture in the world but you can see what I am trying to do. The background has been underexposed by 1 stop, the sun is in the frame (see the flare?), and there is an unnatural looking second shadow from the flash which was firing at full power. If the flash did not fire, you would be looking at a picture of a silhouette.


Wow i learnt something again. Thanks!!! but then i was thinking why we set the aperture to F/11? coz u said meter the background and F/16 was given...then if we set to F11 won't we be overexposing the background this time? i dun understand this part can u explain why it's done this way? :embrass: THANKs!!!!!!!!!! :D :D :D
 

White Balance said:
I had read through the "Zone system" but my 10D does not have a true spot metering feature, do u think I should get a light meter instead ? I am thinking of one that have a spot / incident metering. Any recommendation ? Thanks :D

Er, I don't have a light meter either ... it's another thing to carry around! I just use the zoom on my lens to get readings. One of my friends has a Polaris light meter which I can use if I need it, but most of the time my zooming technique will get exposure right.
 

oh yah i was wondering also, for this example the variable is the aperture, can we tackle the problem by setting the shutter speed as the variable instead? as in fixed aperture (Av).. will there be any difference/limitation between the 2 methods then? thanks for the help
 

actionman said:
Wow i learnt something again. Thanks!!! but then i was thinking why we set the aperture to F/11? coz u said meter the background and F/16 was given...then if we set to F11 won't we be overexposing the background this time? i dun understand this part can u explain why it's done this way? :embrass: THANKs!!!!!!!!!! :D :D :D

DOH not using my brain! Sorry I meant to say F/22 ... thanks for spotting that mistake. It was late at night! :confused:
 

u're welcome, i was trying to get the backgrd underexposed effect a couple of the days ago, but think my method was not vey correct, thanks again for consolidating the steps :)
 

actionman said:
oh yah i was wondering also, for this example the variable is the aperture, can we tackle the problem by setting the shutter speed as the variable instead? as in fixed aperture (Av).. will there be any difference/limitation between the 2 methods then? thanks for the help

Yes of course you can. You can do anything you like, as long as you know what's going to happen.

1. Adjust shutter speed. Too slow - get blur. Too fast - you will hit your max flash sync speed (1/125 - 1/500 depending on which camera you have). This is the major limitation with flash photography in daylight. All Canons and some Nikons (D2h) are able to shoot in FP mode at even higher shutter speeds but then you lose flash power output. If you are using studio flash, or any other brand - forget it.

2. Adjust aperture - will affect your depth of field.

3. Adjust ISO - not sure why you would want to do this in bright sunlight. You would want the ISO to be as low as possible because you are already struggling with high shutter speeds. This is an unsung reason why Canon's ISO 100 is an advantage. If you use ISO 200, you will hit the max flash sync speed a lot earlier.
 

Thanks "amphibius" (wonder if you have scales or fins? :) )

I am not a "flash" shooter. Thankfully, for my holiday snapshots for situations like these, my Leica Minilux can usually cope with it! Not fantastic, but OK. But I did learn something from your discourse.

I shoot only film, and only black & white. In the old days, before technology makes things simple (or complicated?), there is a very simple way to contract contrast by simply adjusting exposure, and reducing or lengthening film development. Works all the time! Actually I still practice this. Meter for the shadows (in this case the person) and develop for the highlights (the background). Or course a lot harder when one use a roll film.

BTW, I think that it is not easy to check for flare and halation from the viewfinder in the usual way people use the viewfinder. Flare and halation are easier to check when one use the depth of field preview with the lens stopped down. Then you will ask, "hey where did that blob come from?"
 

If you want to take your photography to the next level, I highly recommend this book: Secrets of Lighting on Location by Bob Krist. Krist is a National Geographic photographer. This book details many situations and how he approaches the lighting problem and his solution. He is incredibly creative with his solutions and manages to pull off the effect that he wants convincingly.

Example: he was photographing a Japanese traditional hotel. The problem was, the models were only available in the afternoon, and he was assigned to take a romantic night shot of the hotel. So he put a flashbulb inside a lampshade with a flame gel filter (to simulate tungsten light), a few other strategically placed flashbulbs, got the models to lie in the bed, and then massively underexposed the scene and fired the flash. Result: underexposure makes the hotel interior look like night.

Another example: he wanted to photograph a man jumping on a trampoline. The problem was, the sky was grey and featureless, and he could not come back another day. So he put tungsten balanced film in his camera, which he knew would turn the grey sky blue. Tungsten film would also give his subject an awful blue skin tone, so he put an orange filter on his flash to warm up the subject and bring his skin tone back to neutral. He selected a slowish shutter speed to expose the background properly, and then fired his flash at second curtain sync.

Strongly encourage you to buy that book. I have MANY MANY books on photography but that one is the best.
 

Thanks for the very detailed explaination guys! i will try to digest the technical bits:)

I am using the very basic F55 with kit lens & SB-22 speedlight *gulp* due to budget & my lvl of competency.

I had the above problem when I was in sydney & trying to take photo of my wife with the bridge AND the sun in the background. Photo contrast lvl sucks cos I juz point n shoot ;p
 

Status
Not open for further replies.