Guide: About exposure (2/3)


Status
Not open for further replies.

zoossh

Senior Member
Nov 29, 2005
8,725
0
36
Singapore
Please do not post in this thread in order to maintain a clean and efficient platform.
Status: Updated till 2009 Jan 03


About Exposure

1/3: Nature and distribution
2/3: Inputs and Dependent features
3/3: Judgement and Control

The very first step in understanding creative photography with alteration of settings, is to understand the different components with the transmission of light from frame prior to sensor, and the features that varies with this entry.


Summary: Inputs and Dependent features

1. Exposure: Light and its equation
1.1 Exposure and its input variables

2. Exposure modes
2.1 Exposure dial
2.2 Exposure modes: Automatic, semi-automatic and manual
2.3 PASM modes

3. Factor 1 in the light equation and what they affect other than exposure: Frame & subject
3.1 Light intensity of the frame and its contents

4. Factor 2 in the light equation and what it affects other than exposure: Shutter duration
4.1 Shutter
4.2 Shutter duration
4.3 What does shutter duration affects?
4.4 Shutter priority mode
4.5 Shutter priority mode and its applications
4.6 Limiting factors of exposure when using shutter priority mode
4.7 Bulb mode

5. Factor 3 in the light equation and what it affects other than exposure: Aperture size
5.1 Aperture
5.2 Aperture size & f/stops
5.3 What does aperture size affects?
5.4 Aperture priority mode
5.5 Aperture priority mode and its applications
5.6 Limiting factors of exposure when using aperture priority mode

6. The light equation before it reaches the sensor
6.1 Relationship between exposure, shutter duration & aperture size
6.2 Reciprocity Law
6.3 Stops (aperture size, shutter duration, ISO) & stopping-down (aperture size)
6.4 Reversal of shutter duration: shutter speed
6.5 Reversal of aperture size & f/stop: f/stop number
6.6 Relationship of the reversed values: shutter speed and f/stop number
6.7 Exposure values (EV)

7. Factor 4 in the light equation after it reaches the sensor, and what it affects other than exposure: ISO
7.1 ISO
7.2 What is noise and why is noise associated with higher ISO?
7.3 Why or when do we need to take pictures at high ISO?
7.4 What other causes of noise is there and how to tackle that?

.
 

Last edited:
1. Exposure: Light and its equation


1.1 Exposure and its input variables

As quoted from wikipedia, exposure refers to the total amount of light allowed to fall on the sensor during the taking of a photograph. But often when we talk about it, we are talking actually about the intensity or density that we see from the screen or the printout, either judging from the overall, or from the most important areas of the photo, or about specific area. Remember what we see from the screen or the printout may varies from one another, and does not always tally with the exact exposure that is on the sensor which is what we cannot see directly.

Exposure is determined by the overall light intensity emitted/reflected from the contents in the frame, going through the lens (with or without filters), controlled by the aperture size and the shutter duration, and finally converted into data in the sensor governed by the efficiency set by the ISO values. This data would eventually be projected to our eyes via the LCD screen on the camera body, on your computer screen or onto the photo paper it is printed on.

We are used to the teaching of exposure being determined by aperture size and shutter duration, but a third factor is always not said - that i have self learnt from practice - the light intensity from the frame (we'll talk briefly later). And depending on the definition of exposure, ISO may or may not be in the equation. It does not physically increase/decrease the light by twice. Whatever that enters through the lens and passed through the open shutter would be the exposure (light that falls on the sensor). However, ISO affects the efficiency of exposure conversion into pictorial data, and thus effectively alters the need of the amount of exposure giving the same output of "exposure" we see on our screen and on the printout. And thus, there are 4 practical variables that alters the eventual "exposure" we see from the pictorial data.

1. overall light intensity from the frame
2. aperture size
3. shutter duration
4. ISO

The light equation

frame light intensity x aperture size x shutter duration x ISO = exposure on media

(more light in frame x large aperture size x long shutter duration) x high ISO = more exposure
(less light in frame x small aperture size x short shutter duration) x low ISO = less exposure

The first 3 factors affect the actual exposure before reaching the sensor. The 4th factor, ISO, affects the resultant "exposure" recorded upon conversion in the sensor to the data storage medium.

The respective factors, what they means, how they affect the exposure and what else they affect will be discussed in the following sections.

.
 

2. Exposure modes

The mentioning of the exposure modes is to give a brief idea of the settings before each of the light factor is being described. These are described prior to each of the exposure inputs so that the application and theory gels together.


2.1 Exposure dial

Most if not all DSLR would have a big thick button on top of the DSLR on the side, usually on the left. This big button lying horizontally is a dial. And this dial can be rotated at regular preset intervals to the respective exposure modes.


2.2 Exposure modes: Full-auto, preset auto, priority-coupled, programmed-manual and full-manual

Exposure modes refer to how the camera control the overall amount of exposure by calculating the aperture size, shutter duration and ISO. The only thing in the equation that is not covered by the dial & menu settings is the framing and light intensity from the contents inside the frame.

The types of modes differs slightly from one brand to another, but there are some similarities that is relatively constant.

Full automatic mode controls all 3 factors - ISO, aperture size and shutter duration. It is usually designated the symbol "auto" on the exposure dial. All you need to do is to zoom, frame, focus and shoot, and the camera does everything else for the exposure.

Preset automatic modes also controls all 3 factors. They are often called scene modes, or by various fanciful names, such as Nikon D50 calling them digital vari-program modes. The only thing you need to do is to know what you are shooting, i.e what scenes or what subjects. Common subjects or lighting situation, such as macro, sports, children, portraits, night etc. And the camera will try to configure the 3 factors to suit the lighting situation or the type of subject and its typical distance relationship. The accuracy will vary on how smart the programming is, and how simple and similar your lighting situation is compared to the preset values pre-determined by the designers.

Priority-coupled, programmed-manual and full-manual are a series of variably manual to fully manual modes for exposure, or what is almost universally called the PASM modes. These exposure modes gives variable degree of user control on exposure factors, apart from ISO, the framing and subjects. ISO becomes an independent control, which could be automatic or at manual intervals, from the menu or other buttons, but not by the PASM switches. On the contrary, the fully automatic and preset automatic modes control the ISO.


2.3 PASM modes

PASM modes are a standard control on DSLR. It refer to the settings of whether the aperture size and the shutter duration will be left to automatic by the camera itself with each given metering, of which at least one factor or both factors are controlled by the user. It is an addition to the automatic mode and various scene modes.

P - programmed mode (P)
A - aperture priority mode (AP)
S - shutter priority mode (SP)
M - manual mode (M)

The nomenclature from Canon and Pentax is a bit different but meant the same thing.
A - aperture priority mode (AP) = aperture valued (Av)
S - shutter priority mode (SP) = time valued (Sv or Tv)

If left to automatic mode, the camera will control both the aperture size and shutter duration to the metering, as well as the ISO.

In programmed mode (programmed-manual), the camera will give a preset range of combination of aperture size and shutter duration that suits the metering, and you will be allowed to manually choose among this few options. Effectively, programmed mode is a unique mode dependent on how you use the mode. If you do not choose among different combinations of aperture size and shutter duration, then it is quite similar to automatic mode where you do not vary the two factors. If you vary among different combinations, effectively it is more like a manual mode in a way where both factors are controlled or like an AP or SP mode depending on which factor you look at. The differences between P mode versus AP or SP modes is that P mode restrict the exposure combinations within a limit and does not allow excessive/insufficient exposure as an option, whereas AP and SP modes, you can push the limit till the limits of the shutter duration governed by the camera body and the limits of the aperture size governed by the lens.

Some experts have advised against the use of programmed modes as the range of given options tends to be narrow. The system tends to correct things to be neutral which at times is not desired. That is of cos when the user is in good control. Newbies can try to use programmed modes as a progression. As for me, i started off directly from auto to aperture and shutter priority, which means in another perspective, i'm not familiar with the programmed modes and various scene modes and can potentially subperformed to really fresh newbies. It is always good to try everything, but some people are just more lazy and less motivated.

Both aperture and shutter priority modes are priority-coupling modes where you control one value, and the camera automatically calculate the other, after you have determined your ISO and EV compensation.

In aperture priority mode, you will be able to set the aperture size, while the camera will set the shutter duration to suit the metering. You will not be able to change the shutter duration.

In shutter priority mode, you will be able to set the shutter duration, while the camera will set the aperture size to suit the metering. You will not be able to change the aperture size.

In manual (full-manual) mode, you will be able to set both the shutter duration and the aperture size. The camera will not change these settings for you automatically. If you left the factors alone and unchanged, and reframe at another scene with the opposite lighting situations, you can get bizarre exposures such as full overblown or full darkness.

Futher discussion of AP and SP will be discussed in details later together with the descriptions on aperture and shutter. And using M modes basically mean you need to know almost everything about overall exposure.

A question often asked is how should one proceed. It is of cos by comfort of use. Start with auto just to learn focusing, framing, focal length and general handling. Move on to AP when comfortable with controlling DOF, learning distance and focal length, and overall effect with exposure. Then next to SP when speed is critical and not a luxury. And manual when you know more and have all the time in the world. I'm still at the stage of using AP & SP, rather than manual. So that is my progression. If one wanted to progress immediately into manual mode, by all means, ok too - i hope.

.
 

3. Factor 1 in the light equation and what they affect other than exposure: Frame & subject


3.1 Light intensity of the frame and its contents

Shutter duration and aperture size only controls how fast you want the available light to enter the lens and the body onto the sensor, but that available light is not a constant.

Take for example, you set up your camera on a tripod trying to take long exposure shot of light trails of a road. you may have pre-set your shutter duration and aperture size and ISO, perhaps ISO 100, f/8, 30 seconds.

Does that mean you will have the same exposure all the time? The answer is no. Why? becos the above values of ISO 100, f/8 and 30 seconds is all fixed, and the other variable may still change - that is the frame light intensity.

Imagine if you have 10 cars passing over that frame driving at the same speed, versus another situation when traffic is busier with 150 cars passing over that frame driving at the same speed, would the latter gives you more light and a higher resultant exposure? think again, all the other 3 factors are already fixed.

Another way of looking at this, for more practical purposes, when you frame a picture with a sun, more light is in the frame with the sun being very bright. When you frame the picture slightly differently with the sun being framed outside of the frame, significantly less light enters the lens, and the exposure is different now, so either the shutter duration prolong or the aperture size increase to compensate for the reduction in intensity of light, by increasing the rate of entry or the duration of entry of light. Ok, if the idea about shutter duration and aperture size is still not there yet, keep this part in the back of your mind, read that and come back to read this again - the various factors of the light equation is inter-related.

The significance of this is to understand that selection of subjects and focal length are important factors in exposure too.

When shooting in bright daylight, one may have highly contrasting light intensity with very bright intensity (sky/sun) v.s. very dark intensity (silhouette of backlit subject), esp in cases of woodland/forest in the early morning where light is bright and directional rather than diffused, one have to consider framing off the sun and choosing as little sky as possible, such that the bright intensity area does not bring too much light too fast and ending the shutter release when the metered level is reached, causing the dark areas to have insufficient light and remains dark.

One concept to grab first and early is that aperture size and shutter duration results to overall change in exposure. So if there is very dark and very bright areas, no matter how you alter this two settings, it will be either you
1. decrease exposure: the highlight is suppressed to keep details, but the shadow becomes really dark.
2. increase exposure: the shadow is brightened to show details, but the highlight got blown off.

Hence framing off elements that increased the light intensity difference is important in exposure, which most of the time refers to the sun, the bright sky and certain bright subjects.

On the other hand, if it is in the dark night, by framing against an area of bright light, such as a store with a lot of lamps within, will help to aid exposure, such that you dun suffer from handshake even when you push to ISO 1600. Otherwise, you may need to add light source that is not shown in the frame, ie. flash.

Focal length alters the area-specific intensity and overall intensity too. Why area specific? Becos a change of focal length changes the field of view and light now comes from the central part of the field only, and depending on the proportion of dark v.s. bright intensity areas in this field, you may need to handle it accordingly. Why overall? Do you noticed that your shutter duration prolongs as you zoom in, and you are thus more prone to handshake in tele lengths? one reason of the handshake is becos of the magnification of the subject to frame ratio and hence the movement of the subject becomes more distinct. another reason of the handshake related to the shutter duration is becos of the smaller field of view gathering light from less objects in a smaller angle of view at often a further distance.

control your frame light intensity

In short, it means
you want more exposure,
- frame in something bright, or
- add light by flash

you want less exposure,
- frame in something dark, or
- decrease light by using ND and a lesser extent, CPL or other light losing filters,

and if you want more balanced exposure,
- frame out something too dark or too bright, or
- selectively brighten something too dark by fill flash/diffusers/reflectors or
- selectvely darken something too bright by graduated neutral density filter

read more on GND filter under relevant section.

The handling of frame intensity is often the difference between good photographers who exerts control compared to ordinary users at the mercy of the in-camera settings. A large portion of control of exposure is centred outside the camera relevant to this section.

.
 

4. Factor 2 in the light equation and what it affects other than exposure: Shutter duration


4.1 Shutter

Shutter is a device that is located in front of the sensor and behind the mirror. It covers the sensor at rest position, moves away for a certain duration when picture is being captured on the camera, and shuts back to cover the sensor again when the shutter duration is over. (look here for a better idea)

All one needs to know is to differentiate the shutter from the aperture diaphragm which are different items, so that they dun get confused. Both controls the light by their movements across the pathway of the light. But one is in the camera body (shutter) and one is in the lens (aperture diaphragm), and one shuts totally open or close to determine the duration (shutter) while the other remains open all the time at variable size of opening to determine the amount of light entering per duration (aperture)


4.2 Shutter duration

Shutter duration refers to the time duration that the shutter is open to allow light to go through to the sensor.
nomenclature is in seconds, denoted by " which is in this case not meant as inch.
hence 1 second = 1", 1.5 seconds = 1.5", 10 seconds = 10"

shutter duration less than 1 second is either in decimal point but most of the time is given in divisions of a second to aid comparison with the relationship with the aperture size. as such,
1/2 seconds, or 1/2sec, or 1/2s = half a second
1/2.5s = a second divide by 2.5 = 0.4 seconds
1/10s = one-tenth of a second

If a preset value is set on the camera either by you or the automatic setting, it will have a minimum and maximum value that can be entered. The minimum duration refers to the fastest the shutter can open and close. The maximum duration refers to the longest duration the shutter will remain opened without the need to set to bulb mode.

For example, for Nikon D50, the shutter ability ranges from 1/4000 sec to 30 sec. That means that you can set the shutter duration as fast as 1/4000 sec (minimum value). If the subject you are photographing hardly moves much in the frame over a period of 1/4000 sec, you will be able to freeze his movement. If the subject moves faster than that and shows movement in the frame over a period of 1/4000 sec, Nikon D50 will not be able to freeze the subject no matter how (we are talking about the same frame) and if freezing fast moving subjects is that important to you, then the next time is to move to Nikon D70s or Nikon D200 whose shutter duration can go lower to 1/8000 sec. Likewise other brands do the same with their higher ends bodies. And by the same logic, the maximum value is 30secs that you can set on the camera before the shutter release is pressed. Anything more than that cannot be entered before the shutter release is pressed, and will require the bulb mode.


4.3 What does shutter duration affects?

As part of the light equation, of cos the resultant exposure, or to maintain the same exposure, the other factors may change.

Other than that, the shutter duration affects how much motion the sensor capture, relative to the speed of the contents of the subject and the size proportion of the subject to the entire frame.

If you use a very short shutter duration, e.g. 1/4000s, it tends to freeze the motion of most subjects. If you use a moderately long shutter duration, e.g. 1/4s, you will start to show the motion of some moving subjects. At very long shutter duration, you can record light trails that may not show the subject clearly, eg. 30mins for a star trail. This is about subject motion blur or what we call motion blur, which is based solely on the subject - this is to say, even if your camera is fixed rock steady on the tripod with all the best techniques applied to reduce mirror vibrations and shutter release vibrations, your camera will not be able to eliminate that "unsharpness" owning to the subject movement, especially when it is multidirectional.

When shutter duration increases, the likelihood that our handshake frequency will start to come in and induces unwanted motion, affecting the sharpness of the picture. Unlike subject motion, this is what can be reduced with certain techniques which would be covered later in the section of focusing, motion and sharpness (the designated location will be revealed later when the thread structure is more concrete).

.
 

4. Factor 2 in the light equation and what it affects other than exposure: Shutter duration


4.4 Shutter priority mode

dpreview (shutter priority mode)

This is a semi-auto exposure mode. Which means that after you have selected the ISO, and have selected your metering mode, and have framed your picture and metered, the camera body will have a calculated level of appropriate overall exposure, and with that left two factors in the light equation, the aperture size and the shutter priority.

Shutter priority means you select the shutter duration and the camera body will automatically select the aperture size. This mode allows you to decide and control your shutter duration fast, as the aperture size is automatically calculated.

In Nikon terminology, Shutter priority means manual setting of shutter duration is coupled to automated aperture size settings calculated based on given ISO and EV compensation after metering from the frame. In Canon terminology, Tv is being used to refer to time-valued, but being unused to this term, it sounds like a television.


4.5 Shutter priority mode and its applications

Application of the shutter priority mode and controlling within the limits, requires the entire light equation to be understood, if you do not understand the following discussion, perhaps you can read the sections following this section, and return here to read again. All the values are inter-related.

Shutter priority mode is usually applied when you need to take control of the shutter duration as a priority. If you have no time to think about the aperture size and the resultant depth of field, just regulate the shutter duration and the exposure will be covered. That is the purpose of shutter priority mode.

Usually when you have long exposure to set, you are mounting on a tripod and shooting a static subject or a static background with moving subjects. That probably means you have time to think, hence you can use manual, or aperture priority or shutter priority, up to you.

However, two situations are often applied with shutter priority mode.
1. When you need a fast speed / short shutter duration to capture and freeze fast moving subjects.
2. When you need a fast speed / short shutter duration to avoid handshake when it is dark.

Aperture size is automatically calculated but that does not mean that you have no control over the aperture size though. There is a range of mixed values, and by changing the shutter duration, there will be a change in the automatically calculated aperture size, with which you can choose to take or move on to another shutter duration value. It is about balancing the two, or even involving the other factors in the equation, if you have the time to think. Whether there is enough time to think about the combination is dependent on whether the movement is predictable and if your reaction time is fast enough.


4.6 Limiting factors of exposure when using shutter priority mode

Like the above paragraph, this is also an integratory portion, skipped and returned if you feel too fresh on the light equation.

We shall use some arbitrary and live examples.

If the exposure calculated from metering gives 10000. ISO 100, light intensity from frame is 10, that gives the remaining 10. The shutter duration and aperture size (by arbitrary value for area) can be a combination of for example,

0.01s x 1000
0.02s x 500
0.04s x 250 (arbitrary max aperture size of the lens)
0.10s x 100
0.50s x 20
1.00s x 10
5.00s x 2 (arbitrary min aperture size of the lens)

10.0s x 1

Within this range, you can decide on your own. For example, you wanted the motion effect with 1.00s, but with that, your aperture size will be 10, which may be too small and may not give you a shallow field of depth, which may require 100. In that case, you may need to roll the dial about and decide on a compromise, so maybe 0.50s and 20, so that you can get some of the motion effect and some of the depth of field. in that case, you are actually also controlling the aperture size too.

The calculated exposure can be maintained within the range dictated by the values in red. If you have a lens that can only open to arbitrary value of 250, you can only select the shutter duration to be fastest at 0.04s. You want any faster than that, e.g. 0.02s, the aperture size will still be 250, but exposure cannot be maintained, unless you frame a brighter frame or increase the ISO. If not, the camera body will simply give you half the exposure, i.e. 1 stop below your calculated (hopefully accurate and desired) exposure. And if you need to push the shutter duration even lower to maybe 0.01s, then the exposure will drop even lower to one quarter.

Likewise on the other end, the aribitrary min aperture size will limit the exposure, after which any further increase in shutter duration will increase and overexposed the picture.

Also the shutter duration range dictated by the camera body itself also limits the shutter priority range. This is pretty straightforward, but in most situations are not the limiting factors in most situations. You rarely need more than 30 seconds to record motion, unless for very slow moving but not very bright subjects such as star trails. The other end of the shutter duration will be important for fast moving subjects if you need to freeze them, but most of us do not need to capture that fast a moving subjects unless you are a sports photographer. Hence most of the time the aperture is often the limiting factor, more than the shutter duration which has often has a range better fitting to most situations.

I was with a group of friends shooting night market overseas. We told a friend to shoot at shutter priority so that she will always have a fixed shutter duration fast enough to avoid handshake. We told her to push up the ISO and open to the largest aperture, but it is already 1600, the highest. She tried that, but the LCD still shows very underexposed picture. She has no external flash and doesn't used inbuilt flash. And the last advice is to shoot only at things that are very bright.

This shows that depending on the lighting situation, there are many things you can do, yet there are many things you can't do.
You can push the ISO up, but the highest ISO has a limit, and may have too much noise to be tolerated.
You can open up the largest aperture, but the largest aperture at your focal length may be f/5.6, so you may need to sacrifice your focal length (which nobody does becos the whole composition will change) and even so the largest aperture would be f/3.5 maybe, still not enough. so unless you got a fast lens with a large aperture size going up to f/2.8 or more at the scene, you can't do much. and again, by opening the aperture size up, you lose the depth of field gradually (usually not an issue unless your subject have a wide depth).
So what is left is that either you accept the usage of external flash with imperfect uniform exposure, or you have to be selective on what you shoot and make do with the scenes that allow you to shoot relatively sharply.

Hence this is to say using a shutter priority mode can help to make control of shutter duration faster, but eventually whether it can give an appropriate exposure is not always automatic. If there are all the limits, you will not get the appropriate exposure.


4.7 Bulb mode

This is a setting on the camera body that allows the shutter duration to be controlled directly at the discretion of the photographer at any time, usually via a infra-red remote control or a cable cord, and as such a long exposure can be achieved. Cable cord is often more expensive than the remote control but does not required battery.

For example, the camera settings may limit the maximum shutter duration to be 30 seconds, if switched to bulb mode, the shutter duration can be terminated after maybe 2 minutes or even 15 minutes, all at the discretion of the photographer. likewise, it can be terminated as fast as your thumb can pressed, say maybe at 2 seconds or 7 seconds. The point is unlike a predetermined shutter duration calculated by the camera based on the metering or a duration preset by you, bulb mode allows you to decide when you want to terminate the shutter duration, even after the shutter is open, you can terminate at various times, not needed to be pre-decided, and can be changed depending on the situation. However, for DSLR unlike film SLR, there is often a limit to the bulb mode. Nikon D50 has 30mins limit to the bulb mode.

Uses for bulb mode is often applied to fireworks. You can control the shutter duration to control the firework trace to be captured.

Wikipedia link

.
 

5. Factor 3 in the light equation and what it affects other than exposure: Aperture size


5.1 Aperture

Aperture is a device that is located within the back inside a lens, which are usually form by multiple blades, that controls the size of the opening through which light enters via it into the camera body onto the sensor.

Wikipedia Link


5.2 Aperture size & f/stops

Aperture size refers to the size of the opening within the aperture. The nomenclature of the aperture size is not given in terms of area surface of the opening, but rather fractions of the maximum opening in relation to the focal length, known as f/stops or F number. "f" refers to the focal length.

This f/stop numbers followed a typical sequence of f/1.4, f/2.0, f/2.8, f/4, f/5.6, f/8, f/11, f/16, f/22 which have to be memorised hard in the mind.

f/1 refers to the diameter of the aperture opening is exactly the same as focal length, e.g. 50mm diameter of aperture in a 50mm focal length lens.
f/2 refers to 25mm diameter of aperture in a 50mm focal length lens.
f/4 refers to 12.5mm diameter of aperture in a 50mm focal length lens.
each number quoted in the f/stop refers to the division of the diameter of the aperture.

However, as basic mathematics teaches us, when a diameter doubles or halves, the surface area does not doubles or halves, but is governed by a square function associated with a pi value. As such in order to estimate to the changes of the surface area that doubles or halves the amount of light, in relationship to how the shutter duration and ISO changes to doubles or halves the amount of light, it is expressed in the above standardised sequence of f/1.4, f/2.0, f/2.8, f/4, f/5.6, f/8, f/11, f/16, f/22, regardless of the focal length and sensor size. With every increment of the above sequence, e.g. f/2.8 to f/4, the surface area is halved and the amount of light halved.

The size of the opening is thus determined by the surface area via a standardised sequence applied on the focal length, not the diameter of the aperture size itself. Remember this point, the number itself refers to the division demoninator of the focal length, whereas the f/stop aperture size refers to the division of the surface area. Hence, unlike how a second is being divided in the shutter duration, the f/stop is not halved in equal numbering interval, e.g. f/4 is not half of f/2.

I find this reading so far the best for f/stop and it will probably answer all you need to understand about it.


5.3 What does aperture size affects?

Aperture size, other than its part in the light equation affecting the exposure or affecting the ISO and shutter duration decision to keep the same or within appropriate range of exposure, is about depth of field.

Remember two things by the time you are reading now.

1. Frame intensity, aperture size, shutter duration and ISO all affects eventual exposure recorded in media. Hence each of this are inter-related to maintain the same exposure (i.e. one goes up, the others goes down) or any of them can be adjusted to change the exposure.

2. Each of these factors have their own properties. Hence each of them may be restricted to a small range of variability to maintain the same properties or they can be changed to change the properties. For shutter duration, it is the degree of motion. For aperture size, it is the depth of field.

Depth of field would be covered later in the section of depth and depth of field.

.
 

5. Factor 3 in the light equation and what it affects other than exposure: Aperture size


5.4 Aperture priority mode

dpreview (aperture priority mode)

This is a semi-auto exposure mode. Which means that after you have selected the ISO, and have selected your metering mode, and have framed your picture and metered, the camera body will have a calculated level of appropriate overall exposure, and with that left two factors in the light equation, the aperture size and the shutter priority.

Aperture priority means you select the aperture size and the camera body will automatically select the shutter duration. This mode allows you to decide and control your aperture fast, as the shutter duration is automatically calculated.

In Nikon terminology, Aperture priority means manual setting of aperture size is coupled to automated shutter duration settings calculated based on given ISO and EV compensation after metering from the frame. In Canon terminology, Av is being used to refer to time-valued, but being unused to this photographic term, it sounds rather kinky or maybe it sounds like audiovisual.


5.5 Aperture priority mode and its applications

Application of the aperture priority mode and controlling within the limits, requires the entire light equation to be understood, if you do not understand the following discussion, perhaps you can read the sections following this section, and return here to read again. All the values are inter-related.

Aperture priority mode is usually applied when you need to take control of the depth of field as a priority. If you have no time to think about the shutter duration and the resultant motion, just regulate the aperture size and the exposure will be covered. That is the purpose of aperture priority mode.

Usually in bright day light when you have sufficient frame intensity for sufficient exposure, prolonged shutter duration with handheld handshake are not an issue, allowing you to play around with the aperture size without having to worry about the shutter duration, this is where the aperture priority mode plays as the most convinient mode.

However as the light gets darker and darker with increasing difficulty to freeze the scene and cope with handshake, whether to use aperture or shutter priority mode takes some consideration. If you wanted a narrow depth of field, there is two options. You can continue to use aperture priority mode set to the largest aperture size e.g. f/2.8, and look at your shutter duration on the electonic viewfinder to see if you can cope with that. You may need to increase ISO to the max or to reframe at brighter scenes to get sufficient light and not have a shutter duration that fails you occasionally, e.g. 1/8s. Otherwise you can switch to shutter priority mode and preset a shutter duration which you are comfortable at coping with handshake e.g. 1/30s, and shoot at all scenes regardless of the calculated aperture size - which will become larger when the scene is less bright or become smaller when the scene is brighter. If supposedly you saw a less bright scene that you really wanted a narrower depth of field, you can take gamble by switching from maybe (1/30s x f/4) to (1/15s x f/2.8) and hopefully it is sharp enough with your handheld techniques. Thereafter you switch back to 1/30s on the shutter priority.

If motion effects and freezing high speed subjects is the desired effect, switch to shutter priority mode for easier control.

And if you are mounting on a tripod and shooting anything, handshake becomes not an issue and you have time to think too, hence you can use manual, or aperture priority or shutter priority, up to you.

And remember that aperture priority mode is to control the depth of field. This depth of field is dependent on the many factors, such as
1. focal length
2. the distance you are from the subject
3. subject's depth (how far the subject is from the front to the back) or distance between subject in focus and its foreground/background
4. where you focus on
5. aperture size

In macrophotography, depth of field becomes more of a necessity than an option. In landscape pictures for example, becos most subjects is faraway hence are usually uniformly sharp if focused correctly, whereas the foreground rocks and grass are usually more homogenous and does not require too much definition and can afford to be blurred; alternatively you focus near to get the foregound sharp, the background lanscape can afford to be a bit blur becos that is the way our eyes sees distant subject too. In most other subjects, isolation is a choice, not a requisite. However, in macro shots, a small subject takes up a large portion of the picture, and becos of its small size, the entire subject may not be within the depth of field usually sufficient for most other non macro subjects, you need to have a depth of field that is sufficient to cover the entire subject.

Read more on depth of field in the relevant chapter.

However, two situations are often applied with aperture priority mode.
1. When you need a large aperture size for narrow depth of field, e.g shooting a foreground subject and to isolate it.
2. When you need a small aperture size for wide depth of field, e.g. shooting a landscape picture faraway and to shoot everything sharp.

Shutter duration is automatically calculated but that does not mean that you have no control over the shutter duration though. There is a range of mixed values, and by changing the aperture size, there will be a change in the automatically calculated shutter duration, with which you can choose to take or move on to another shutter duration value. This sounded like a programmed mode, except that the range of options is wider and even allowing you to have an exposure far more than or less than the metered & compensated value. It is about balancing the two factors, or even involving the other factors in the equation, if you have the time to think. Whether there is enough time to think about the combination is dependent on whether the movement is predictable and if your reaction time is fast enough.


5.6 Limiting factors of exposure when using aperture mode

After the long example on shutter priority, let get this part short.

The aperture size of cos is limited by the lens aperture range. Usually by having large aperture size, you get more light, and hence handshake in low light situation is less of a problem.

The problem comes when you desired a wide depth of field in a low light situation without a tripod, and that your composition is fixed and ISO is already max or you cannot tolerate the noise of highest ISO. To have a wide depth of field, you need a small aperture which is against the need of more light, which has to be taken from the other factors to gain more light output, e.g. reframe at brighter frame, increase ISO, increase shutter duration but used tripod to avoid handshake. Usually in night shots, you dun really need a really wide depth of field as the background is usually very dark and sharpness in distant background may not be that perceptible as details are not well visualised in darkness. However the light can be so low at night that relatively large aperture size such as f/4 will not be able to give sufficient light to give fast enough a shutter duration, that maximum aperture size and maximum ISO is simply insufficient to give sufficient exposure, hence you will either need to reframe (usually not done) or to forget about handholding with fast shutter duration, i.e. allow long shutter duration with tripod.

Again, like shutter priority modes, if there are all the limits, you will not get the appropriate exposure. The priority modes only enables you to get your chosen aperture size and shutter duration faster - but the eventual exposure are still affected by all the other factors which you have to try to overcome, e.g. by having the tripod in the above situation.

.
 

6. The light equation before it reaches the sensor


6.1 Relationship between exposure, shutter duration & aperture size

Exposure is the amount of light that falls onto the sensor, whereas the shutter duration is the duration of which the light enters while the aperture size is the size of the opening of which the light enters. The shutter which controls the shutter duration is in front of the sensor in the camera body, while the aperture which controls the aperture size is within the lens near the back.

Exposure = Shutter duration x Aperture size

A classical teaching is that light is water and the exposure is the water that is collected eventually in a pail (the sensor). But exposure is distributed unevenly on the sensor depending on the source, whereas the idea we have about water is that it gets distributed evenly. I prefer making reference to sand granules that can get piled up to different height at different spot. All these sand granules may also have different weight per same volume, which relates to the intensity of light.

The aperture size is the size of the tap opening that can be adjusted to make the flow of the sand granules (light) larger. It is like an hour glass except that the opening is not a fixed one but one that can be changed to different sizes. The sand granules will drop via the tap opening into a pail which is the sensor, which is blocked at all times by a pail cover aka the shutter, unless the shutter release is activated. The shutter duration is the time allowed for the shutter to be moved away from the top of the sensor, aka the cover of the pail to be opened.

Hence,

Exposure (doubled) = Shutter duration x Aperture size (doubled)
Exposure (halved) = Shutter duration x Aperture size (halved)

Exposure (doubled) = Shutter duration (doubled) x Aperture size
Exposure (halved) = Shutter duration (halved) x Aperture size

Exposure (same) = Shutter duration (halved) x Aperture size (doubled)
Exposure (same) = Shutter duration (doubled) x Aperture size (halved)

Exposure (x4) = Shutter duration (doubled) x Aperture size (doubled)
Exposure (/4) = Shutter duration (halved) x Aperture size (halved)

Hence shutter duration and aperture size has a reciprocal relationship. You can achieve the same amount of exposure, by altering the shutter duration and the aperture size in relationship to each other.

f/2.8 at 1 seconds gives the same exposure as f/4 at 2 seconds.
By decreasing the aperture size, the shutter duration need to be increased and prolonged to give the same exposure.


6.2 Reciprocity Law

This describe the mathemathical reciprocal relationship between different choices of aperture and shutter speed that result in identical exposure, as above. This is the basis of the time/shutter and aperture priority modes that the camera body offers.

Reciprocity Law failure is mainly of interest to film users, so I won't be describing it here for DSLR users. Those interested may read up from wikipedia.


6.3 Stops (aperture size, shutter duration, ISO) & stopping-down (aperture size)

The arbitrary unit of light in photography is mentioned as stops, which is not essentially an absolute figure but as a relative relationship of doubling and halving. Each stop translated into a change of doubling and halving in the aperture size, or the shutter duration, or the ISO, in doubling and halving the amount of light. As exposure compensation is mentioned behind, the arbitrary unit is also given in stops. Stops is then subdivided commonly into half a stop or a third of a stop.

Although all the above mentioned variables can be referred in terms of stops, when stop-down is being mentioned, it usually refers to the change of the aperture size, with the "down" refering to going to a larger f-stop number/smaller aperture.

Stop-down metering refers to metering at a stop-down aperture, aka a smaller aperture size with a larger f-stop number. Please refer to the paragraph for "DOF button area" for more details.

.
 

6. The light equation before it reaches the sensor


6.4 Reversal of shutter duration: shutter speed

The reason why the 2 things, duration and speed, need to be well differentiated, is because so often in the understanding of the confusing doubles and halves of exposure, the reference is made without an unit and hence we need to know exactly what we are refering to with regards to just the figure without an unit quoted.

Duration and speed are of reversed relationship.
When the shutter duration is doubled, the exposure doubled.
When the shutter speed is doubled, the exposure halves.

The nomenclature of figures used usually applies to shutter duration rather than shutter speed.
It is used in terms of 1/1000, 1/500, 1/250, 1/125, 1/60, 1/30, 1/15, 1/8, 1/4, 1/2, 1", 2", 4", 8", 15", 30" with approximation.
The figure is used with regards to the whole thing, not just the denomination, e.g. it will be 1/1000, not 1000 being quoted.
The changes of the figure changes with regards to the duration, not the speed.
When the figure increased and doubled, e.g. 1/1000 to 1/500, or 1" to 2", the exposure is doubled.


6.5 Reversal of aperture size & f/stop: f/stop number

The largest confusion for newbies in reference to using the camera and judging the relationship of exposure, is the f/stop. As described above, the aperture size is described by the f/stop. Unlike shutter duration, the understanding of whether there is an increase or decrease of the figure (without the "f/" or if you ignore the "f/" wording) naturally describe only the denominator which is the f/stop number.

What you may see on your top panel....

On your top panel, you may only see the f/stop number, i.e. only the number there, or it could be that the "f/" wording is smaller, so you selectively only read the number only. Note that this number is itself a demonimator and hence will experience a reversal relationship to the size. But when we talk about f/stop, such as f/22, we are talking about the aperture size related to f/22, and not the number 22, hence from f/4 to f/22, it is considered to be getting smaller (aperture size), not getting larger like what the number suggest.

The f/stop number reverses its relationship to the aperture size. Every increment of the number according to the nomenclature for stops, the aperture size gets smaller and decreases.

When 1/1000 seconds doubles to 1/500 seconds, we see a doubling of the figure with regards to the duration and exposure, despite of a decrease in the denominator. We see a doubling because we can tell between seconds and sub-seconds, that 1/1000 seconds is smaller and shorter than 1/2 seconds, whereas 2 seconds is larger and longer than 1 second.

However we look at the f/stop, we tend to look at only the figure which is the denominator. In some camera menu or viewfinder, the division sign is being taken off, and f/8 becomes F8. When it seems that f/8 has increased to f/11, the figure has increased, but the aperture size and exposure actually has decreased and halved.

Hence, for shutter duration, the figures increased with increasing exposure and longer shutter duration.
1/1000, 1/500, 1/250, 1/125, 1/60, 1/30, 1/15, 1/8, 1/4, 1/2, 1", 2", 4", 8", 15", 30"

Whereas in the increment of f/stop numbers, the figures increased with decreasing exposure and smaller aperture size.
f/1.4, f/2.0, f/2.8, f/4, f/5.6, f/8, f/11, f/16, f/22


6.6 Relationship of the reversed values: shutter speed and f/stop number

When we look at exposure, we look at shutter duration and aperture size. The increment and decrease in the relationship is uniform. Either an increase of shutter duration or aperture size leads to an increase of exposure.

Exposure (doubled) = Shutter duration x Aperture size (doubled)
Exposure (doubled) = Shutter duration (doubled) x Aperture size

Now we understand that shutter speed is the reverse of shutter duration, and f/stop number is the reverse of the aperture size. Remember that when we talks about exposure, shutter duration and aperture size pairs together, while shutter speed and f/stop number pairs together.

Exposure = 1/shutter speed x 1/f-stop number

Exposure (decrease) = 1/shutter speed (increase) x 1/f-stop number
Exposure (decrease) = 1/shutter speed x 1/f-stop number (increase)
Whenever, we increases the speed of shooting, and when we increases the f-stop number, we decreases the light entering the sensor and decreases the exposure. Vice versa.

Earlier on we wrote
Exposure (same) = Shutter duration (decrease) x Aperture size (increase)
Exposure (same) = Shutter duration (increase) x Aperture size (decrease)
that shutter duration and aperture size goes in different way to maintain the same exposure, hence what we call a reciprocal relationship.

However, in practical usage, when we only look at the numbers and understand by the numbers, we have to understand that the usage is now on shutter duration and f/stop number. When we describe in words, we describe the decrease in aperture size as decreases, i.e. a smaller hole. But when we describe in numbers, we describe an increase of f-stop number while the aperture size decreases.

Hence,
Exposure (same) = Shutter duration (decrease) x 1/f-stop number (decrease)
Exposure (same) = Shutter duration (increase) x 1/f-stop number (increase)
which means that when you correct 1" to 2", you also correct from f/8 to f/11 to ensure the same exposure, noting at the reciprocal relationship of the shutter duration and aperture size is represented as an increase/decrease of the shutter duration and the f/stop number in the same direction, not opposite direction. Both figures gets larger or gets smaller to give the same exposure, while maintaining a reciprocal relationship.

By this point of reading, one should now try to digest it. It is important in the discussion and understanding whenever other is talking about increase, decrease and reversal, what is exactly being mentioned and being described. This is important because if one is confused here, talking about ISO and metering will cause further confusion.

.
 

6. The light equation before it reaches the sensor


6.7 Exposure value (EV)

As quoted from wikipedia (2008 Jun), "EV denotes all combinations of camera shutter speed and relative aperture that give the same exposure" rate, without regard to the light intensity and ISO settings, quantified along the same scale in a logarithmic doubling or halving in stops, and it partially determines how bright and how dark you want your overall output to look like.

As mentioned in the later page, the light equation says that frame light intensity x aperture size x shutter duration x ISO = exposure on media. While frame light intensity is determined by the location and timing, how you frame and what filters you apply, aperture size, shutter duration and ISO settings are all determined by setting on the camera body and lens itself. The exclusion of ISO in the quantification of EV is probably due to the fact that in the old days, the same roll of film is used throughout the shooting and thus the same table that interchanges just the aperture size and shutter duration can be applied more simply.

As quoted in wikipedia, a table tabulates all the different shutter duration and aperture size and their corresponding exposure value. A f/1.0 lens exposing for 1.0 seconds gives an EV of 0. That is of cos too bright for most bright situations, as hardly anyone uses such a large aperture (and of cos, it is already expensive to own one that is f/1.4 and below) and for handshaking one second long duration in bright outdoor situation. Going from EV 0 to EV 1 actually means reducing of light by cutting from 1 second to half a second, or reducing the aperture by a stop from f/1.0 to f/1.4 (the aperture nomenclature can be read under relevant sections on aperture). Hence the higher the EV goes, a lower rate of light is let in through the aperture and the shutter, usually for bright day light. On the other hand, the lower the EV goes (towards negative), a higher rate of light is let in for darker situations.

Note that this EV only affects the aperture size and shutter duration. It has to be considered together with ISO and frame intensity. The same wikipedia article hence put forward a long list of lighting situations and the EV that can be used, but well, i wonder who used them nowadays and how good is it to follow them. Apart from being forced to calculate exposure while doing star trails in manual mode, I typically make preset compensation to the matrix metering in my camera, as described in Page 11 Exposure control, 2.2 Exposure compensation.

The important thing for this section however is to note that there is a reverse in nomenclature between the old literature and the new applications. An out of context confusion is the size of aperture that gets smaller while the figure gets larger (due to its denominator position). Similarly the table can be confusing as the more lights gets through the aperture and shutter, the smaller or more negative the EV value is. That will be the confusion as one reads on EV from traditional texts.

However on practice, at least for my nikon camera, EV compensation is given in a more intuitive manner. +EV means allowing more light in on top of what is determined by the metering, whereas -EV means allowing less light in. It basically is based on the desired luminance, which is to say the bigger the EV, the brighter the luminance on the media, as compared to the earlier description which is the response to the luminance, which is to say, the brighter the scene, the smaller the EV to reduce light entry. However, since in todays terms, there is metering, the shutter duration, aperture size and or the ISO are all coupled to reduce light upon a bright scene, the former definition and application is no longer needed, and rather what is needed to be known is how much you want to over-ride an all midtone automation of the camera.

Hence, the latter definition based on desired luminance that i used simply means for any scene, i want it darker, i will minus EV while if i want it brighter, i will add EV.

.
 

7. Factor 4 in the light equation after it reaches the sensor, and what it affects other than exposure: ISO


7.1 ISO

ISO stands for International Organization for Standardization. While ISO literally refers to the standards for many things, when ISO is applied for photography, it refers to the sensitivity of the sensor or the film, or what we often refer to traditionally as film speed. Read this at photonhead and look at the diagram.

With the analogy of the pail filled up with water, we now look at the pail and the water inside. Here after the water (light) has come in by settings governed by the size of the tap (aperture size of lens) and the duration with which the pail cover is opened (shutter duration), we now look at how the marking (signify appropriate exposure) inside the pail would be reached, with which thereafter the pail cover (the shutter) would close.

Imagine ISO as a catalyst. And we now imagine also that the water must be frozen to ice before the ice block (raw computer file) in this pail (sensor) can be brought out to the storeroom (memory cards) to be stored. We take ISO 100 as a standard when the 1ml of water converts to 100mls of ice, and ISO 200 as converting that 1ml of water into 200mls of ice. The higher the ISO, the stronger the catalyst, and the faster the pail fills up to the required volume of ice at the marking.

Indeed for film, light/exposure that falls onto the film does not naturally became a picture; it takes a chemical reaction to convert the silver halide emulsion into silver crystals, with which ISO of the film, aka film speed, determines the rate of which this process is accelerated and the eventual intensity of the given shutter duration. The density formed of an ISO 200 setting compared to that of an ISO 100 setting, at the same exposure regardless of the combinations of shutter duration or aperture size, would be double. In X-ray examinations, radiation is to be minimised while the x-ray film printout quality is to be optimised, as such intensifiers are also used to convert the x-ray radiations (exposure) into alternative energy form, such as light, in amplified intensified manners. Likewise, a fast x-ray film will help to increase the density with less x-ray radiations (exposure). All these bears similarity to a catalyst.

Hence exposure onto the sensor as data x ISO = intensity of exposure formed on the picture converted in the sensor.
Exposure refers to the amount of light that falls onto the sensor, it does not refer to the amount of light that is required to form a picture that looks appropriately exposed; but with a high ISO and a high rate of conversion of less data into a reproducible picture format, the exposure (amount of light) that falls onto the sensor can be reduced.

As such, aperture size x shutter duration x ISO = intensity of exposure formed on the picture converted in the sensor. Of which like above, all 3 shares a reciprocal relationship. While maintaining the same intensity converted, any increase of one of the above factor will be associated with corresponding decrease of the other two factors, vice versa.

Note again that ISO is a feature within the sensor, it does not alter the amount of exposure entering the camera body and falling on the sensor, if the aperture size and shutter duration is not changed. However, as ISO amplify the data from this exposure to increase the efficiency of conversion into the output, less exposure is required and can be achieved by alteration of either the aperture size (smaller aperture size, larger f-stop number) or the shutter duration (shorter shutter duration, faster speed)

The article by Ken Rockwell covers exposure, with issues on exposure compensation and auto ISO.


7.2 What is noise and why is noise associated with higher ISO?

This is a good article to read with regards to how noise arises, from The Image.com.

Noise basically comes from signal-to-noise ratio. In most electronics, data is not always transmitted at full accuracy, and random and constant interference can come in with various technical factors. What you want to perceived is the signal and the unwanted interference is the noise.

In digital photography, each pixel on the sensor captures a light intensity and present as a dot in the eventual output. If the color and intensity captured is accurate, each pixel should show a similar color or smooth graduation from one another if they are supposed to represent the same subject and should show a good differentiation from adjacent pixels if they are supposed to represent an edge between different subjects. If some of the pixels showed a statistical error in which the color and intensity captured is not accurate, the noise increases. Which means that among pixels that is supposed to show a similar color or smooth graduation from one another, e.g. a uniformly black sky, there might be some scattered pixels that is abnormally brighter than usual, and where there should be pixels that is supposed to be all blue on one side of the edge, and where there should be yellow on the other side of the edge, e.g. an edge between the two colors, some of the pixels showed a different color from its side but is similar to the other side.

This noise is often increased when the ISO is increased, because ISO amplify the limited signal data as well as the noise, hence a subtle difference in color and intensity becomes more prominent. Different camera models have different ability to cope with this issue, as such, some camera will start to show visible noise at ISO 800 and above, whereas others will show up at ISO 400 even.

A good article from dpreview.


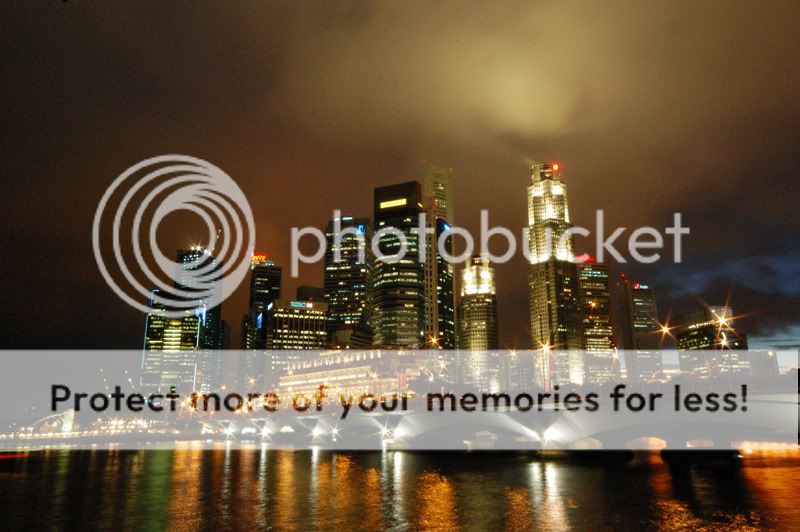
An example of a noisy picture at high ISO is one of my earlier days try where I forgot to change the ISO down (I still do forget nowadays) despite of using a tripod. As such, as below

Setting
Nikon D50, Sigma 10-20mm, UV filter
Focal length = 18mm x 1.5
Matrix (Evaluative or Multiple Pattern) metering
Optimized image vivid, white balance auto, mode IIIa (sRGB), saturation enhanced, sharpening auto
Long Exposure Noise Reduction ON
ISO 1600

Aperture Priority EV -0.5
f/32, 6 seconds


1. RAW (NEF) read by Adobe CS2, downsized from 3008x2000 into 800x532 pixels at 300 DPI, saved once as jpeg maximum quality. note the fine colored speckles in the sky.

DSC_2793-cs2-800w.jpg


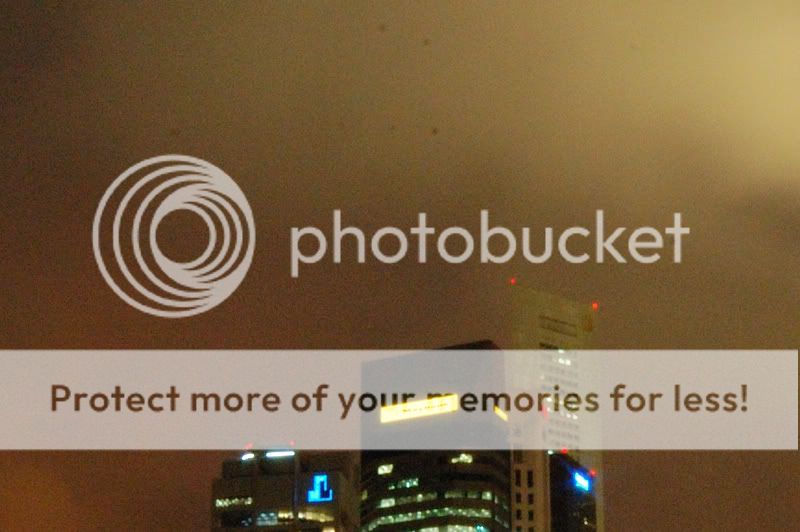
2. Cropped 100%
and in addition, note the sensor dust that appears as rounded opacities.

DSC_2793-cs2-800w-crop100.jpg


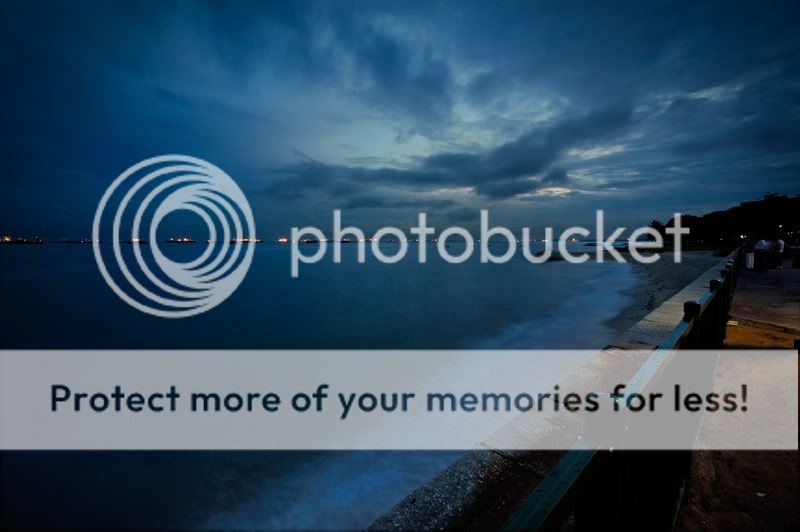
And now with another one at ISO 200.

Setting
Nikon D50, Sigma 10-20mm, UV filter
Focal length = 10mm x 1.5
Matrix (Evaluative or Multiple Pattern) metering
Optimized image custom, white balance auto, mode II (aRGB), saturation enhanced, sharpening medium high
Long Exposure Noise Reduction OFF
ISO 200

Manual mode EV 0
f/16, 6 seconds


1. RAW (NEF) read by Adobe CS2, edited in Elements 4, downsized from 3008x2000 into 800x532 pixels at 300 DPI, saved once as jpeg maximum quality, note less noise in the sky now

_DSC4165cs2edit800w.jpg


2. Cropped 100%

_DSC4165cs2edit800w100crop-1.jpg


.
 

7. Factor 4 in the light equation after it reaches the sensor, and what it affects other than exposure: ISO


7.3 Why or when do we need to take pictures at high ISO?
Discussion in CS: (2006 Dec)


In low light situations, e.g. indoor, evening/night/early dawn, very cloudy overcast, when even with the largest aperture size, the shutter duration still need to be long to collect enough light to capture a decent exposure, and when the shutter duration is too long for the hand to hold steadily, e.g. 1/2 secs at 75mm focal length, then handshake will be introduced if a tripod is not used, and VR or monopod is not going to be enough to eliminate the handshake, hence higher ISO can be used to increase the efficiency of conversion of existing exposure, thereby requiring less exposure and less shutter duration for the same output. When the shutter duration is reduced, the effects of handshake can be minimised or eliminated.

Do note that flash is able to provide strong lighting condition that will overcome the ambient lighting at that moment, as such once flash is introduced, the exposure will often be constant regardless of the ambient lighting. Hence the ISO setting need not be altered often.


As quoted from ortega, Why Need High ISO
1. when flash photography is not allowed
2. when you need a faster shutter speed to help freeze the subject
3. to help you shoot handheld without a f2.8 lens
4. to save on the flash battery
5. to introduce more noise

and "becos i can't afford fast lenses." from yanyewkay

As quoted from Miki-chan, Why Need High ISO
1. When you plan for a grainy look (but IMO, film grain looks so much better than electronic noise)
2. When you need high shutter speed and the light is not enough. Example: Sports & Concert photography
3. When you cannot comprimise the shutter speed and you're not allowed to use flash to fill up
4. When the light is really at its minimal and you don't want your flashlight to be the keylight, In other words, still maintaining the light intensity of background in your photographs

As quoted from zac08,
ISO 100 for bright conditions
ISO 200 for cloudy or lower light
ISO 400 for general faster action or early evening (indoors for most places would be ok)
ISO 800 for much faster action or darker conditions (generally the most I push normally)
ISO 1600 for very dim conditions or when I want the noise factor in the shots
ISO 3200 for added noise and low light conditions.
Also, note that with flash, I normally push to only ISO 400.

ExplorerZ: "i must add, even with a f1.8 or f2.8 lens there is still a need for high ISO at very dim condition."

megaweb: "If you are taking still life photography like buildings or road at night, what you need is use a tripod and use low ISO. You will get good quality shots. Other night or low lighting photography like indoor/outdoor events including candid, single/group shots, you need a fast lens, external flash and carry the camera on handheld. So the shutter speed needed is 1/30sec or faster (depend on individual). So if your camera meter slower than 1/30sec, you will get blur shots. Therefore to resolve the problem, increase the ISO value to get faster speed. Nowsaday DSLR has low noise for high ISO."

Alternatives to using higher ISO, as quoted by Scaglietti
For example, in a low light situation, you to get the appropriate amount of light to create an image, you can:
1. Use flash
2. Use a fast lens (lens with large aperture, e.g.f/1.4, 1.8 or 2.8, some of these lens are heavy and expensive, especially zooms and telephotos)
3. Use a slow shutter speed (probably need a tripod to prevent camera shake, not suitable for moving subject)
4. Use higher ISO (high ISO tends to exhibit more noise and have lower resolution)


7.4 What other causes of noise is there and how to tackle that?

1. high ISO
2. long exposure
3. post processing of areas with less data.

High ISO have been mentioned above. Long exposure similarly can add to this artifact by lengthening the chances of random error. Using of jpeg format with low resolution, or having areas of underexposure, if pushed in post processing and saved repeatedly as lossful jpeg formats, can accentuate this problem.

To reduce this problem

1. avoid the above causes
- avoid using high ISO if other means to handle low light is available
- avoid long exposure using larger aperture size
- save in raw or higher quality jpeg
- take note of post processing and avoid over pushing alterations, e.g. sharpening
- avoid saving post processed files in lossful formats repeatedly

2. avoid framing of areas that is more prone to effects of noise
- avoid framing of areas that is monotonous and have little details. noise is less visualised in detailed areas.
- avoid overexposure and large areas of dark areas.
- such areas typically would be the dark sky if there is no clouds

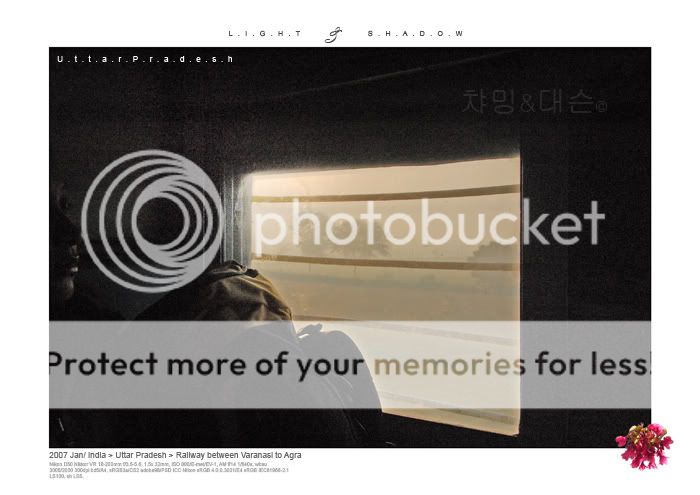
DSC_0010aqw.jpg


This is an example of pushing of under exposed area. The noise level at ISO 800 should be quite acceptable even in areas of monotonous tone. However as i tried to maintain correct exposure for the main subject through the windows, i have sacrifice the area within the train, which becomes very dark contrasted to the much brighter outside area. It is saved in raw and integrity maintained with saving as photoshop files (psd). In order to push back details and to outline the forms in the shadow area, such as the face, the shadow area is lightened. As such the noise level is accentuated and appears as above. It is however subsequently left as such without using noise reduction software as i deemed the noise effect suitable for the mood.

3. using in camera noise reduction mechanism
- to combat high ISO noise, noise reduction setting can be used but it does that by softening the details to blur out the noise
- to combat long exposure noise, the sensor records a similar period of exposure with the shutter closed, and map out the noise pattern to compensate for it. however, imagine if you use a bulb mode of half an hour to shoot star trails, the camera will get stuck in long exposure noise reduction for another half an hour, which means that your battery must last for that period and for that half an hour you cannot take another picture or do other settings

4. using noise reduction software
- adobe photoshop has it own noise reduction settings
- other 3rd party software include neat image and ninja

.
 

Status
Not open for further replies.