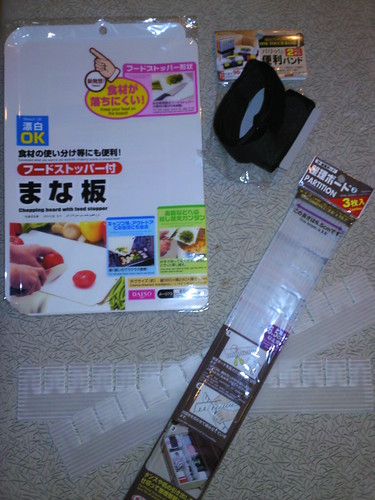
DIY Flash Diffuser


j76xx

New Member
Jul 25, 2010
86
0
0
Singapore, Singapore, Singapor
Stuffs Required:
1) 1 x Chopping Board
2) 2 x Drawer Sorter
3) 1 x Velco Strip
Cost: Total $6 ($2 each from Daiso)
4938077346_1c78d918fe.jpg


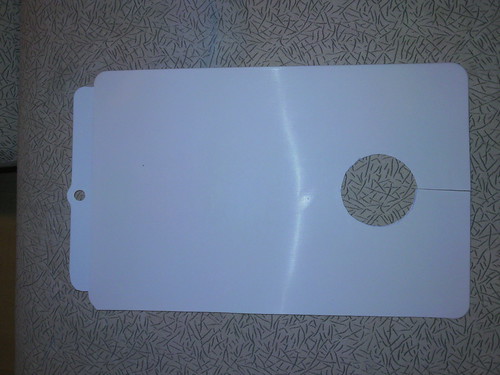
Just need to cut a hole on the chopping board for the lens to go thru.
4937495985_9fc8252daa.jpg


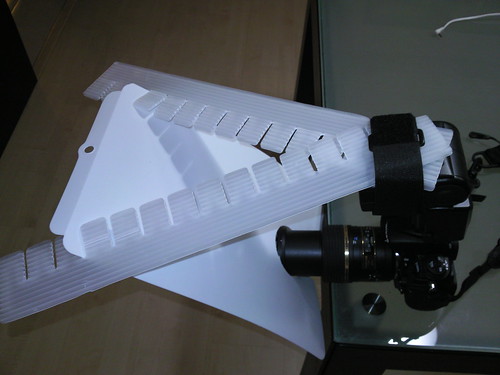
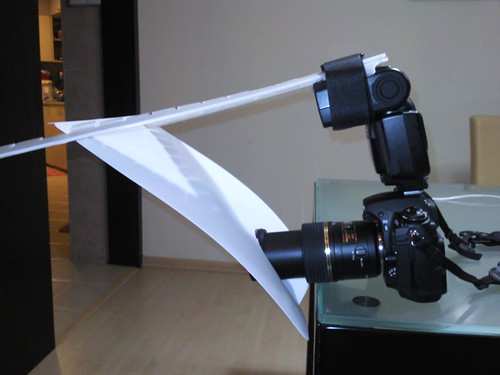
Then, secure the drawer sorter to the flashlight and use the drawer sorter to hold the chopping board in place.
4937504691_2e5141b770.jpg

4938135220_67d984de9d.jpg
 

Last edited:
I'm new in macros so not too sure if this diffuser is working fine. Attached are a shot on a mini key chain.

Without Diffuser:
4937569209_1c8c47699d.jpg


With Diffuser:
4937599223_2fe0de5212.jpg


Can anyone share if this DIY diffuser is working ok?
 

With the diffuser, the subject find quite natural in color.
Good afford..:thumbsup:
 

Hmmm..............pretty good. But how about a test shot to see if there are shadow cast?
 

It will definitely give better results than no diffuser. The question is.. by how much :)

If comparing the results, do make sure you set to manual shutter/aperture/iso/wb and TTL (or even manual power.. but not fair since diffuser takes away some power). Otherwise the differences you see might be due to change in settings instead of the diffuser at work.
 

With the diffuser, the subject find quite natural in color.
Good afford..:thumbsup:

Isn't color dependent on WB settings? What is TS's white balance before and after putting on the diffuser?

TS, note that you need to color WB for both BEFORE and AFTER diffuser is put on, otherwise, its quite pointless to talk about color.... might as well set to "daylight" white balance, take a picture with flash (which will result in a blue cast) and then add a yellow cellophane paper to it, take another picture, and say "that looks more natural".

Also diffuser is more for shadows and highlights, so it'll be more meaningful to test for those instead of colour. We'll be waiting for your "field" test. :p
 

It will definitely give better results than no diffuser. The question is.. by how much :)

If comparing the results, do make sure you set to manual shutter/aperture/iso/wb and TTL (or even manual power.. but not fair since diffuser takes away some power). Otherwise the differences you see might be due to change in settings instead of the diffuser at work.

Got it. Will do a field trial to verify the result again. ;p
 

Last edited:
Put the figurine near the wall. This will cast a shadow on the fall for comparison. Or shoot at a 45-60 deg angle to cast a shadow on the floor.
 

Update 001:
Drop the initial idea as the diffuser is too flimsy, take time to setup and difficult to store it away. Thus move on to version 2. Following are for sharing.

Material required:
1) Black & White Plastic cardboard (can get from bookstore)
2) Aluminum foil
3) Velcro
4) Glue & Duct tape

Step 1: Cut the frame based on the dimension of your flash and lens. This frame is for Speedlight SB-900 & Tamron 900mm Macro. NOTE: THIS FRAME SHOULD BE BLACK.
Frame1.JPG


Step 2: Glue Aluminum foil on the sides which are facing up.

Step 3: Use duct tape to "stitch" up the frame.
Side%20View%201.jpg

Front%20View.jpg


Step 4: Use the White Plastic Cardboard to cut out the diffuser. Use the frame as a measurement guide. Leave some edge for Velcro.
Diffuser.jpg


Step 5: Velcro the diffuser onto the frame. Use a strip of Velcro to fasten the frame to the flash.
Mounted.jpg
 

Following are some more picture of the diffuser.

Mounted onto the flash
Side%20View.JPG


When the flash is activated
Flash.JPG


Diffuser in stored-away position. Can be easily stored in a bag at the laptop compartment, with or without the laptop.
Store%20Away%20Mode.JPG
 

Not much difference to be honest...

look for something reflective to give you a better guage.
 

Hi j76xx

Thanks for sharing the version 2 which I have the intention to DIY also .

But I got no confidence in getting it as neat as yours. Last week I bought 2 sheets of the translucent white boards from a bookstore but havn't start doing it yet :sweat:

I saw your macro shots, the lighting is good.
 

you do know that this concept of a mini softbox is available in the shops
don't know the price

but an alternative would be to use a plastic container
eg. milk bottles, fruit juice bottles, round containers ...

ikea used to sell a container that was good, i'll dig up mine and post
 

you do know that this concept of a mini softbox is available in the shops
don't know the price

but an alternative would be to use a plastic container
eg. milk bottles, fruit juice bottles, round containers ...

ikea used to sell a container that was good, i'll dig up mine and post

Yep, got the idea from the softbox. But instead of buying, just wanna have some fun DIY-ing. ;)

As for the container DIY, I'm still waiting for my wife to finish her milk so I can use the container. However, the only problem is that the container took up too much space in the bag. ;p
 

Not much difference to be honest...

Obvious difference to me though. Look at the shadows below the buttons.

Thanks for sharing, j76xx.
 

I can see the shadow under the button vanishing :). I do quite a bit of figurine photography (something like pseudo macro?) so this would be helpful. I like DIY also haha, DIY-ed my light tent last time, this shouldn't be too hard :).