
Digicabi dry cabinet
- Thread starter pfloh
- Start date
You are using an out of date browser. It may not display this or other websites correctly.
You should upgrade or use an alternative browser.
You should upgrade or use an alternative browser.
Hi, my digicabi reader is not working but it lights up and the green color indicator blinks. Does anyone know what's the problem? Thanks
Dead battery for hygrometer.Without the meter you will not know if unit is functional or not.
I have not seen a tear down of a dry cabinet dehumidifier unit on the internet not even in electronics website so I will do it here.Do note you are dealing with 230 Vac.from the wall so it can kill so be forewarned! Do not try if you have no knowledge of electricity or soldering/desoldering tools. I found this digi-cabi DB-036 (36 liters)left for dead at the void deck. Since I'm also an electronics hobbyist I thought I might try to repair it.I suspect this post will be highly viewed from now on.:bsmilie:
The diagnosis: DOA (dead on arrival) On power-up the red led lit up but is dim after I replaced the switchmode power supply capacitor (22uf 400V 105 degree C) which was open circuit ( no capacitance reading).I then replace red led with a 8mm super bright transparent bulb led. 8mm is non existent in sim lim tower.I suggest you use 5mm. anyway it's just a light indicator.Of course you can buy 8mm. at element14 at taiseng but subject to minimum $10 order.So far I have not tested if it still work as I measured the voltage to peltier device at -2V supply.That's right negative sign as I followed same colour probes of multimeter to the correspong wires.FYI if check on the net if you supply 12V to peltier device ice will form almost in seconds! Don't know how big is the device but assuming like for like a 2V. supply make sense as it will slowly do it's job? I think the inside of the cabinet is the cold side as there is a curved recepticle at the bottom of the peltier draining to the outside of the cabinet.
A picture is worth a thousand words: The dehumidifier unit removed from cab.

The view from inside cab of unit:The peltier device is underneath the heatsink.
Note the cover of adjustment knob is a push fit type (3 cross head studs) no screws just use flat screw drive to pry it a little and then pull up straight gently.

The external view outside of cab:

The pcb close-up: If you can't get the exact size capacitor height-wise then remove one of the plastic panels give space not so professional but it solves the problem of obstruction.
This will expose it to the elements/dust or cut a hole?

The battery compartment of hygrometer panel: Battery leaked so crud build-up on positive terminal.
Scaping off and cleaning made the contacts usable again.There are 4 screws if you want to try removing it which I did not as cleaning the contact point did the trick.Note the bits of crud still left at the contact terminal.Note that that battery fitted poorly when door is closed as it lost contact and lcd did on work.Carefully and slowly closing the door seemed to work.")

The diagnosis: DOA (dead on arrival) On power-up the red led lit up but is dim after I replaced the switchmode power supply capacitor (22uf 400V 105 degree C) which was open circuit ( no capacitance reading).I then replace red led with a 8mm super bright transparent bulb led. 8mm is non existent in sim lim tower.I suggest you use 5mm. anyway it's just a light indicator.Of course you can buy 8mm. at element14 at taiseng but subject to minimum $10 order.So far I have not tested if it still work as I measured the voltage to peltier device at -2V supply.That's right negative sign as I followed same colour probes of multimeter to the correspong wires.FYI if check on the net if you supply 12V to peltier device ice will form almost in seconds! Don't know how big is the device but assuming like for like a 2V. supply make sense as it will slowly do it's job? I think the inside of the cabinet is the cold side as there is a curved recepticle at the bottom of the peltier draining to the outside of the cabinet.
A picture is worth a thousand words: The dehumidifier unit removed from cab.
The view from inside cab of unit:The peltier device is underneath the heatsink.
Note the cover of adjustment knob is a push fit type (3 cross head studs) no screws just use flat screw drive to pry it a little and then pull up straight gently.
The external view outside of cab:
The pcb close-up: If you can't get the exact size capacitor height-wise then remove one of the plastic panels give space not so professional but it solves the problem of obstruction.
This will expose it to the elements/dust or cut a hole?
The battery compartment of hygrometer panel: Battery leaked so crud build-up on positive terminal.
Scaping off and cleaning made the contacts usable again.There are 4 screws if you want to try removing it which I did not as cleaning the contact point did the trick.Note the bits of crud still left at the contact terminal.Note that that battery fitted poorly when door is closed as it lost contact and lcd did on work.Carefully and slowly closing the door seemed to work.
Last edited:
UPDATE: As I reported earlier that I repaired the power supply of the dry cab but did not test it fully assembled in the cabinet.So recently I did that and powered up for 5 days continuous.The reading of the built-in hygrometer and temperature indicated was off when compared to my external standalone meter. It was plus 3%RH (relative humidity) and temperature was minus 2 centigrade off. Inside RH was 77% -79%, no where near the recommended 45% -55% RH.(tested by adjusting through the green,blue and red ranges) Obviously unit is still not working.I disassembled the unit again and found out that the thermoelectric module or peltier cooling device was dead short as indicated by the multimeter resistance reading of zero ohms.There should be some resistance like a fraction of 1 ohm or a few ohms depending on device characteristics of voltage and current.
Now guessing the thermoelectric part is tricky as manufacturer did not indicate type used nor are there markings on the device itself as it was covered by heatsink compound which I did not wipe off to check. Remembering that I measured the input voltage as minus 2 volts gave a clue and also the current rating of the power transistor that supplies the current to work the peltier device.The transistor is a japanese part 2SC3866..900V, 3 ampere current maximum. Normally the transistor is designed to use up to 60 - 80% of max. rating which is about 1.5A. to have a long and reliable life span.
The original thermoelectric device measured 20 X 20 mm. So I check Aliexpress and found only 1 type which is 40 X 40 mm and rated at 12 Volts. which is way bigger and current is way beyond what the transistor can supply.It costs about US$2 per piece.This can be used in a much bigger dry cab I suppose.So I have no choice but to check local electronics supplier Element14 singapore and I know prices are 10 -25x more.I found a suitable peltier. It's rated at 3.9A 3.8 volts. 15 X 15mm. which if you download the datasheet found on the webpage indicate that at
2 volts input the current output of the peltier is 1.5 and 2A ( blue cross and yellow triangle lines which is within the power transistor capability )as indicated on the graph that show input voltage of the device.It is SG$28 before gst.
I can say that if I get this peltier and the cost of the capacitor for the power supply overall
I would have spent about $50 including busfare. Personally I would not recommend anyone to attempt
the repair as it is a hassle and for $70 buy a used one on BnS here. I only do this for learning and fun.
To be continued...
Last edited:
UPDATE: Good news and irony!
As reported in my previous post that even after 5 days of power up the RH stayed at 80% so obviously something still is not working and I checked the resistance of the thermoelectric module or peltier unit's postive and negative terminal after unplugging from connector showed zero ohm which mean a dead short. Yesterday I ordered a suitable peltier unit from Element14 at Taiseng rd. order no: 2466914 and paid $30.20 gst.Since stock is in uk it will arrive between 3 - 5 business days.
Later at night I removed the peltier unit from heatsink assembly, cleaned up the heatsink compound from both sides of the peltier unit and measured the resistance to confirm...it had a resistance of 1.5 ohm and 3.9 ohm depending on the polarity of the meter probes! What the...so to really test if peltier is functional or not I plug it back into the control circuit and power it up at the same time holding it between my fingers,the adjustment pot is at 12 o'clock position in the middle of the blue range (recommended).I also noticed not only the red power Led is lit but the green Led too faintly.(I also check the components
of the control circuit and they all test functional from what I can guess)
Sensing no heat at my fingers I cranked clockwise towards the red range and
wow it got hot fast to burn my fingers.Turn knob back to 12 o'clock and placed the hot side on heatsink and power on again but now my finger is pressing down on the cold side with hot side on heat sink and now I feel feel peltier is getting cold! That means peltier is working. Note that when you turn knob towards red range (clockwise) the green Led gradually brightens.
I reapplied heatsink compound to both sides of the peltier unit and placed the hot side on the big heatsink assembly and a small heatsink on the cold side facing the inside of the cabinet.Do not over tighten the screws with the round plastic clamps to heatsink, just enough that the heatsink does not move or slide easily with a push of the finger or else you night damage peltier or worse crack the ceramic body.
Then I reassemble whole unit back into drycab and power up.Within 30 minutes the RH dropped 1%. It's encouraging...this morning after 7.5 hours the reading is 62% down from the starting 80%. Woohoo.. it's working although it's still far from the recommended 45% - 55%.After about 45 min. it dropped another 1% to 61%. As I looked at the hygrometer reading just now it's still at 61% so the RH is not coming down in a linear manner vs time but calculating by 7.5 hrs. 80% - 62% is a difference of 18%.If you divide 18 by 7.5 you get 2.4%. so ASSUMING linearly it will take another 16 hours to get to target range but I don't think it's going to happen but longer at current 12 o'clock setting or cold temperature.It may mean that to get to target range Rh (relative humidity) I need to increase the coldness but still remaing in the blue range.
A little about how a peltier works in a drycab, A peltier is a semiconductor device made up of P and N junctions.Please google for more detailed discription. It has a hot and cold side. Technically it is a heatpump. Depending on the polarity of the power supply at it's positive and minus terminals which side get hot or cold.The cold side is used in the drycab to attract moisture to form on the small heatsink that becomes cold instead of hot.Condensation (water) forms on it and if alot drips into the "cup" and overflows into the sponge "outside" where there is an open slot so that
water can evaporate with the help of heat dissipated by the big heatsink or naturally.Mostly like thsi will not occur as mositure is little as can be seen in photo.
Generally if set in blue range not much heat is produced and this means not much electrical power is consumed but if you want RH to change faster you can also crank up more meaning get peltier colder but at the same time more heat is dissipated.Since I'm a miser..haha I will monitor tommorow if RH falls or not to target range and adjust accordingly.
Photo below to show proof that drycab is working. To be continued...
Note: I did not attach the peltier cover as I want to see and monitor the peltier.
My standalone hygrometer is for comparison, reading is not far off (63% vs 61%) I don't care about temperature but I think drycab meter can be adjusted but I'm going to leave it as is.
Last edited:
UPDATE: Success :thumbsup:
At midnight "yesterday" drycab meter read 60% RH so peltier needed more cooling power so I cranked it up from 12 o'clock to 1 o'clock.This morning after 7.75 hours it read 49% RH and standalone meter was 55%RH. Already hitting recommended range of 45% - 55% but since it's at the high end range I decided to crank it up some more to between 1 o'clock and 2 o'clock. Now it reads 47%.Hopefully it will hit 45%.If not I can always adjust again. I consider this a successful repair and adjustment.
Edit: It's now at 43% RH. today.

At midnight "yesterday" drycab meter read 60% RH so peltier needed more cooling power so I cranked it up from 12 o'clock to 1 o'clock.This morning after 7.75 hours it read 49% RH and standalone meter was 55%RH. Already hitting recommended range of 45% - 55% but since it's at the high end range I decided to crank it up some more to between 1 o'clock and 2 o'clock. Now it reads 47%.Hopefully it will hit 45%.If not I can always adjust again. I consider this a successful repair and adjustment
.Edit: It's now at 43% RH. today.
Last edited:
Cool tinkering! I wonder if this is also the 'repair' that is done by them when we send it in... replacing the peltier module?
Not likely as the peltier is quite robust and it is run at a current that is within the specs. of the power transistor.Mind you the peltier is rated at about 3.9Amps,8 Watts, 3.8 Volts ( this is max @ 0 degree centigrade). In actuality when set at the blue range it's not even at maximum of peltier.Of course this peltier is a small one, larger drycabs may have bigger ones and higher voltage supply.There is extra footprint for another power transistor on the pcb.The bad component is a 400V capacitor of the switching power supply.It had zero capacitance (22uF.) and rated for 2000 hours at 105C only.Can you guess how many hours it is when it has been working for about 7 years X 365 days? FYI the power supply switches at a frequency of 25Khz. or more. Normally 105 degree C rated caps are used as it gets hot internally inside the cap.The electrolyte in the cap would have dried up and hence reduced capacitance or not function at all.The cap costs me $2.50. The experience gained is priceless.
Last edited:
I only do this for learning and fun.
Thank you for your informative post. My dry cab is back to working order.
I have not seen a tear down of a dry cabinet dehumidifier unit on the internet not even in electronics website so I will do it here.Do note you are dealing with 230 Vac.from the wall so it can kill so be forewarned! Do not try if you have no knowledge of electricity or soldering/desoldering tools. I found this digi-cabi DB-036 (36 liters)left for dead at the void deck. Since I'm also an electronics hobbyist I thought I might try to repair it.I suspect this post will be highly viewed from now on.:bsmilie:
The diagnosis: DOA (dead on arrival) On power-up the red led lit up but is dim after I replaced the switchmode power supply capacitor (22uf 400V 105 degree C) which was open circuit ( no capacitance reading).I then replace red led with a 8mm super bright transparent bulb led. 8mm is non existent in sim lim tower.I suggest you use 5mm. anyway it's just a light indicator.Of course you can buy 8mm. at element14 at taiseng but subject to minimum $10 order.So far I have not tested if it still work as I measured the voltage to peltier device at -2V supply.That's right negative sign as I followed same colour probes of multimeter to the correspong wires.FYI if check on the net if you supply 12V to peltier device ice will form almost in seconds! Don't know how big is the device but assuming like for like a 2V. supply make sense as it will slowly do it's job? I think the inside of the cabinet is the cold side as there is a curved recepticle at the bottom of the peltier draining to the outside of the cabinet.
A picture is worth a thousand words: The dehumidifier unit removed from cab.
The pcb close-up: If you can't get the exact size capacitor height-wise then remove one of the plastic panels give space not so professional but it solves the problem of obstruction.
This will expose it to the elements/dust or cut a hole?
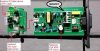
View attachment 13256
I have almost the same SMPS in my PCB. It is a much older unit (i think from 2010). The 22uF capacitor had bulged and the MOSFET shorted causing the fuse to blow up. I replaced the Capacitor but before I could order the MOSFET, I misplaced the MOSFET. Now I don't know which MOSFET to order. Is it possible to let me know the MOSFET which is there in this circuit? Right now I have done some drastic surgery on the unit and feeding it 3.8 volts from an external power supply. I have edited the original image and put a label - "MOSFET" for the part I need to know. If anyone can let me know the markings on the MOSFET, I will be grateful. Thanking you in advance
Attachments
I have almost the same SMPS in my PCB. It is a much older unit (i think from 2010). The 22uF capacitor had bulged and the MOSFET shorted causing the fuse to blow up. I replaced the Capacitor but before I could order the MOSFET, I misplaced the MOSFET. Now I don't know which MOSFET to order. Is it possible to let me know the MOSFET which is there in this circuit? Right now I have done some drastic surgery on the unit and feeding it 3.8 volts from an external power supply. I have edited the original image and put a label - "MOSFET" for the part I need to know. If anyone can let me know the markings on the MOSFET, I will be grateful. Thanking you in advance
Hi, Your shorted device is not a MOSFET but a bipolar transistor npn type Japanese fully insulated device 2SC3866. You can try Sim Lim tower or order from Lazada but what I saw was lots of 10pcs.
You will need a tube of heatsink paste white in colour for heat distribution to heatsink. If not the device will tend to run hot and not last long. Spread thinly and evenly to the back of transistor and screw it back on to heatsink careful to not over apply contact the 3 pins. Clean it up if so.
Last edited:
Hi, one eye jack. Thanks for sharing your thoughts trying to fix the dry cabinet. Let just share my thoughts on what you did.UPDATE: Good news and irony!
As reported in my previous post that even after 5 days of power up the RH stayed at 80% so obviously something still is not working and I checked the resistance of the thermoelectric module or peltier unit's postive and negative terminal after unplugging from connector showed zero ohm which mean a dead short. Yesterday I ordered a suitable peltier unit from Element14 at Taiseng rd. order no: 2466914 and paid $30.20 gst.Since stock is in uk it will arrive between 3 - 5 business days.
Later at night I removed the peltier unit from heatsink assembly, cleaned up the heatsink compound from both sides of the peltier unit and measured the resistance to confirm...it had a resistance of 1.5 ohm and 3.9 ohm depending on the polarity of the meter probes! What the...so to really test if peltier is functional or not I plug it back into the control circuit and power it up at the same time holding it between my fingers,the adjustment pot is at 12 o'clock position in the middle of the blue range (recommended).I also noticed not only the red power Led is lit but the green Led too faintly.(I also check the components
of the control circuit and they all test functional from what I can guess)
Sensing no heat at my fingers I cranked clockwise towards the red range and
wow it got hot fast to burn my fingers.Turn knob back to 12 o'clock and placed the hot side on heatsink and power on again but now my finger is pressing down on the cold side with hot side on heat sink and now I feel feel peltier is getting cold! That means peltier is working. Note that when you turn knob towards red range (clockwise) the green Led gradually brightens.
I reapplied heatsink compound to both sides of the peltier unit and placed the hot side on the big heatsink assembly and a small heatsink on the cold side facing the inside of the cabinet.Do not over tighten the screws with the round plastic clamps to heatsink, just enough that the heatsink does not move or slide easily with a push of the finger or else you night damage peltier or worse crack the ceramic body.
Then I reassemble whole unit back into drycab and power up.Within 30 minutes the RH dropped 1%. It's encouraging...this morning after 7.5 hours the reading is 62% down from the starting 80%. Woohoo.. it's working although it's still far from the recommended 45% - 55%.After about 45 min. it dropped another 1% to 61%. As I looked at the hygrometer reading just now it's still at 61% so the RH is not coming down in a linear manner vs time but calculating by 7.5 hrs. 80% - 62% is a difference of 18%.If you divide 18 by 7.5 you get 2.4%. so ASSUMING linearly it will take another 16 hours to get to target range but I don't think it's going to happen but longer at current 12 o'clock setting or cold temperature.It may mean that to get to target range Rh (relative humidity) I need to increase the coldness but still remaing in the blue range.
A little about how a peltier works in a drycab, A peltier is a semiconductor device made up of P and N junctions.Please google for more detailed discription. It has a hot and cold side. Technically it is a heatpump. Depending on the polarity of the power supply at it's positive and minus terminals which side get hot or cold.The cold side is used in the drycab to attract moisture to form on the small heatsink that becomes cold instead of hot.Condensation (water) forms on it and if alot drips into the "cup" and overflows into the sponge "outside" where there is an open slot so that
water can evaporate with the help of heat dissipated by the big heatsink or naturally.Mostly like thsi will not occur as mositure is little as can be seen in photo.
Generally if set in blue range not much heat is produced and this means not much electrical power is consumed but if you want RH to change faster you can also crank up more meaning get peltier colder but at the same time more heat is dissipated.Since I'm a miser..haha I will monitor tommorow if RH falls or not to target range and adjust accordingly.
Photo below to show proof that drycab is working. To be continued...
Note: I did not attach the peltier cover as I want to see and monitor the peltier.
My standalone hygrometer is for comparison, reading is not far off (63% vs 61%) I don't care about temperature but I think drycab meter can be adjusted but I'm going to leave it as is.
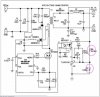
View attachment 13453
To begin with, let me introduce myself. I am an electronic engineer with years of design experience, so I dare to make some suggestions.
1. Your assessment of the peltier not working could be flawed, because if is not working, the humidity would not be lowered. The easiest way to test the peltier is to apply a (3-4V) voltage directly onto the peltier. The peltier could feel cold on the heat sink side if the voltage is applied correctly or if the polarity is incorrect, the peltier will be hot on the heatsink side. Both indication hot or cold shows that the peltier is working.
2. The voltage from the SMPS which is measured at 2V is too low. This type of dry cabinet requires a voltage of 3.6V. The power supply is most likely the reason, why the drybox is not lowering the humidity fast enough. I have a similar box and it could reach below 40% with day.
3. Additional informaiton for you. There are 2 PC board, the bigger board is the power supply that supplies 3.5 to 4V, and I found out that the smaller board is actually a current regulator. With brightness of the green LED shows the level of current flowing through the peltier.
4. What I found in this type of system is that it is basically a open loop system. The dial control only control the current but it does not control the humidity. Meaning, the humidity will reach a terminal humdity when the humidity loss (by condensation) = humidity gain (leaking into the box). If the box is properly sealed, humidity gain is very low, so even with low current setting (with dim Green LED), it could still reach a low humidity but it takes a longer time than if the current setting is higher (brigther LED). In another word, the control does not control the humidity but rather controls the rate of humidity absorption.
5. For you information, I have a similar one, and I am trying to see if I can add a cheap humidity controller.
6. For your dry cabinet, I suggest you replace the power supply with a 3.6V power module (> 8W), and you will see the humidity coming down much faster.
Hi nikon_ray, thanks for your electronic analysis. I'm a electronics hobbyist so my reasoning is simply whether it works or not. As to how it controls humidity in the actual scientific process is not important concerning the control dial.
You are right about the power supply the the voltage of 2 volts is too low. In fact the controller failed after some time n I tested with my meter the power supply but could not find any component defective from my limited experience. Yes of course you could buy a small 5V switch mode supply and adjust it to 3.6 - - - 4 V and probably get the controller to work again but I simply use 2 hungry hippo type humidity absorbers as using one the humidity took too long to bring the reading down. With 2 such absorbers the standalone hygrometer reached 21% but as of now it reads 32%. I know this is not the ideal range of 45% - 55% but it was the easy way and at least it can prevent fungus and protect the gear.I may revisit the power supply again...haha. Many thanks. Ps I'm still using the original peltier unit and kept the $30 one. On examining the datasheet of the specs it would need the voltage you suggested to get it to work.
You are right about the power supply the the voltage of 2 volts is too low. In fact the controller failed after some time n I tested with my meter the power supply but could not find any component defective from my limited experience. Yes of course you could buy a small 5V switch mode supply and adjust it to 3.6 - - - 4 V and probably get the controller to work again but I simply use 2 hungry hippo type humidity absorbers as using one the humidity took too long to bring the reading down. With 2 such absorbers the standalone hygrometer reached 21% but as of now it reads 32%. I know this is not the ideal range of 45% - 55% but it was the easy way and at least it can prevent fungus and protect the gear.I may revisit the power supply again...haha. Many thanks. Ps I'm still using the original peltier unit and kept the $30 one. On examining the datasheet of the specs it would need the voltage you suggested to get it to work.
Last edited:
Hi one eye jack,
Since you have gotten the power supply SMPS working at 2V, it is not difficult to raise the output to 3.6V.
The likely cause of this being at 2V is that the feedback resistance has changed. What you need is to restore it back.
Let me try to insert a picture of where the resistance that could be changed from a typical flyback conveter.
Look for the 2 resistors connected at the output. These are the feedback resistor to the controller.
To increase the voltage, there are 2 options, either increase R6 or decrease R7.
Measure the resistance and change it by 20 to 30% and check the voltage to see how much to change.
By trial and error you can determine the right value. Of course, you can do this by calculation, but I will not elaborate how this can be done.
Attachments
Hi, nikon_ray thanks for for expert help but I think that since it was working with the original resistor values unless the resistance has changed over time which I doubt but you never know with electronic components. As the resistance is in the optocoupler circuit which simply connects the high power AC side and is prone to aging effects but again who knows as I read online such optocouplers parameters deteriorate from 5 yrs. onwards ( led part ). Then again the pwm chip which is the heart of the circuit and the MOSFET transistor are the weak points, some pwm chip include this fet in it. One has to take into account that dry cabs operate 24/7 on average for about 8 yrs. before the power supply fails. It's just the normal wear and tear thing. I will get back to it when time permits as I have over repairs and personal projects to attend to..haha Much appreciate your help and expertise. Ps the peltier device needs more than 2 volts to operate properly.
hi everyone, very interesting thread - thanks for sharing! I've been looking for convo around drycabs for years and there has been little discussion.
I kind of understand the theory - but mastering the theory and then how to actually replace the electronics when my skill is poor, is going to be tough.
With about 3 drycabs that have failed over the years and in need of repair... does anyone know where I can just buy replacement motor units, or get a tech to fix them all? For my biggest cab, the agent went out of business years ago... for the other two, I have read on the web that the manufacturer's design is what caused the failure to begin with.
I could go out and buy new dry cabs of course... but the newer cabinets are not as well built i.e. they don't use metal shelving etc anymore.
Any advice is appreciated.
Hi Keltzar, my drycab failed again after I repaired it. I have also found a similar unit dismantled by previous owner and have no time to fiddle with it. One can buy a 5 volt power supply and try to adjust it to the designed spec.
With your non functioning drycabs you can use moisture absorber like hungry hippo which has a lower height profile than generic NTUC equivalent to put inside the drycab. At first I used One unit but I noticed the humidity reading took a long time to reach target say 55% so I put another unit 2 in total and saw that humidity came down fast but it was in the mid 20s % way too dry haha. But it's it's up to you. So I think one unit of desiccant will suffice. But I still left 2 units inside and after a year the humidity reading climbed up again so I will be replacing them if reading is above what I think is suitable to keep things inside protected. Hope this helps.
Edit: Take note that the humidity readings are for a small 36 liter drycab. The bigger ones will have lightly higher readings due to the volume of space.
Last edited:
I have switched to Thirsty Hippo style years ago when I noticed that the replacement unit also failed within 3 years. Just make sure to close any gaps at the back to prevent outside air and humidity to creep in. I removed the electrical unit completely and covered the hole with plastic sheet and duct tape.
Came across this while searching ways to re-use my old dry cabinet. I had the same DB-036 and it stopped working abt 4 to 5 yrs back. I sent it for repair and paid $60 that stopped working again after 6 mth warranty ended. I bought a new one as the cost for repairing the second time just isn't worth it. I had been using it for storage box.
I came across an amazon item that is a dry cabinet with USB charging (https://www.amazon.in/Dehumidifying-Charging-Password-Woodgrains-Equipment/dp/B07PSF5XPD). This got me thinking. Can I power my dry cabinet from my usb hub?
I know only how to change light bulb and connect batteries. So what I did is just trial and error. Might not work for long run, but just sharing what I did.
I removed the electrical components from my dry cabi and left with the cooling element. I connect directly to my use cable. It works. But the RH only goes down to 60%. Since the previous post stated that the cooling element works with 3.6V, and USB is 5V, I bought a "USB step up step down module" from shopee, but with 3.6V, the RH is higher. And when I pump the voltage to 6V, the RH goes down to 54%. I can't go higher than 6V as the device will starts blinking.
I can't adjust the current on the device, not sure why.
Similar threads
- Replies
- 0
- Views
- 169
- Replies
- 0
- Views
- 59
- Replies
- 0
- Views
- 156
- Replies
- 0
- Views
- 42