Cinemagraphy - How I made 'The Shimmering'


gatchaman

New Member
Dec 2, 2007
415
0
0
www.facebook.com
569f41c271a34d81b81982a9411e5c88-d4zkmgf.gif


1. Introduction


Cinemagraphs are created by photographer Jamie Beck and graphic artist Kevin Burg. It is animated GIFs (Graphics Interchange Format) made from masking out certain areas in a video sequence. This making of is a documentation of how I made this particular cinemagraph ‘The Shimmering’, given my equipment restrictions and shooting environment. We all know that there cannot be just one fixed way of doing things, so I hope this can be a reference for others to explore better working methods.


2. Tools

Hardware: Canon 550D, Sigma 30mm f1.4 lens, Manfrotto 682B self-standing monopod

Software: Photoshop CS4, After Effects 6.0

I strongly recommend against using Manfrotto 682B for shooting the videos. It is made for still photography. In windy condition it shakes. Use a steady tripod instead. Shaky video footage is unusable, or requires additional effort in post, like in my case here.


3. Shooting


As this is a group shoot meant for still photography, it is not the ideal shooting condition. I am lucky that one usable footage out of the five shot.

In an ideal situation, make sure that:


  • You are using a steady tripod to minimize camera shake
  • You have a plan, or at least an idea where is the moving area in the cinemagraph
  • The model stay as still as possible (in my case, the only moving element is her hair)
  • You take more short sequences of about 5 sec rather than a lengthy 3 min sequence. It makes life easier when u work on the computer later. It is also easier to go through shorter sequences.


However, in the 9 sec video I shot, I didn’t really ‘do the right thing’. The model is moving from pose to pose professionally for a still shoot, there is camera shake due to wind because I m not using a steady tripod. It is the perfect negative example.


Original video (downsized)
[video=youtube;cKVF9-Clkiw]http://www.youtube.com/watch?v=cKVF9-Clkiw&feature=youtu.be[/video]


4. Selection

Choosing a segment of the video with a reasonable number of frames for looping is the next hardest thing to do, other than making the loop itself. You will have to sit down and look through everything you shot and pick something suitable. I chose to work with a 9 sec video in the end.

The actual length for this cinemagraph is merely 30 frames. The illusion of continuous motion lies in the first and the last frame matching up seamlessly. For this purpose, I bring the chosen 9 sec HD video into After Effects. I find it easier to do previews in After Effects than in Photoshop. It is meant for video after all.

In the ideal case, the simplest way is to mask out the hair from the rest of the image and make it loop. That is the first thing I tried. I tried making the last frame fades over a duration of 5 frames into the 1[SUP]st[/SUP] frame. That didn’t look good. I then tried doing a ‘ping-pong’ loop (i.e. playing from frame 1 to 30 and then from 30 back to 1 and so on so forth). That does not look natural too.


5. Making the Loop

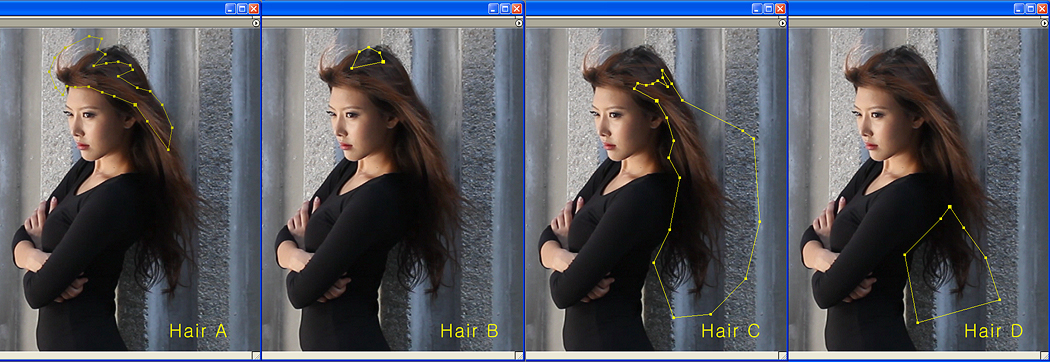
Since the simple way did not work, I have to break the hair into 4 areas and make them loop well individually. There is no hard and fast rule for doing this. It is simply scrubbing the timeline up and down looking for something that works. There is also much trial and error. And because I did not shoot ‘the ideal way’, I have more pain in this process which could have been avoided.

In the end, I break the hair into A, B, C & D (img5-1 & Img5-2) for the ease of explaining. They are duplicated from the same source video and masked out differently, blending into each other with soft masking.


img5-1.jpg

img5-1


img5-2.jpg

img5-2


HairA is from frame 151 to 182. Due its fast movement, I need not do any work to make it loop. In this case, it is pure luck.

HairB is a duplicate of A. this is because there is head movement during that range and I need the area in HairB to remain static. So HairB is simply a still frame covering on top of HairA.

HairC is from frame 90 to 120. The movement for that part of the hair looks the best in that range. I duplicated HairC_Tween to fade into the first frame at the end of the sequence over 3 frames. By fading in like this, it will eliminate the sudden jump when it is looped.

HairD is from frame 190 to 219. I used Time-remapping to create a ‘ping-pong’ loop, such that it plays from frame 190 to 205 then back to 190.

As I have said earlier, if you have done the shooting ‘the right way’, you probably need not go through all these pains. One mask one layer may have done the job. Then again, when it comes to random flying hair, nothing is for sure.


Last edited:
6. Output to Photoshop

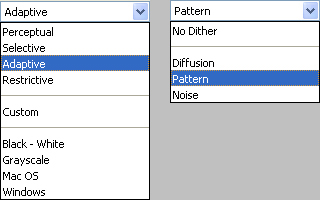
The 30 frame long sequence is then rendered to uncompressed quicktime movie. avi should work too. I use uncompressed settings to maintain the quality. But if you are short of hard disk space u can use any of the compressions for a smaller file size. Photoshop should import fine. img6-1 shows how to import video frames to layers in PS.


img6-1.jpg

img6-1


Open up the animation panel by Window > Animation. You will see the 30 frames as in img6-2.


img6-2.jpg

img6-2


7. Working in Photoshop


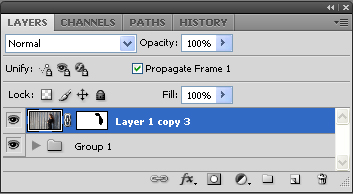
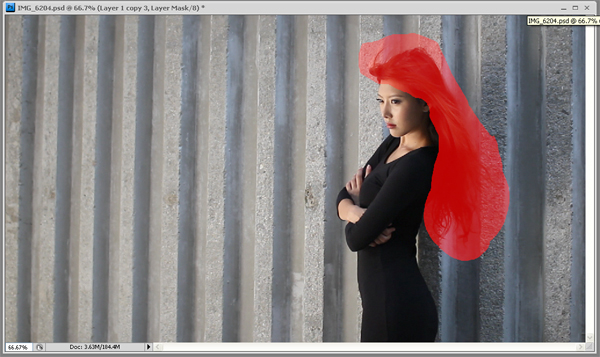
In the layer panel, I grouped the 30 layers into one group for a neater workspace. Then I duplicated the first layer (which is also the first frame) and placed it outside and on top of the group (img7-1). Next I masked out the area around the flying hair (img7-2). This defines the area where the gif is animated. Although you can get the same gif without this mask, the file size would be larger.


img7-1.jpg

img7-1


img7-2.jpg

img7-2


The rest is just photoshop retouching work, like you would do for a still photo. One thing I believe is that a cinemagraph has to be a captivating still photograph first, and the motion only come in later to breathe life into it. My major dissatisfaction with this shot is the lack of depth in the image, even though I do find the repeated background interesting. Thus I composited part of another photo to create the depth I wanted. I also cropped it to improve the composition.

The final output will be in 256 colors so I cannot be over ambitious in the color scheme. For this one, I introduced an overall pinkish orange tone to create the feel of sunset. Unfortunately, my monitor is not doing that great in terms of color accuracy and I find that on some screens the cinemagraph is leaning more towards an orange tone.
 

Last edited:
8. Exporting to GIF

Before the exporting I reduce the image size to 1024x578. I think this is considered a little too large. But I did it because I want to keep the consistency with the other stills in the series. In some cases, the resulting GIF is so big, or the color reduction look really bad in this resolution, I will compromise with a smaller size. Again there is a much trial and error in this process to obtain the optimal result. You have got to play around with the settings.
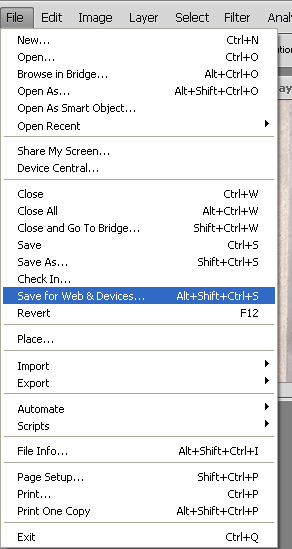
Export to GIF using File > Save for Web & Devices.


img8-1.jpg

img8-1


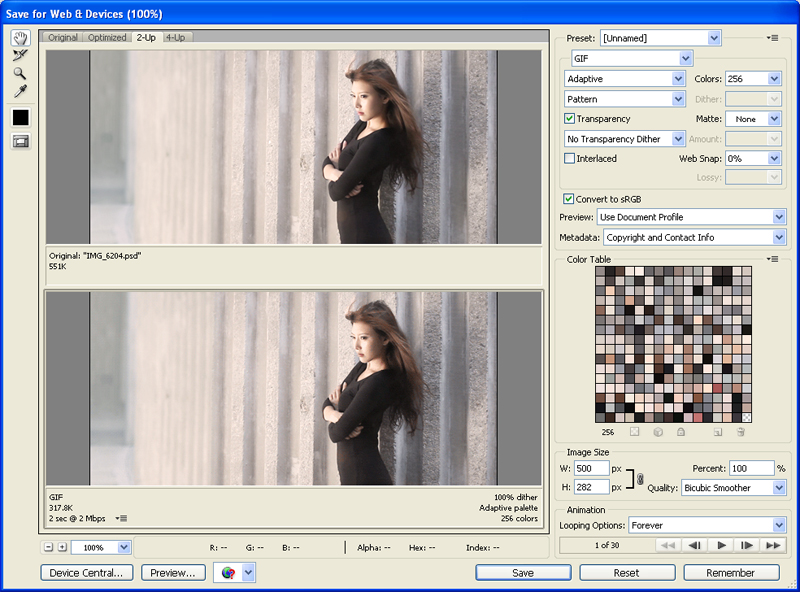
The export interface window will pop out. img8-2 shows the settings I used for this one.


img8-2.jpg

img8-2


Do play around with the other options as shown in img8-3.


img8-3.jpg

img8-3


The final export is 1.23Mb which is pretty decent for a 1K GIF. On Tumblr, you will have to reduce it to 1 Mb so it can play on the dashboard.


9. Conclusion

You can view the series ‘The Shimmering’ and cinemagraphs on my livejournal daydreaming.is.bad

I am also on facebook and deviantart.

For Clubsnap members, the forum thread for the 'The Shimmering' series in the Portraits & Poses section.

Hope this article is useful to you.


10. Credits

Thanks to Ed from Clubsnap for inviting me to do this article.

Thanks to Winnie for introducing me to the world of cinemagraphs.

Model credits: Jee

Lighting credits: Ivan S
 

wow that is so cool !!

Thanks for making it easy to understand :)
 

Thank you for sharing.
 

great tutorial and great cinemagraph... just wondering though: the body is a bit oddly static... maybe just a hint of diaphragm breathing, just at the tummy, not too much to make it distracting, just enough to hint at natural fluidity?... though I guess it would mean the clip would have to be longer, and thus a bigger file :)
 

great tutorial and great cinemagraph... just wondering though: the body is a bit oddly static... maybe just a hint of diaphragm breathing, just at the tummy, not too much to make it distracting, just enough to hint at natural fluidity?... though I guess it would mean the clip would have to be longer, and thus a bigger file :)

Hey RBK thanks for dropping by! i think by doing that it won't be a cinemagraph anymore but more like a anime sequence. i don't really like defining what is and what is not, but going in that direction, the eyes shld blink once a while as well and other things come in too. anyway i don't have any sequence of her remaining still and her tummy moving subtlely to make that. this is not 3d animation. i can't add in things that didn't appear in the video : )

nevertheless, thanks for the suggestion! ve a good night!