
Regarding the exposure on taking sunset pictures, when i set my shutter speed high, the pictures went dark. But when i increase the shutter speed(low), the exposure is alright in the foreground, however, the sky is too bright, cannot capture the dramatic colours of the clouds. Can any one enlighten me?:dunno:
Exposure at sunset
- Thread starter chikubang
- Start date
You are using an out of date browser. It may not display this or other websites correctly.
You should upgrade or use an alternative browser.
You should upgrade or use an alternative browser.
- Status
- Not open for further replies.
is the sky brighter than the foreground? ")
therein lies your answer
to even out exposure, i.e. to take things other than silhouette photography or just the sky alone
you need tools, either graduated neutral density filter or hdr technique will help you.
as to what they are, google - there are a lot of resources out there regarding these two tools.
Yar. The sky is overexposed and cannot capture the dramatic skies. I think I will need GND filters to help. Night86mare, do you use filters too?
Bcause the foreground is underexposed when I am trying to capture the dramatic skies. That's why i tweak with shutter speed.
For me I'll normally use aperture priority or P mode to shoot. The camera is usually "smart" enough to decide the correct exposure (bar metering off the wrong place).
Yar. The sky is overexposed and cannot capture the dramatic skies. I think I will need GND filters to help. Night86mare, do you use filters too?
Bcause the foreground is underexposed when I am trying to capture the dramatic skies. That's why i tweak with shutter speed.
it also depends. what sort of foreground are you talking about? i use a combination of both, depending on the picture and what i think i should do. don't have an extensive collection of gnd filters yet, i think mine is maybe 2 or 3 stop from tianya - hence sometimes have to resort to hdr.
maybe picking up a photography book from the library will help in terms of understanding exposure.
This may not be the best method and depend on the camera system you use. For my D2x i am able to use image overlay so this is what i do.. see picture.
How much to under expo or how much to over expo will various.. hope this help.

Don't have such function.. get a NIKON or photoshop..
How much to under expo or how much to over expo will various.. hope this help.
Don't have such function.. get a NIKON or photoshop..
Exposure to use at sunset depends on the sky condition, time of the evening and what you want to include in your photo, e.g. foreground interest vs dramatic sky/ clouds.
Your camera metering system should be able to give you an accurate measure of the actual exposure. To achieve better exposure, you can try to use bracketing to add or minus exposure value.
The use of filters will be able to help in achieving the mood you want to create, e.g. cool filter vs warm filters etc.
This may not be the best method and depend on the camera system you use. For my D2x i am able to use image overlay so this is what i do.. see picture.
How much to under expo or how much to over expo will various.. hope this help..
...
Don't have such function.. get a NIKON or photoshop..
:nono:
Using Photomatix will render you similar results, or even better, because you have greater control over your tone mapping. Basically, such situations call either for HDR or extensive filter work with GNDs.
Does exposure compensation solves the problem? Will the dramatic skies get washed out?:dunno:
Do you know what exposure compensation does?
Erm..yes. I think I have asked a stupid question. I guess the onli solution is to use filters and photoshop.
Erm..yes. I think I have asked a stupid question. I guess the onli solution is to use filters and photoshop. But can i use braketing to remedy the problem too?
Erm..yes. I think I have asked a stupid question. I guess the onli solution is to use filters and photoshop. To what extent can braketing in dslr helps?
Erm..yes. I think I have asked a stupid question. I guess the onli solution is to use filters and photoshop. To what extent can braketing in dslr helps?
No, you have not asked a stupid question.
And to think that the only solution is to use filters and photoshop is a fallacy.
Have you read into what some of the others here have posted? Please ignore the post on Nikon and Photoshop, that is another thing meant to lead you astray.
Back to your "problem" -
Like my first question to you, which you obviously did not understand, why did you choose only to tweak shutter speed in the first place? Did someone/somewhere/something teach you to tweak only shutter speed? Were you shooting purely in M/Manual mode? Why did you do that?
Then to carry Calebk's point further - if you were shooting in Manual mode, and you know only to tweak shutter speed, do you REALLY know what exposure compensation is?
Do you even understand what Taurean/Night86mare/Sanny/Calebk posted? What kinds of settings are you using? Are you looking for a magical setting that will work every time?
Take a step back and think about these, if you are serious about fixing your sunset exposure "problem". If you do not understand what any of us are talking about, clarify it. I'm sure anyone of us will happy to entertain clarifications, if you really put the effort it. At the least, I do know that Night86mare and Sanny and Taurean are competent shooters.
Erm..yes. I think I have asked a stupid question. I guess the onli solution is to use filters and photoshop.
no, this is not a stupid question. there are far worse ones than a query from someone new to photography about exposure - it is easy, yet hard to understand. the thing is, there is no one-size-fits-all sure fire solution for anything. there are quite a number of ways to do anything - i simply suggested my way.
but more on technicalities - you have to absolutely accept the fact that all digital sensors (and even film) are not quite as adaptable as the human eye. when you look at a sunset, even if you look directly at the sun (not advisable, just illustrating a point), you are able to see the areas around it in shadow. yes?
this is the concept of dynamic range - the "brightest point" which you can see compared to the "darkest point". the tolerance of the human eye to what is bright compared to what is dark is a lot better than a digital sensor. whatever you shoot, will not turn out like what your eye sees at all. if you shoot a building with the sun shining behind, your EYE can see it. your camera WILL NOT. you will get one out of three options -
a) underexposure (more on exposure later on). in layman terms, you get the sky nicely, but the building is all black (all in shadow)
b) overexposure. in layman terms, the building is nicely seen, you can see every detail in your photograph. but the sky is all white and has no detail, none of the blue you see with your eye is there, let alone the clouds.
c) correct exposure. you get to see a bit of the building detail, while keeping what you see in the sky.
exposure is a very subjective thing. when it comes to exposure, you have three parameters in your camera that you can VARY. there is no magic setting to dial in and just expect the result to be right, as the light conditions vary everytime. basically, when you depress the shutter, to put it simply, three things are predetermined by what you decide or sometimes, what the camera decides, depending on the mode you shoot in. once you depress the shutter button, simultaneously, the shutter flips up to allow light to hit the digital sensor in your camera, the sensor starts operating, and in your lens, aperture blades close to form the right sized hole. in detail, these three parameters previously mentioned are:
i) f-stop or aperture size. this is basically the size of the hole in your lens that lets light through when the shutter opens up in your camera. this also has something to do with depth of field - sulhan's notes will have something on this, read them if you have the time. note that f-stop number on your camera screen is inversely proportional to aperture size. the bigger the f-stop number, the smaller the hole, and vice versa.
ii) shutter speed. this is how long your shutter is open for. also has something to do with the amount of "motion" in your picture.
iii) iso. this is how sensitive your sensor will be to light when it operates. this has something to do with the amount of noise you get - noise can be desirable too.
using an analogy, a PROPERLY EXPOSED photograph is like a pail of water you have to fill. the unit of this water is light. the camera is a hose. the aperture size is the diameter of the hose. the shutter speed is how long the hose is turned on for. the iso is the speed of the water flowing out from the hose. this should help you remember how each parameter affects the other. for example, if you make the diameter of your hose smaller (smaller aperture size) you can EITHER turn on the hose for a longer period of time (longer shutter speed) or increase the speed of water in the hose (higher iso), OR BOTH.
when you overexpose a picture, your pail of water has overflowed. this is not good, since your water is lost and cannot be retrieved. this is actually quite true for overexposure in digital photography - details are harder to retrieve.
when you underexpose a picture, your pail of water is not sufficiently filled. this is not good, but not as bad because you can use photoshop and various programs to "fill up the water". this will come to you when you shoot and experiment more.
you can CHOOSE to underexpose a picture deliberately, or overexpose a picture deliberately - it is alright so long as you INTENDED for this.
so that was a concentrated writeup on exposure - i'm not sure if you understand it, but i hope you do. without shooting you will never be able to get the idea - with shooting and active thinking while shooting these will become a part of you and you will no longer need to think eventually.
now back to your landscape with sky. taking what was written about exposure there, along with the fact that a digital sensor is not as versatile as the human eye; the camera cannot handle all parts of the photo due to the different amounts of light coming from each area. think of a photo as many small pails of water, but ultimately remember that light is not formed in the camera itself, it is formed outside of the camera. so while light from the sky hitting your sensor is coming in a lot faster because the sky is brighter, light from your foreground, which is DARKER, will come in a lot slower. hence you will either not fill up your "foreground pails" or make your background (sky) pails "overflow".
this is where a graduated neutral density filter comes in. it "controls" the flow of light from the sky by adding a layer of darkness across the sky.
you can see the effect here, taken from the singh ray website:
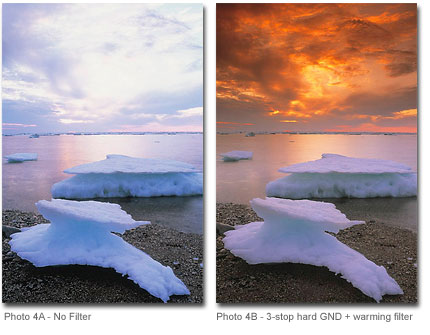
left is without, right is with.
alternatively, hdr is a process where you take a number of shots where each one is exposed differently, and merges it digitally using computer programming. note that you can do this YOURSELF, and this would be better than any program out there that does it for you, but is very very time consuming and requires a good understanding of photoshop and processing technique.

this is what an automatic process would look like, to give you an idea or what the program does and what it involves doing. cheers.
Guy... don't be so serious... Just joking on the nikon and photoshop thing.
1. why i propose this method..
if he got the filter, he will already put it on and no question here.
if he bought the filter and forget to bring out..
if he don't know how to use photoshop..
This is the in-camera function that nikon provide which may save some precious shot should one require to use it.. I personally find nothing wrong to teach him this technic.. (maybe some will think NIKON put this function into there top range camera for fun)
No technic is too much.
So guy... what density of GNDs filter do you propose? and in what situation will this filter work perfectly? (he's a newbies.. see where the thread is posted)
Actually, I know about the HDR and the filters. I just wanna to clarify if it's because of my camera's problem, or it's an universal thingy among all cameras.
Thanks so much night6mare for the detailed explanation. Greatly appreciated. Actually, I wanna to thanks all who spent time to type down your solutions here on my thread.
- Status
- Not open for further replies.
Similar threads
- Replies
- 0
- Views
- 123
- Replies
- 1
- Views
- 509
- Replies
- 0
- Views
- 429
- Replies
- 0
- Views
- 333
- Replies
- 0
- Views
- 606